Your new post is loading...

|
Scooped by
173 Sud
August 14, 2011 10:16 AM
|
The post-war decades of the 20th century were unusually hospitable to the American middle class—the result of strong growth, rapid gains in education, progressive tax policy, limited free agency at work, a limited pool of competing workers overseas, and other supportive factors. Such serendipity is anomalous in American history, and unlikely to be repeated. Yet if that period was unusually kind to the middle class, the one we are now in the midst of appears unusually cruel. The strongest forces of our time are naturally divisive; absent a wide-ranging effort to constrain them, economic and cultural polarization will almost surely continue. Perhaps the nonprofessional middle class is rich enough today to absorb its blows with equanimity. Perhaps plutonomy, in the 21st century, will prove stable over the long run. But few Americans, no matter their class, will be eager for that outcome.
|
|
Scooped by
173 Sud
August 13, 2011 4:30 PM
|
Quand on aime la photo de paysage, on travaille souvent au grand-angle, voire à l’ultra grand-angle. On a tous vu ces images avec une profondeur presque irréelle et une perspective très forte. Voyons ensemble quelques astuces pour obtenir la même chose et bien travailler au grand-angle. Tout d’abord, quand je parle de grand-angle, je parle d’une focale de 24mm ou inférieur en équivalent 24×36, soit en-dessous de 16mm sur capteur APS-C. Au 18mm de votre 18-55 on s’en approche déjà cela dit. Comme ce type de focale est surtout utilisé pour le paysage, je prendrai souvent des exemples de ce type, mais ces conseils s’appliquent aussi aux autres types de photos.
|
|
Scooped by
173 Sud
August 13, 2011 11:09 AM
|
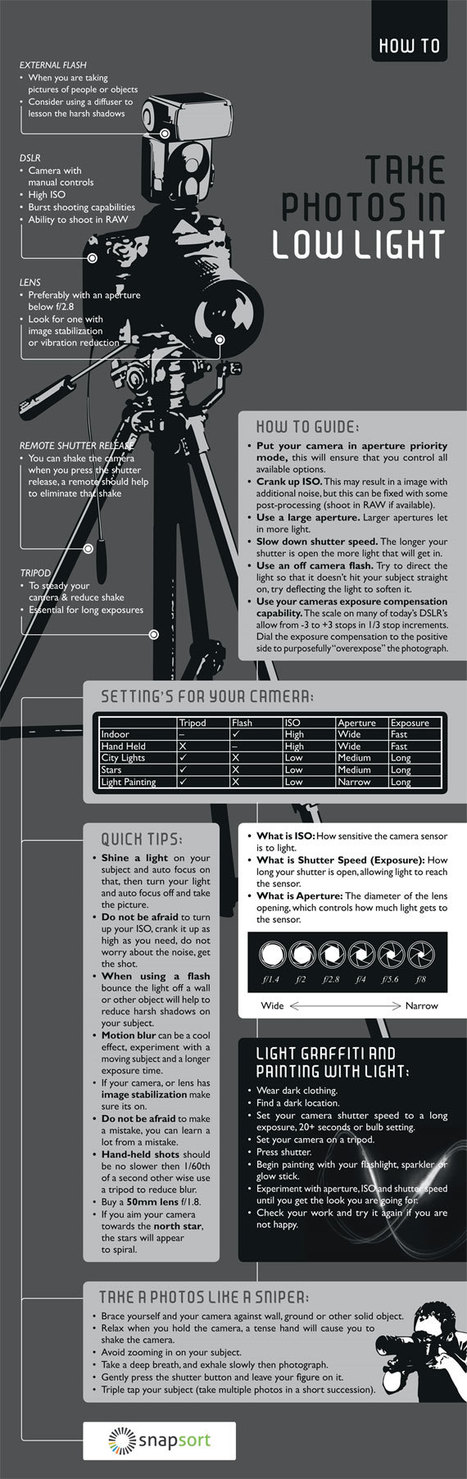
Low light photography is something that we all must deal with as photographers. Whether you’re taking photos with a point and shoot during an evening out, shooting a wedding party or capturing a landscape at dusk it’s important to understand the basics of shooting with low light. Photography is all about light, low light photography is no different and it offers new challenges and opportunities for creativity.
|
|
Scooped by
173 Sud
August 10, 2011 11:57 AM
|
Voici 4 logiciels gratuits et portables (pour 3 d'entre eux) qui permettent de supprimer les métadonnées de vos images, c'est-à-dire toutes les informations intégrées dans les photos (titre,auteur, date, sujet, éditeur, etc.). Ils sont presque tous en anglais (sorry) et fonctionnent sous Windows XP, Vista et 7. 1) Image MetaData Stripper : http://goo.gl/9Cdwd 2) Easy Image Modifier : http://goo.gl/i1Fj1 3) FileMind QuickFix : http://goo.gl/z1qvB 4) JPEG & PNG Stripper : http://goo.gl/Ql0aJ
|
|
Scooped by
173 Sud
August 10, 2011 11:09 AM
|
Aujourd’hui, je vais essayer de vous apprendre à ”rater vos photos” ! Attention, ne rigolez pas, ce n’est pas aussi simple qu’on pourrait l’imaginer… En effet, l’art de rater sa photo doit se faire dans la subtilité, sinon, on va tout de suite comprendre que vous avez sciemment raté le cliché. Si vous cadrez de travers, que votre photo est floue, que le sujet est centré et qu’une partie de la photo est surexposée, alors que d’habitude vous faites de belles images, vos ”spectateurs” vont comprendre. Nous allons donc agir par petite dose discrète. Pour ce faire, et pour bien comprendre, je vais illustrer chacun de mes propos avec la photo ci-dessous:
|
|
Scooped by
173 Sud
August 9, 2011 7:21 AM
|
Avant de se lancer dans la retouche d'image, il faut bien connaitre ses gammes. Petit récapitulatif pour partir du bon pied. En photographie, la retouche ne s’improvise pas. Comme dans toutes les activités, il est important de maîtriser les bases avant de s’aventurer dans des expériences créatives débridées.Apprendre la retouche photo est très liée à l’usage d’un logiciel en particulier (même si certaines notions sont communes). Sur 1point2vue, l’accent est mis sur les produits gratuits et/ou libres avec une attention toute particulière pour Gimp. La plupart des liens que vous trouverez dans cet article sont donc des tutos et des conseils pour ce logiciel.
|
|
Scooped by
173 Sud
August 2, 2011 11:49 AM
|
Un afficheur de paramètres exif : Un petit outil qu’on devrait mettre en place systématiquement quand on s’intéresse un tant soit peu à la photo. « Exif Viewer » est une extension Chrome que je viens d’installer sur mon navigateur chrome. Cette extension permet de voir les caractéristiques des photos qui se trouvent sur les sites internet. Ainsi on peut savoir directement avec quel appareil photo chaque photo a été prise et les caractéristiques de prise de vue. Le deuxième avantage de cette extension, c’est qu’elle permet également de visualiser à quel endroit la photo a été prise. Bien sûr il faudra tout de même que l’appareil photo soit pourvu d’un système gps.
|
|
Scooped by
173 Sud
August 1, 2011 12:39 PM
|
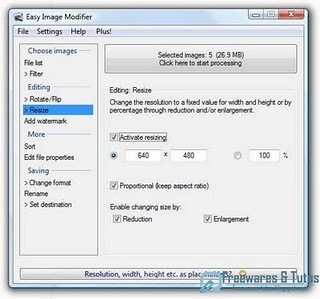
Disponible gratuitement, en français et ne nécessitant même pas d’installation (application portable), Easy Image Modifier est comme son nom le laisse présager un utilitaire très léger permettant de redimensionner, faire pivoter, retourner, changer de format, d’ajouter des textes en filigrane, de trier ou de renommer vos images et photos sans avoir à utiliser des logiciels complexes.
En quelques clics vous accédez à toutes les fonctionnalités d’Easy Image Modifier. Pratique, Easy Image Modifier permet de modifier rapidement des lots d’images et photos, c’est-à-dire plusieurs fichiers à la fois.
|
|
Scooped by
173 Sud
July 31, 2011 8:02 AM
|
Photo Tip Tuesday - Determine which is your dominant photo eye that you should be shooting with. Okay many of us take this one for granted. Here’s how you do it: • Extend your arms out in front of you with your palms faced out • Bring your hands together to form a small triangular hole • Look through this hole at a fixed object across the room • Keep looking at the object with both eyes, through the triangle hole • Slowly pull your hands to your face, still looking at the object • Bring your hands all the way back to your face • You just discovered your dominant eye If you’re left eye dominant and use a DSLR camera you have an added secret weapon, as I have never seen (although I’m sure there must have them) a ‘left-handed’ camera. If you’re shooting with a DSLR, the secret left weapon is this – you can twist your body slightly to the right, look through the view finder with your left eye and rest the left side of the camera body against your left shoulder. This will give you added stability and allow you to shoot at slower shutter speeds hand-held. Sorry righties, this is hard to do on the right side of your body with the shutter release also on the right side.
|
|
Scooped by
173 Sud
July 30, 2011 9:51 AM
|
Apple’s iPhone has changed the game, providing not only a pretty decent camera and HD video camera coupled with a fully functional computer. Here are 10 iPhone apps that are meant for photographers, but don’t always involve using the camera.
Simple DoF Calculator
Gyroscope Surface Level
Hipstamatic
iRotate Photo
TiltShift Generator
Strobox
QuadCamera
Pano
Pudding Camera
DSLR Camera Remote Professional Edition
|
|
Scooped by
173 Sud
July 25, 2011 9:11 AM
|
While I’m not always a fan of sticking strictly to the ‘rules’ or ‘guidelines’ of photography I think they can be well worth knowing and keeping in the back of your mind as you shoot (whether it’s so you can follow them or break them for effect). Here’s four ‘rules’ for landscape photography that might be helpful for those just starting out (ie they’re not meant as a definitive guide but rather a starting point) :
1. Diagonal Lines
2. Geometric Shapes
3. The Rule of Thirds
4. Framing Images
|
|
Scooped by
173 Sud
July 19, 2011 9:22 AM
|
When framing a landscape shot one of the types of environmental features that many photographers look for and like to incorporate in their shots is converging lines. Perhaps the classic example (and one that’s probably been overdone) of converging lines are railway tracks. Position yourself in the middle of two tracks (after taking a look at what might be coming from behind) and you’ll see the two tracks on either side of you appear to get closer and closer together as they go into the distance. Take this shot and the natural reaction for those looking at the scene will be for them to follow the lines off into the distance. In a sense the two lines act like a funnel which directs the gaze of those entering them in a certain direction. The same effect can be achieved with roads or pathways, converging fence lines, a set of stairs, power lines or virtually any other lines that run parallel into the distance or that actually converge at some point. 4 Tips Regarding Converging Lines 1. Experiment with Positioning 2. Wide Angle Lenses 3. Positioning the ‘convergence 4. Adding Interest at the Point of Convergence Read more: http://www.digital-photography-school.com/converging-lines#ixzz1SYbGunDf
|
|
Scooped by
173 Sud
July 16, 2011 6:00 AM
|
Le portrait est la représentation d'une personne destinée à reproduire ses traits et ses caractéristiques. En photographie, il consiste à retranscrire les expressions d'une ou plusieurs personnes.
Techniques de portrait
1. L'attitude du sujet : expressions du visage, sourire ou pas, l'attitude de la personne photographiée joue un rôle important en portrait. Il permet de mettre en valeur sa personnalité. A éviter : grimaces disgracieuses, faire attention aux yeux fermés également.
2. La composition : au-delà du choix du décor, des accessoires et d'un possible maquillage, la règle des tiers s'applique également en portrait.
3. Objectif utilisé : un 50mm ou 85mm en 24x36, est l'objectif de base pour faire du portrait. On considère que ces focales déforment moins le visage qu'un grand angle et donne une meilleure échelle qu'une longue focale.
4. Autofocus : le plus utilisé reste le mode One shot. On choisit le collimateur central par exemple, on le pointe vers l'endroit où l'on souhaite faire sa mise au point(les yeux de préférence), on appuie à mi-course sur le déclencheur pour mémoriser le focus puis on fait son cadrage.
5, Priorité ouverture : ce mode permet de choisir une ouverture, tandis que l'appareil adapte la vitesse d'obturation automatiquement. De nombreux portraitistes travaillent ainsi à de grandes ouvertures afin de détacher le sujet de son arrière-plan, grâce à une faible profondeur de champ qui floute le décor (cf. Le bokeh).
6. La lumière : en studio comme en lumière naturelle, la lumière est un point clé du portrait réussi. Au-delà du fait qu'elle vous permettra d'avoir une photo techniquement réussie (ouverture de diaphragme, vitesse d'obturation, sensibilité ISO), elle est l'élément qui donnera à votre sujet une dimension différente selon son intensité et son orientation : relief du visage, mise en avant des yeux ou d'autres parties, etc.
|
|
|
Scooped by
173 Sud
August 14, 2011 9:57 AM
|
Double Exposure, or Multiple Exposure, is a photographic technique that combines 2 different images into a single image. The technique has been practiced for several years, and it became particularly famous recently, due to the fact that graphic editor like Photoshop can help to create the identical effect. With double exposure technique, you can create certain effect like ghost image, mirror image, or simply merging a bright moon into the dark, lonely sky. The reason of using this technique varies, but they are surely created for same purposes – beauty and uniqueness.
|
|
Scooped by
173 Sud
August 13, 2011 4:14 PM
|
Les feux d’artifice sont un spectacle fascinant qui donne envie aux photographes de l’immortaliser. Je vous donne quelques conseils pour réussir vos photos d’artifices, ces informations sont principalement destinées pour les appareils de photo numériques et son basées sur mon expérience personnelle. En effet, depuis plusieurs années, je photographie régulièrement les feux d’artifices des Fêtes de Genève .
|
|
Scooped by
173 Sud
August 12, 2011 12:34 PM
|
Le terme “Time-lapse” désigne en Anglais une technique cinématographique qui consiste à capturer des images à une vitesse plus lente que celle de leur projection. La projection étant “accélérée”, elle permet de visualiser des mouvements normalement imperceptibles en raison de leur lenteur (éclosion d’une fleur, pourissement d’aliments, aurore boréale, mouvements d’étoiles, de nuages…) ou bien elle permet de compresser le temps, afin de “résumer” des actions ayant une durée de plusieurs heures voire plusieurs jours (construction industrielle, mouvements de véhicules, de foule, mouvements de lumières la nuit, “making of” de tournage…). Cette technique, qui peut être esthétique ou ludique et souvent spectaculaire, connait un engouement important sur les sites de diffusion vidéo. Il n’existe pas de traduction exacte au terme “time-lapse”. En Français on pourrait dire “intervalle de temps” mais c’est un terme scientifique, ou “accéléré” pour rester dans le registre cinématographique, mais le mot est imprécis, cette traduction me semblerait approximative.
|
|
Scooped by
173 Sud
August 10, 2011 11:37 AM
|
La photo au flash est un vaste domaine. En partant du simple flash intégré, en passant par les flashs cobra, macro, multiflash…etc. Jusqu’au Flash de studio, il y aurait de quoi écrire une encyclopédie, de quoi remplir un blog qui ne serait consacré qu’à ce sujet, et les milliers d’utilisations différentes, dans des milliers de cas différents. Je n’ai donc pas la prétention de vous offrir un article exhaustif sur le sujet. Je vais me contenter de vous donner quelques petites astuces pour le cas très malheureux où un manque cruel de lumière se ferait ressentir, et que votre seul moyen d’éviter le pire sera le recourt au flash! C’est un article où vous allez devoir un peu travailler, voir beaucoup, mais c’est pour votre bien.
|
|
Scooped by
173 Sud
August 9, 2011 7:32 AM
|
Quelles sont les 5,5 (oui oui, virgule 5) cadrages classiques du portrait qui sublimeront vos modèles
J’ai beaucoup dit ces derniers temps de ne pas trop respecter les règles établies en photo, mais il n’en reste pas moins qu’il faut les connaître avant de pouvoir s’en affranchir. Voyons donc ensemble les 5,5 différents types de cadrages utilisés classiquement pour le portrait, et qui fonctionnent donc bien pour mettre en valeur votre sujet.
Attention : ce ne sont bien évidemment pas les seuls cadrages possibles, et couper à tel ou tel endroit du corps ne garantit pas un bon portrait évidemment, de la même façon que ça ne vous empêche pas de trouver des poses un peu originales Prenez donc cette liste plutôt comme de grands principes que comme des règles à respecter absolument (comme d’habitude en fait, mais il vaut toujours mieux le rappeler ).
|
|
Scooped by
173 Sud
August 8, 2011 11:05 AM
|
Ever take one of those photos that’s great, except for a bunch of shadows that ruin the image? Here’s how to salvage that shot and bring the detail back out of those shadows in a few quick seconds. With this Photoshop and GIMP friendly method, you can turn those frustrating “almost perfect” photos into great images. So, let’s dive in, and see what we can do about all those shadows. Keep reading!
|
|
Scooped by
173 Sud
August 2, 2011 11:45 AM
|
Has buying the right studio lighting setup stopped you from taking your portrait photography seriously? It shouldn’t. You can take great portraits with natural light.
Photography is about light. Learning how to see light is essential to developing your photographic eye. When taking pictures, being able to determine the intensity, color and direction of the light will help you know how to position your subject and which camera settings to use.
|
|
Scooped by
173 Sud
July 31, 2011 8:32 AM
|
With my very first digital SLR there was a sigh of relief, everything was going to be so much easier now and I didn’t have to think anymore.
You know the scenario; you pull the camera out, charge the batteries, go for a walk around the house and down the street taking the same pictures you have taken every time a new camera came into your life. “This is great!” you think to yourself, “this is going to make my life so much easier!” I was wrong… In fact, I was dead wrong.
There are three very simple things that improve all photography, including portraits. To this day, there is no trick I have found that replaces the need for proper exposure, white balance, and sharp focus. Today’s digital cameras have less exposure latitude than a roll of Kodak gold film. In-camera metering systems have become much more advanced, but the sensors still lack the seven ƒ-stop exposure latitude that negative film has.
1) Never select all of the focus points for portraits, pick one.
2) Always focus on the eyes.
3) Shoot wide open for shallow depth of field.
4) Never, ever, shoot a portrait at less than 50mm; try to stay at 70mm or higher.
5) Always shoot in RAW.
6) Always bring a gray card or a piece of a gray card for white balance.
7) Shoot in the shade (Avoid direct sunlight)
9) If you must use hot, hard, bright light…
10) Use an existing reflector.
11) Learn the sunny ƒ16 rule.
12) Bring a sheet and a few spring clamps from home.
13) Keep the power-lines and signs out!
|
|
Scooped by
173 Sud
July 30, 2011 12:04 PM
|
Shooting in JPG mode is convenient because you instantly have a file you can throw onto the Internet, but if you’re serious about photography, you might want to think about shooting in RAW if you aren’t already. The reason is that only shooting JPG is the equivalent of letting the camera make a print for you and then tossing the negative — something film photographers would never do. Here’s a simple diagram by Haje Jan Kamps and Reddit user jannne to help you understand the differences.
|
|
Scooped by
173 Sud
July 29, 2011 5:55 PM
|
If you are a serious photographer with a digital single lens reflex (DSLR) camera, you may have been frustrated by the lack of support in Windows for the raw image format. Microsoft has now announced a download that adds support for raw format images to Windows Live Photo Gallery 2011. It is called the Microsoft Camera Codec Pack for Windows 7 and Windows Vista and will enable the viewing of raw photo files from more than 120 DSLR cameras in Photo Gallery, as well as in Windows Explorer. It will also enable editing copies of raw images in Photo Gallery.
Judging from the comments at the Microsoft announcement, the new software could be better but it is a start. The codec pack is available at this Microsoft link. If you do not already have Windows Live Photo Gallery 2011, it can be downloaded here.
Microsoft says the new support for raw images works in the 32- or 64-bit version of Windows 7, or Windows Vista with Service Pack 2 and the Platform Update for Windows Vista.
|
|
Scooped by
173 Sud
July 22, 2011 10:49 AM
|
Light travels through a lens, the shutter opens, and a moment is preserved by capturing it on the camera’s sensor. This chip is an absolute essential in creating digital images. However, you may not have a good idea of how it all works. If you’re wanting to demystify the magic of how your digital SLR works, look no further than today’s Basix article all about camera sensors.
|
|
Scooped by
173 Sud
July 18, 2011 9:34 PM
|
Choosing a digital camera used to be a simple process that was heavily dictated by the amount of money in your pocket. Now the same money can buy you different benefits and compromises, making the decision much more complex. Here's a look at your camera-buying options, the pros and cons of each, and some specific suggestions to help you pick the perfect camera for your needs.
This is a long guide and not every section is relevant to everyone. If you want to skip to the type of camera that interests you, just use these links:
Cellphone and Smartphone Cameras
Point and Shoot Cameras
EVIL Cameras
DSLR Cameras
If you're not sure what you want, however, do feel free to read the whole thing.
|