ESP8266WiFi library¶ ESP8266 is all about Wi-Fi. If you are eager to connect your new ESP8266 module to a Wi-Fi network to start sending and receiving data, this is a good place to start. If you are looking for more in depth details of how to program specific Wi-Fi networking functionality, you are also in the right place. Introduction¶ The Wi-Fi library for ESP8266 has been developed based on ESP8266 SDK, using the naming conventions and overall functionality philosophy of the Arduino WiFi library. Over time, the wealth of Wi-Fi features ported from ESP8266 SDK to esp8266 / Arduino outgrew Arduino WiFi library and it became apparent that we would need to provide separate documentation on what is new and extra. This documentation will walk you through several classes, methods and properties of the ESP8266WiFi library. If you are new to C++ and Arduino, don’t worry. We will start from general concepts and then move to detailed description of members of each particular class including usage examples. The scope of functionality offered by the ESP8266WiFi library is quite extensive and therefore this description has been broken up into separate documents marked with :arrow_right:. Quick Start¶ Hopefully, you are already familiar how to load the Blink.ino sketch to an ESP8266 module and get the LED blinking. If not, please use this tutorial by Adafruit or another great tutorial developed by Sparkfun. To hook up the ESP module to Wi-Fi (like hooking up a mobile phone to a hot spot), you need only a couple of lines of code: #include <ESP8266WiFi.h> void setup() { Serial.begin(115200); Serial.println(); WiFi.begin("network-name", "pass-to-network"); Serial.print("Connecting"); while (WiFi.status() != WL_CONNECTED) { delay(500); Serial.print("."); } Serial.println(); Serial.print("Connected, IP address: "); Serial.println(WiFi.localIP()); } void loop() {} In the line WiFi.begin("network-name", "pass-to-network") replace network-name and pass-to-network with the name and password of the Wi-Fi network you would like to connect to. Then, upload this sketch to ESP module and open the serial monitor. You should see something like: How does it work? In the first line of the sketch, #include <ESP8266WiFi.h> we are including the ESP8266WiFi library. This library provides ESP8266 specific Wi-Fi routines that we are calling to connect to the network. The actual connection to Wi-Fi is initialized by calling: WiFi.begin("network-name", "pass-to-network"); The connection process can take couple of seconds and we are checking for whether this has completed in the following loop: while (WiFi.status() != WL_CONNECTED) { delay(500); Serial.print("."); } The while() loop will keep looping as long as WiFi.status() is other than WL_CONNECTED. The loop will exit only if the status changes to WL_CONNECTED. The last line will then print out the IP address assigned to the ESP module by DHCP: Serial.println(WiFi.localIP()); If you don’t see the last line but just more and more dots ........., then likely name or password to the Wi-Fi network is entered incorrectly in the sketch. Verify the name and password by connecting from scratch to this Wi-Fi network with a PC or a mobile phone. Note: if connection is established, and then lost for some reason, ESP will automatically reconnect to the last used access point once it is again back on-line. This will be done automatically by Wi-Fi library, without any user intervention. That’s all you need to connect ESP8266 to Wi-Fi. In the following chapters we will explain what cool things can be done by the ESP once it’s connected. Who is Who¶ Devices that connect to Wi-Fi networks are called stations (STA). Connection to Wi-Fi is provided by an access point (AP), that acts as a hub for one or more stations. The access point on the other end is connected to a wired network. An access point is usually integrated with a router to provide access from a Wi-Fi network to the internet. Each access point is recognized by a SSID (Service Set IDentifier), that essentially is the name of network you select when connecting a device (station) to the Wi-Fi. ESP8266 modules can operate as a station, so we can connect it to the Wi-Fi network. It can also operate as a soft access point (soft-AP), to establish its own Wi-Fi network. When the ESP8266 module is operating as a soft access point, we can connect other stations to the ESP module. ESP8266 is also able to operate as both a station and a soft access point mode. This provides the possibility of building e.g. mesh networks. The ESP8266WiFi library provides a wide collection of C++ methods (functions) and properties to configure and operate an ESP8266 module in station and / or soft access point mode. They are described in the following chapters. Class Description¶ The ESP8266WiFi library is broken up into several classes. In most of cases, when writing the code, the user is not concerned with this classification. We are using it to break up description of this library into more manageable pieces. Chapters below describe all function calls (methods and properties in C++ terms) listed in particular classes of ESP8266WiFi. The description is illustrated with application examples and code snippets to show how to use functions in practice. This information is broken up into the following documents. Station¶ Station (STA) mode is used to get the ESP module connected to a Wi-Fi network established by an access point. Station class has several features to facilitate the management of a Wi-Fi connection. In case the connection is lost, the ESP8266 will automatically reconnect to the last used access point, once it is available again. The same happens on module reboot. This is possible since ESP saves the credentials to the last used access point in flash (non-volatile) memory. Using the saved data ESP will also reconnect if sketch has been changed but code does not alter the Wi-Fi mode or credentials. Station Class documentation Check out separate section with examples. Soft Access Point¶ An access point (AP) is a device that provides access to a Wi-Fi network to other devices (stations) and connects them to a wired network. The ESP8266 can provide similar functionality, except it does not have interface to a wired network. Such mode of operation is called soft access point (soft-AP). The maximum number of stations that can simultaneously be connected to the soft-AP can be set from 0 to 8, but defaults to 4. The soft-AP mode is often used and an intermediate step before connecting ESP to a Wi-Fi in a station mode. This is when SSID and password to such network is not known upfront. ESP first boots in soft-AP mode, so we can connect to it using a laptop or a mobile phone. Then we are able to provide credentials to the target network. Then, the ESP is switched to the station mode and can connect to the target Wi-Fi. Another handy application of soft-AP mode is to set up mesh networks. The ESP can operate in both soft-AP and Station mode so it can act as a node of a mesh network. Soft Access Point Class documentation Check out the separate section with examples. Scan¶ To connect a mobile phone to a hot spot, you typically open Wi-Fi settings app, list available networks and pick the hot spot you need. Then enter a password (or not) and you are in. You can do the same with the ESP. Functionality of scanning for, and listing of available networks in range is implemented by the Scan Class. Scan Class documentation Check out the separate section with examples. Client¶ The Client class creates clients that can access services provided by servers in order to send, receive and process data. Check out the separate section with list of functions WiFi Multi¶ ESP8266WiFiMulti.h can be used to connect to a WiFi network with strongest WiFi signal (RSSI). This requires registering one or more access points with SSID and password. It automatically switches to another WiFi network when the WiFi connection is lost. Example: #include <ESP8266WiFiMulti.h> ESP8266WiFiMulti wifiMulti; // WiFi connect timeout per AP. Increase when connecting takes longer. const uint32_t connectTimeoutMs = 5000; void setup() { // Set in station mode WiFi.mode(WIFI_STA); // Register multi WiFi networks wifiMulti.addAP("ssid_from_AP_1", "your_password_for_AP_1"); wifiMulti.addAP("ssid_from_AP_2", "your_password_for_AP_2"); wifiMulti.addAP("ssid_from_AP_3", "your_password_for_AP_3"); } void loop() { // Maintain WiFi connection if (wifiMulti.run(connectTimeoutMs) == WL_CONNECTED) { ... } } BearSSL Client Secure and Server Secure¶ BearSSL::WiFiClientSecure and BearSSL::WiFiServerSecure are extensions of the standard Client and Server classes where connection and data exchange with servers and clients using secure protocol. It supports TLS 1.2 using a wide variety of modern ciphers, hashes, and key types. Secure clients and servers require significant amounts of additional memory and processing to enable their cryptographic algorithms. In general, only a single secure client or server connection at a time can be processed given the little RAM present on the ESP8266, but there are methods of reducing this RAM requirement detailed in the relevant sections. BearSSL::WiFiClientSecure contains more information on using and configuring TLS connections. BearSSL::WiFiServerSecure discusses the TLS server mode available. Please read and understand the BearSSL::WiFiClientSecure first as the server uses most of the same concepts. Check out the separate section with examples . Server¶ The Server Class creates servers that provide functionality to other programs or devices, called clients. Clients connect to sever to send and receive data and access provided functionality. Check out separate section with examples / list of functions. UDP¶ The UDP Class enables the User Datagram Protocol (UDP) messages to be sent and received. The UDP uses a simple “fire and forget” transmission model with no guarantee of delivery, ordering, or duplicate protection. UDP provides checksums for data integrity, and port numbers for addressing different functions at the source and destination of the datagram. Check out separate section with examples / list of functions. Generic¶ There are several functions offered by ESP8266’s SDK and not present in Arduino WiFi library. If such function does not fit into one of classes discussed above, it will likely be in Generic Class. Among them is handler to manage Wi-Fi events like connection, disconnection or obtaining an IP, Wi-Fi mode changes, functions to manage module sleep mode, hostname to an IP address resolution, etc. Check out separate section with examples / list of functions. Diagnostics¶ There are several techniques available to diagnose and troubleshoot issues with getting connected to Wi-Fi and keeping connection alive. Check Return Codes¶ Almost each function described in chapters above returns some diagnostic information. Such diagnostic may be provided as a simple boolean type true or false to indicate operation result. You may check this result as described in examples, for instance: Serial.printf("Wi-Fi mode set to WIFI_STA %s\n", WiFi.mode(WIFI_STA) ? "" : "Failed!"); Some functions provide more than just a binary status information. A good example is WiFi.status(). Serial.printf("Connection status: %d\n", WiFi.status()); This function returns following codes to describe what is going on with Wi-Fi connection: 0 : WL_IDLE_STATUS when Wi-Fi is in process of changing between statuses 1 : WL_NO_SSID_AVAILin case configured SSID cannot be reached 3 : WL_CONNECTED after successful connection is established 4 : WL_CONNECT_FAILED if connection failed 6 : WL_CONNECT_WRONG_PASSWORD if password is incorrect 7 : WL_DISCONNECTED if module is not configured in station mode It is a good practice to display and check information returned by functions. Application development and troubleshooting will be easier with that. Use printDiag¶ There is a specific function available to print out key Wi-Fi diagnostic information: WiFi.printDiag(Serial); A sample output of this function looks as follows: Mode: STA+AP PHY mode: N Channel: 11 AP id: 0 Status: 5 Auto connect: 1 SSID (10): sensor-net Passphrase (12): 123!$#0&*esP BSSID set: 0 Use this function to provide snapshot of Wi-Fi status in these parts of application code, that you suspect may be failing. Enable Wi-Fi Diagnostic¶ By default the diagnostic output from Wi-Fi libraries is disabled when you call Serial.begin. To enable debug output again, call Serial.setDebugOutput(true). To redirect debug output to Serial1 instead, call Serial1.setDebugOutput(true). For additional details regarding diagnostics using serial ports please refer to the documentation. Below is an example of output for sample sketch discussed in Quick Start above with Serial.setDebugOutput(true): Connectingscandone state: 0 -> 2 (b0) state: 2 -> 3 (0) state: 3 -> 5 (10) add 0 aid 1 cnt connected with sensor-net, channel 6 dhcp client start... chg_B1:-40 ...ip:192.168.1.10,mask:255.255.255.0,gw:192.168.1.9 . Connected, IP address: 192.168.1.10 The same sketch without Serial.setDebugOutput(true) will print out only the following: Connecting.... Connected, IP address: 192.168.1.10 Enable Debugging in IDE¶ Arduino IDE provides convenient method to enable debugging for specific libraries. What’s Inside?¶ If you like to analyze in detail what is inside of the ESP8266WiFi library, go directly to the ESP8266WiFi folder of esp8266 / Arduino repository on the GitHub. To make the analysis easier, rather than looking into individual header or source files, use one of free tools to automatically generate documentation. The class index in chapter Class Description above has been prepared in no time using great Doxygen, that is the de facto standard tool for generating documentation from annotated C++ sources. The tool crawls through all header and source files collecting information from formatted comment blocks. If developer of particular class annotated the code, you will see it like in examples below. If code is not annotated, you will still see the function prototype including types of arguments, and can use provided links to jump straight to the source code to check it out on your own. Doxygen provides really excellent navigation between members of library. Several classes of ESP8266WiFi are not annotated. When preparing this document, Doxygen has been tremendous help to quickly navigate through almost 30 files that make this library.
This is one of my news digests. If you like my editorial choices, there are more to be found by clicking on the "dear reader" link, and on my name above. Enjoy !
Takeoff projects help students complete their academic projects. Register at takeoff projects today to find and learn about different interesting big data projects and grab the best jobs. Get started right now.
🧠Learn how to make a simple circuit using basic electronic components. In this short video, we explain each part of the circuit diagram clearly for beginners. Perfect for students and DIY electronics lovers in the USA!
About Circuit Diagram :- Learn how to create a simple and efficient 3.7V battery charger circuit with an automatic cut-off feature. This easy-to-follow tutorial provides a detailed circuit diagram and explanation to help you build a reliable and safe battery charging system. With this circuit, you can charge your 3.7V batteries with ease and precision, and the auto cut-off feature ensures that the charging process is stopped when the battery is fully charged, preventing overcharging and damage to the battery. This project is perfect for DIY enthusiasts, electronics hobbyists, and anyone looking to create a custom battery charging solution. The circuit diagram is easy to understand and implement, making it a great resource for beginners and experienced electronics enthusiasts alike.
Related Tags :- power supply circuit, how to charge lithium ion battery, Arduino battery charger, battery management system, voltage regulator circuit, lithium ion battery, how to make 18650 battery charger, 3.7v battery charger circuit diagram, how to make lithium ion battery charger, lithium battery charger, automatic cut off charger, how to make, battery charger, battery, electronics projects, 18650 battery charger, charger, electronics tutorial, circuit design, electronics, how to make lithium battery charger, 3.7v battery, rechargeable battery, diy electronics.
Targeted Tags :- 3d circuit animation, electrical engineering explained, physics animation, usa circuit diagram 3d, electronics basics, 3d visualization, usa engineering shorts, science explained, how circuit works, 3d learning, usa tech shorts, 3d education, visual physics, us tech students, 3d science shorts.
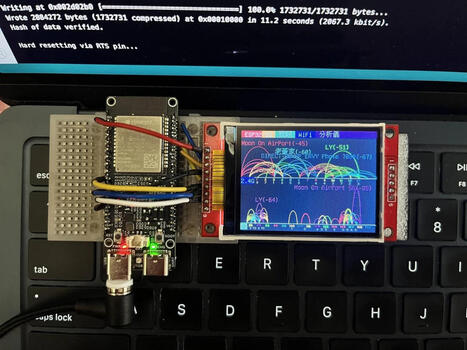
Chen Liang (陳亮) has found an interesting use case for the Espressif ESP32-C5: a dual-band Wi-Fi analyzer showing the signal strength of 2.4 GHz and 5 GHz...
Whether you're a casual listener, a sustainability enthusiast, or simply hate letting gadgets go to waste, here's nine ways to repurpose old Bluetooth speakers.
Analizamos a fondo los lanzamientos más bestias de finales de 2025: La Raspberry Pi 500+, el Arduino UNO Q híbrido y la PocketBeagle 2. ¿Cuál es para ti? 👇
¡Viajamos al futuro! En este video desglosamos el informe técnico definitivo de noviembre de 2025. El mercado de las SBC (Single Board Computers) se ha fragmentado y tenemos tres bestias compitiendo por tu atención: Raspberry Pi 500+: Un teclado-ordenador con SSD NVMe de serie y potencia de escritorio real. Arduino UNO Q: La fusión prohibida entre microcontrolador y microprocesador (Qualcomm + STM32) en el tamaño de siempre. PocketBeagle 2: La reina del tamaño reducido y la industria, ahora con multi-núcleo. Descubre qué placa domina en Inteligencia Artificial, cuál es mejor para robótica y cuál reemplazará a tu ordenador de sobremesa.
This video discusses raspberry pi and how we can get started with any type of OS needed for our work. #raspberrypi #mxlinux #sbc
00:00 - Intro 01:23 - Pi / Computer Differences 03:57 - Writing an img File 05:45 - Distro Options for Raspberry Pi 10:20 - Install Pi Imager 11:35 - Using Pi Imager (DL from Imager) 16:05 - Writing a Custom Download 19:55 - Pi Setup 22:27 - Final Comments
We are a participant in the Amazon Services LLC Associates Program, an affiliate advertising program designed to provide a means for us to earn fees by linking to Amazon.com and affiliated sites.
Title Card Music - "Into the Depths" (Sting) by Jingle Punks
“Under Section 107 of the copyright Act 1976, allowance is made for “Fair Use” for purposes such as criticism, comment, news reporting, teaching, scholarship and research. Fair Use is a use permitted by copyright statute that might otherwise be infringing. Non-profit, educational or personal use tips the balance in favor of Fair Use.” - Truthstream Media https://www.youtube.com/c/TRUTHstreammedia
UNO is the widely used microcontroller board for developing a different kind of projects and prototypes. This small development board has all the features of its native IC Atmega328p with additional features. This comes with on-board programmer CH340, so no need to connect an external programmer. Arduino Uno board has a 12V DC barrel jack which can accept up to 12V but use for 9V Max. It has onboard LEDs to indicate power. The IC Atmega328p is removable, so if the Atmega IC is not working then it can be replaced with another one.
In this video, I will be testing the oldest version of raspberry pi os (Raspbian) from mid-2012. This video covers how to install, as well as a few-minute desktop showcase.
In this video I walk through my “Junkbox Arcade” project — a tiny retro-style game console built entirely from parts I already had lying around. Using a Raspberry Pi Pico, an ILI9341 display, a few buttons, and a 3D-printed enclosure, I built a simple handheld arcade game. It’s a great starter project if you’re experimenting with the Pico, retro-inspired games, or small embedded displays. Full source code and build details are in the repo!
Qualcomm’s acquisition of Arduino and the company’s new Terms of Service sparks major concerns in the open source community over privacy and terms of service. What will happen to the Arduino open hardware and how does this effect Linux users? We'll do a dive in today.
00:00 Arduino the Maker Board 01:03 Qualcomm's Aquistion of Arduino 03:21 Will Ardunio Remain Open? 04:34 Adafruit enters.. 07:45 Death of Arduino 08:28 Qualcomm's Reponse to backlash 13:27 My exp with Ardunio
#robotics #robotcar #yahboom Yahboom Rider-Pi is a desktop two wheel-legged robot designed for developers, educators and robot enthusiasts. Built-in inertial measurement unit (IMU) and the carbon fiber connecting rod structure, which allow the robot to adjust the joint angle in real time to adapt to different terrain obstacles. Based on the Raspberry Pi CM4 core module, adopt Python programming, support a series of AI functions such as face recognition, color tracking/following, QR code motion control, object detection, license plate recognition, gesture following, etc. A 2.0-inch IPS screen on the front, can display video images and 35 dynamic expressions in real time. In addition, Rider-Pi also supports ChatGPT (extra charge), which can realize voice Q&A, voice control, text-to-picture, and image analysis description functions.
To get content containing either thought or leadership enter:
To get content containing both thought and leadership enter:
To get content containing the expression thought leadership enter:
You can enter several keywords and you can refine them whenever you want. Our suggestion engine uses more signals but entering a few keywords here will rapidly give you great content to curate.


 Your new post is loading...