

The Raspberry Pi project website is http://www.raspberrypi.org/
This is one of my news digests. If you like my editorial choices, there are more to be found by clicking on the "dear reader" link, and on my name above.
Enjoy !


|
Scooped by
F. Thunus
onto Raspberry Pi November 27, 2011 5:08 PM
|
The Raspberry Pi project website is http://www.raspberrypi.org/
This is one of my news digests. If you like my editorial choices, there are more to be found by clicking on the "dear reader" link, and on my name above.
Enjoy !

 Your new post is loading...
 Your new post is loading...
Your new post is loading...
The Raspberry Pi project website is http://www.raspberrypi.org/ This is one of my news digests. If you like my editorial choices, there are more to be found by clicking on the "dear reader" link, and on my name above.

Wuzea Recherche's comment,
March 15, 2015 6:45 AM
Propose de rechercher une ressource en tapant un mot clé dans le champ de recherche. Wuzea : http://www.wuzea.com

Vasu10's curator insight,
June 9, 2021 1:49 AM
Takeoff projects help students complete their academic projects. Register at takeoff projects today to find and learn about different interesting big data projects and grab the best jobs. Get started right now.
From
www

Check out the incredible capabilities of the ESP32-C6 Mini WiFi Development Board (DC-10116)! 🛠️ Whether you're a beginner or an advanced electronics hobbyist, this tiny development board is a game-changer for your next IoT project. Featuring native WiFi 6 support and the super convenient Qwiic connector, it simplifies prototyping like never before.

From
dev
Raspberry Pi Cyberdeck Turns: A Raspberry Pi 4 and Teensy 4.1 team up as a pocket M8-tracker music workstation you can build in a single weekend, screen and battery included. Tagged with raspberrypi, teensy, cyberdeck, diyaudio.
From
dev
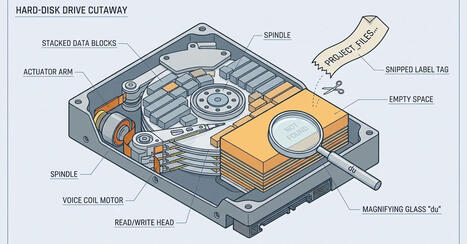
Linux disk-usage tools that find gigabytes du can't see — dust, ncdu, gdu — plus the lsof one-liner for deleted-but-open files. Tagged with linux, diskusage, lsof, du.
From
www
Discover how the $35 Raspberry Pi transformed education, DIY electronics, robotics, home automation, and programming around the world. Learn why this tiny computer became one of the most popular single-board computers ever made and how it continues to power amazing projects.

A new single-board computer is certainly an alternative to a Raspberry Pi, but it features a rather unique architecture. This should make the Debix T62P-01 particularly well-suited for critical real-time applications.
From
www
These projects turn a Raspberry Pi into a practical home automation tool...
From
blog
jetpax on GitHub has dropped PiZZa, running Arduino on the Raspberry Pi Zero 2 W. Write sketches in the Arduino IDE and run them on a Raspberry Pi Zero 2 W or the original Raspberry Pi Zero W. A small firmware on the SD card (a Zephyr “loader”) loads your compiled sketch as a runtime […]

From
uk
Do you have an ancient laptop or desktop just lying around? Transform that aging PC into an NAS, experiment with a new OS, build your own security cam, and more.
From
www
Meet Micro Albert, a pocket-sized quadruped robot powered by an ESP32-C3, four SG90 servos, and a tiny OLED display.

From
www
Smart homes require smart purchases, and they aren't always cheap.
From
pypi
Host control and management tools for Raspberry Pi Pico devices
|
From
www
You can ditch your monthly subscriptions by spending just one afternoon setting up these self-hosted open-source apps.

From
liliputing
RootBoard is a Raspberry Pi-powered handheld PC with a 3.5 inch screen, 70-key keyboard (crowdfunding)...

BasiliskII Macintosh emulator project ported to ESP32-P4 display devkits: M5Stack Tab5 and Waveshare ESP32-P4-WIFI6-Touch-LCD-10.1.

Public Wi-Fi networks are inherently more secure than ever...
RootBoard: Raspberry Pi "mini laptop" with built-in battery and 70-key keyboard - Notebookcheck News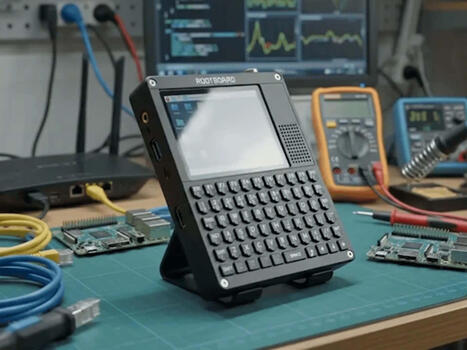
Lots of possibilities and a keyboard: A new handheld device is designed to be quite versatile and is based on the Raspberry Pi. It is essentially an open system and is compatible with various versions of the Raspberry Pi.

From
hackaday
About 18 months ago, we brought you a sneak peek at a handheld that started life in the Dutch conference badge scene. At the time it showed promise, but its software wasn't ready for a fair review. No...

From
makerspet
I’m starting a new build-in-public project: oomwoo, an open-source robot vacuum you build yourself. Raspberry Pi, ROS 2, 2D LiDAR, Home Assistant, 3D printed, local-first — and open from the first commit.

From
misryoum
The Tanmatsu handheld is finally ready for a full review: stable operating setup, a repository of apps, and hacker-focused hardware including Wi‑Fi/me...
From
www
Votre écran LCD I2C affiche des carrés noirs, du texte invisible ou reste complètement éteint sur votre projet Arduino ? Pas de panique ! Dans ce tutoriel rapide, je vous montre les 3 vérifications indispensables pour débloquer votre affichage en moins d'une minute.

From
www
Immich 3.0 rolls out with major updates across mobile and web, improving editing, automation, video playback, and background syncing, plus many fixes and stability upgrades.
From
www
Vous trouverez le programme et le schéma de câblage du système dans ce lien : https://www.robotique.site/tutoriel/projet-de-robinet-automatique-a-commande-arduino-uno/
|


this is