In this video I walk through my “Junkbox Arcade” project — a tiny retro-style game console built entirely from parts I already had lying around. Using a Raspberry Pi Pico, an ILI9341 display, a few buttons, and a 3D-printed enclosure, I built a simple handheld arcade game. It’s a great starter project if you’re experimenting with the Pico, retro-inspired games, or small embedded displays. Full source code and build details are in the repo!
This is one of my news digests. If you like my editorial choices, there are more to be found by clicking on the "dear reader" link, and on my name above. Enjoy !
Takeoff projects help students complete their academic projects. Register at takeoff projects today to find and learn about different interesting big data projects and grab the best jobs. Get started right now.
It’s never a bad time to think about saving money, and self-hosting your own software is a great place to start. With the help of my always-on Raspberry Pi, I’m hoping to buck trends and avoid subscriptions by hosting the following projects on my own.
This video presents our project entitled “RFID-Based Automated School Gate System for Vehicles.”
The project demonstrates an automated access control system designed to manage vehicle entry inside a school campus using RFID technology. It uses an Arduino Uno, MFRC522 RFID reader, servo motor, LCD display, and buzzer to verify authorized users and automatically open the gate. The system supports role-based access for students, teachers, and administrators, providing real-time feedback and improved campus security.
Presented by: Charies Canque Ana Mae Lebetos Jiamae Ates Bea Dolog Rosemarie Ygoña
🧠Learn how to make a simple circuit using basic electronic components. In this short video, we explain each part of the circuit diagram clearly for beginners. Perfect for students and DIY electronics lovers in the USA!
About Circuit Diagram :- Learn how to create a simple and efficient 3.7V battery charger circuit with an automatic cut-off feature. This easy-to-follow tutorial provides a detailed circuit diagram and explanation to help you build a reliable and safe battery charging system. With this circuit, you can charge your 3.7V batteries with ease and precision, and the auto cut-off feature ensures that the charging process is stopped when the battery is fully charged, preventing overcharging and damage to the battery. This project is perfect for DIY enthusiasts, electronics hobbyists, and anyone looking to create a custom battery charging solution. The circuit diagram is easy to understand and implement, making it a great resource for beginners and experienced electronics enthusiasts alike.
Related Tags :- power supply circuit, how to charge lithium ion battery, Arduino battery charger, battery management system, voltage regulator circuit, lithium ion battery, how to make 18650 battery charger, 3.7v battery charger circuit diagram, how to make lithium ion battery charger, lithium battery charger, automatic cut off charger, how to make, battery charger, battery, electronics projects, 18650 battery charger, charger, electronics tutorial, circuit design, electronics, how to make lithium battery charger, 3.7v battery, rechargeable battery, diy electronics.
Targeted Tags :- 3d circuit animation, electrical engineering explained, physics animation, usa circuit diagram 3d, electronics basics, 3d visualization, usa engineering shorts, science explained, how circuit works, 3d learning, usa tech shorts, 3d education, visual physics, us tech students, 3d science shorts.
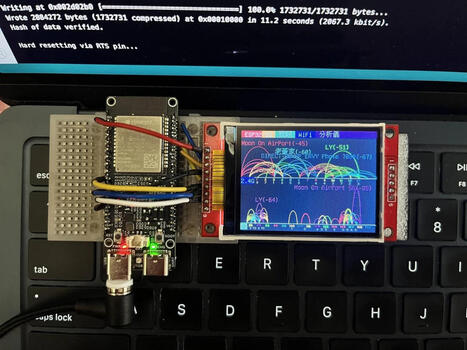
Chen Liang (陳亮) has found an interesting use case for the Espressif ESP32-C5: a dual-band Wi-Fi analyzer showing the signal strength of 2.4 GHz and 5 GHz...
Whether you're a casual listener, a sustainability enthusiast, or simply hate letting gadgets go to waste, here's nine ways to repurpose old Bluetooth speakers.
Analizamos a fondo los lanzamientos más bestias de finales de 2025: La Raspberry Pi 500+, el Arduino UNO Q híbrido y la PocketBeagle 2. ¿Cuál es para ti? 👇
¡Viajamos al futuro! En este video desglosamos el informe técnico definitivo de noviembre de 2025. El mercado de las SBC (Single Board Computers) se ha fragmentado y tenemos tres bestias compitiendo por tu atención: Raspberry Pi 500+: Un teclado-ordenador con SSD NVMe de serie y potencia de escritorio real. Arduino UNO Q: La fusión prohibida entre microcontrolador y microprocesador (Qualcomm + STM32) en el tamaño de siempre. PocketBeagle 2: La reina del tamaño reducido y la industria, ahora con multi-núcleo. Descubre qué placa domina en Inteligencia Artificial, cuál es mejor para robótica y cuál reemplazará a tu ordenador de sobremesa.
RasTech Raspberry Pi 5 Kit 16GB RAM with 27W PD Power Supply 5.1V5A,Heat Sinks and Ras...
Welcome to our channel! Before we dive into the detailed review of the RasTech Raspberry Pi 5 Kit with 16GB RAM, just a quick note: the link to purchase this product at a discounted price is pinned in the first comment, so be sure to check it out. This kit is a comprehensive package designed for both hobbyists and professionals who want to harness the power of the latest Raspberry Pi 5 board. Included in the kit is the Raspberry Pi 5 single board computer with a hefty 16GB of RAM, a robust 27W GaN power supply rated at 5.1V and 5A, four heat sinks to keep the system cool, and a screwdriver for easy assembly.
The Raspberry Pi 5 itself is a significant upgrade over its predecessor, featuring a Broadcom BCM2712 64-bit quad-core Arm Cortex-A76 processor clocked at 2.4GHz. This translates to roughly 2 to 3 times faster CPU performance compared to the Raspberry Pi 4, which is a major boost for multitasking, programming, and media applications. On the graphics side, the 800MHz VideoCore VII GPU supports OpenGL ES 3.1 and Vulkan 1.2, delivering enhanced graphical performance suitable for gaming, media streaming, and more.
One of the standout features of this kit is the high-quality power solution. The included 27W GaN power supply ensures stable and sufficient current delivery even under full load, eliminating the common low-voltage issues seen in less capable adapters. This means you can push the Raspberry Pi 5 to its limits without worrying about power instability.
Connectivity options are impressive: dual micro HDMI ports support dual 4Kp60 displays with HDR, enabling a stunning visual experience for workstations or media centers. The board includes two USB 3.0 ports and two USB 2.0 ports, tripling bandwidth compared to previous models and supporting multiple peripherals simultaneously. Gigabit Ethernet, dual-band Wi-Fi, and Bluetooth 5.0/BLE round out the connectivity suite, making this Raspberry Pi 5 kit versatile for networking and IoT projects. Additionally, the PCI Express 2.0 x1 slot opens up possibilities for SSD expansion (with a separate M.2 HAT), which is a first for Raspberry Pi boards.
The kit also includes four heat sinks to help maintain optimal temperatures during heavy use, and a screwdriver for easy installation. Backed by a 12-month warranty and lifetime service with prompt customer support, this kit offers peace of mind alongside performance.
Pros: - Powerful 16GB RAM and quad-core 2.4GHz CPU for high performance - Advanced GPU supporting modern graphics APIs - Stable 27W GaN power supply preventing voltage drops - Dual 4Kp60 HDR display support via micro HDMI - Extensive connectivity including USB 3.0, Gigabit Ethernet, Wi-Fi, Bluetooth - PCIe slot for SSD expansion - Cooling solution with heat sinks included - Warranty and responsive customer service
Cons: - PCIe SSD expansion requires additional hardware - Premium price point compared to lower RAM models - May be overkill for casual Raspberry Pi users
Overall, the RasTech Raspberry Pi 5 Kit 16GB RAM is a top-tier offering that combines powerful hardware, excellent connectivity, and solid build quality. Whether you're building a media server, a development workstation, or experimenting with embedded projects, this kit is a worthy investment. Remember, the link to get this product at a discount is pinned in the first comment, so don’t miss out on that offer. Check it out now!
The UNO Based ESP8266 NodeMCU Development Board combines the simplicity of Arduino UNO with the power of ESP8266 WiFi. It is ideal for IoT projects, smart automation, wireless control systems, and prototyping. This board allows easy programming, stable performance, and seamless internet connectivity for makers, students, and professionals.
🔌 Product Name: UNO Based ESP8266 NodeMCU Development Board
This video discusses raspberry pi and how we can get started with any type of OS needed for our work. #raspberrypi #mxlinux #sbc
00:00 - Intro 01:23 - Pi / Computer Differences 03:57 - Writing an img File 05:45 - Distro Options for Raspberry Pi 10:20 - Install Pi Imager 11:35 - Using Pi Imager (DL from Imager) 16:05 - Writing a Custom Download 19:55 - Pi Setup 22:27 - Final Comments
We are a participant in the Amazon Services LLC Associates Program, an affiliate advertising program designed to provide a means for us to earn fees by linking to Amazon.com and affiliated sites.
Title Card Music - "Into the Depths" (Sting) by Jingle Punks
“Under Section 107 of the copyright Act 1976, allowance is made for “Fair Use” for purposes such as criticism, comment, news reporting, teaching, scholarship and research. Fair Use is a use permitted by copyright statute that might otherwise be infringing. Non-profit, educational or personal use tips the balance in favor of Fair Use.” - Truthstream Media https://www.youtube.com/c/TRUTHstreammedia
UNO is the widely used microcontroller board for developing a different kind of projects and prototypes. This small development board has all the features of its native IC Atmega328p with additional features. This comes with on-board programmer CH340, so no need to connect an external programmer. Arduino Uno board has a 12V DC barrel jack which can accept up to 12V but use for 9V Max. It has onboard LEDs to indicate power. The IC Atmega328p is removable, so if the Atmega IC is not working then it can be replaced with another one.
In this video, I will be testing the oldest version of raspberry pi os (Raspbian) from mid-2012. This video covers how to install, as well as a few-minute desktop showcase.
In this video I walk through my “Junkbox Arcade” project — a tiny retro-style game console built entirely from parts I already had lying around. Using a Raspberry Pi Pico, an ILI9341 display, a few buttons, and a 3D-printed enclosure, I built a simple handheld arcade game. It’s a great starter project if you’re experimenting with the Pico, retro-inspired games, or small embedded displays. Full source code and build details are in the repo!
Qualcomm’s acquisition of Arduino and the company’s new Terms of Service sparks major concerns in the open source community over privacy and terms of service. What will happen to the Arduino open hardware and how does this effect Linux users? We'll do a dive in today.
00:00 Arduino the Maker Board 01:03 Qualcomm's Aquistion of Arduino 03:21 Will Ardunio Remain Open? 04:34 Adafruit enters.. 07:45 Death of Arduino 08:28 Qualcomm's Reponse to backlash 13:27 My exp with Ardunio
To get content containing either thought or leadership enter:
To get content containing both thought and leadership enter:
To get content containing the expression thought leadership enter:
You can enter several keywords and you can refine them whenever you want. Our suggestion engine uses more signals but entering a few keywords here will rapidly give you great content to curate.


 Your new post is loading...