This is one of my news digests. If you like my editorial choices, there are more to be found by clicking on the "dear reader" link, and on my name above. Enjoy !
Takeoff projects help students complete their academic projects. Register at takeoff projects today to find and learn about different interesting big data projects and grab the best jobs. Get started right now.
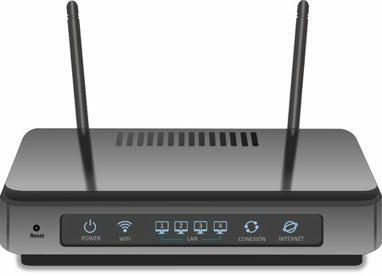
Vous n'avez peut-être jamais entendu parler des routeurs Thread Border, mais ils sont en passe de devenir un élément de base de la maison intelligente : ils travaillent en coulisse pour relier tous vos équipements de maison intelligente.
[Ancient] has a video showing off a fascinating piece of work: a lip-syncing robot whose animated electro-mechanical mouth works like an IBM Selectric typewriter. The mouth rapidly flips between diffe...
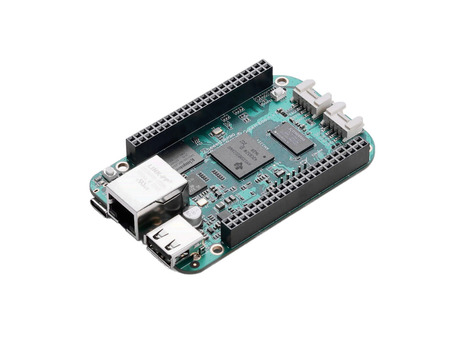
What is SeeedStudio BeagleBone® Green Eco?Seeed Studio BeagleBone® Green Eco is an industrial-grade, open-source single-board computer, co-developed with...
In this video, you’ll learn how to assemble and test a PIR motion sensor step by step. PIR sensors are widely used in smart home automation, energy saving, lighting control, and security systems for residential, office, and commercial buildings.
What you’ll see in this tutorial: 🔹 Quick and simple assembly of a PIR sensor 🔹 How PIR motion sensors detect movement 🔹 Live testing of the sensor in action 🔹 Real-world applications in IoT and smart building projects
PIR sensors are essential components for anyone interested in electronics, DIY projects, Arduino, and automation systems.
👉 If you found this video helpful, don’t forget to Like 👍, Subscribe 🔔, and Share it with your friends to support the channel!
WaveShare E-Paper Hat + is the Black and Gold one, this is not a sponsored video nor is it a paid video. This is just an informative video on which hats are the best for the raspberry pi zero and pi zero projects like the pwnagotchi project.
Un nuevo experimento promete cambiar la forma en que entendemos la calefacción doméstica: convertir el calor generado por la computación en una fuente de energía limpia y barata para los hogares...
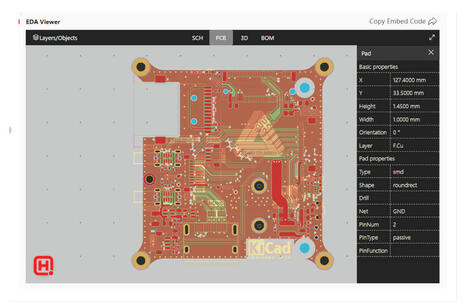
NextPCB, a global leader in PCB manufacturing and assembly solutions, proudly announces the launch of kicadprojects.com, a dynamic open-source community...
A step-by-step guide to integrating the DMR858M module with ESP32 to build custom digital walkie-talkies, covering hardware design, power, UART, and firmware.
A "Hello, World!" program is usually a simple computer program that emits (or displays) to the screen (often the console) a message similar to "Hello, World!". A small piece of code in most general-purpose programming languages, this program is used to illustrate a language's basic syntax. Such a program is often the first written by a student of a new programming language, but it can also be used as a sanity check to ensure that the computer software intended to compile or run source code is correctly installed, and that its operator understands how to use it. - Wikipedia
Arduino (/ɑːrˈdwiːnoʊ/) is an Italian open-source hardware and software company, project, and user community that designs and manufactures single-board microcontrollers and microcontroller kits for building digital devices. Its hardware products are licensed under a CC BY-SA license, while the software is licensed under the GNU Lesser General Public License (LGPL) or the GNU General Public License (GPL), permitting the manufacture of Arduino boards and software distribution by anyone. Arduino boards are available commercially from the official website or through authorized distributors. - Wikipedia
If you like this video, don't forget to hit the SUBSCRIBE! It's FREE!
[WhiskeyTangoHotel] wrote in with his newest clock build -- and he did warn us that it was minimalist and maybe less than useful. Indeed, it is nothing more than a super-cheap ESP32-C3 breakout board ...
As developers and businesses are shifting their attention to the edge, we see a growing interest for home-grown Kubernetes clusters that adopt mission-c...
Parceria com EnQuali: Este episódio conta com o apoio da EnQuali, uma plataforma de soluções industriais que está redefinindo a forma como profissionais de automação se conectam com dados digitais em tempo real. Com uma arquitetura escalável e flexível, a EnQuali acelera a transformação digital de fábricas e plantas industriais, oferecendo ferramentas inteligentes para monitoramento eficiente de ativos físicos e virtuais.
Conheça mais sobre a EnQuali e suas soluções em: www.enquali.com
Neste episódio especial, mergulhamos no universo da robótica educacional com o professor e pesquisador Felipe Oliveira (IFBA). O bate-papo mostra como a tecnologia, que muitas vezes começa como uma brincadeira com LEGO, transforma vidas, desenvolve o raciocínio lógico e prepara crianças e jovens para o futuro. Felipe compartilha sua jornada, demonstra ferramentas acessíveis como o Tinkercad e revela como as habilidades desenvolvidas na robótica podem ser aplicadas até mesmo para salvar vidas com projetos de Inteligência Artificial.
Temas abordados:
O que é robótica educacional e por que ela é tão importante. A jornada: da inspiração com o filho à criação de projetos de impacto. Como a robótica integra na prática matérias como física, matemática e biologia. A importância dos soft skills: pensamento crítico, resiliência e trabalho em equipe. Demonstração do Tinkercad: uma ferramenta gratuita para iniciar na eletrônica e programação. O impacto da educação tecnológica no futuro do mercado de trabalho. Como a tecnologia pode ser usada para resolver problemas reais, como no diagnóstico de doenças. Expectativas e a importância de expandir a robótica para todas as escolas.
Quem Somos: Automação com Vinho é um podcast que conecta tecnologia, indústria e educação em conversas descontraídas e inspiradoras — sempre acompanhadas de uma boa taça de vinho 🍷
Redes e Contato: Instagram → @automacaocomvinho E-mail → automacaocomvinho@gmail.com
Capítulos: 00:00 – Abertura e a inspiração que veio de uma caixa de LEGO 03:10 – O que realmente se aprende com robótica educacional? 14:55 – O papel do professor e a importância de popularizar a tecnologia 26:30 – Desenvolvendo soft skills e preparando para o futuro 38:15 – Da sala de aula para o mundo: O projeto de IA que ajuda a salvar vidas 51:40 – Demonstração prática do Tinkercad: qualquer um pode começar! 1:02:10 – Mensagem final e agradecimentos
Welcome to this detailed and beginner-friendly video on Serial Communication using UART (Universal Asynchronous Receiver/Transmitter)—one of the most widely used communication protocols in embedded systems and microcontrollers.
In this session, we will demystify UART by explaining how devices exchange data over just two lines, making it simple, efficient, and reliable for countless applications.
🎯 In this video, you will learn:
What is UART and why it is important
How asynchronous communication works
UART components: Transmitter, Receiver, and Baud Rate
TX and RX pin connections explained
Step-by-step working of data transmission and reception
Advantages and limitations of UART
Common use cases in microcontrollers like Arduino, ESP32, and STM32
Whether you are an engineering student, IoT developer, or embedded systems enthusiast, understanding UART is essential for interfacing microcontrollers with sensors, GPS modules, GSM devices, and other peripherals.
We’ll also explore practical coding examples and real-world applications to help you implement UART communication in your projects with ease.
At SNS Institutions, our teaching follows the Design Thinking methodology—making complex concepts simple, interactive, and application-driven. This video is a part of our commitment to bridging theory with practical skills in electronics and embedded programming.
📌 By the end of this video, you will be able to confidently set up UART communication and troubleshoot common issues
To get content containing either thought or leadership enter:
To get content containing both thought and leadership enter:
To get content containing the expression thought leadership enter:
You can enter several keywords and you can refine them whenever you want. Our suggestion engine uses more signals but entering a few keywords here will rapidly give you great content to curate.


 Your new post is loading...