The Arduino has also another very good argument to offer: Controlling status LED. At the moment all buttons simply glow but they can not be individually addressed. What can be individually addressed tho is a WS2811 or WS2812 LED stripe. This is basically one long string of LED that forward a data wire so I can power the whole thing with my regular VCC for all the lights and control the data lane with an IC like the Arduino. I found an older type that does not come as SMD but with “real” round LED that can be put on a panel more easily. It’s also RGB � There is only one drawback: If one LED gives up it usually dooms all the others following from operating until it is replaced. The stripe comes with 50pcs tho so I’ll have plenty as backup. Best of it: This solution is dirty cheap and occupies only one of the valuable pins before I have to go for an additional multiplexer. Not that such an IC is expensive but it adds another part to the free flying mix that is already going on.
This is one of my news digests. If you like my editorial choices, there are more to be found by clicking on the "dear reader" link, and on my name above. Enjoy !
Takeoff projects help students complete their academic projects. Register at takeoff projects today to find and learn about different interesting big data projects and grab the best jobs. Get started right now.
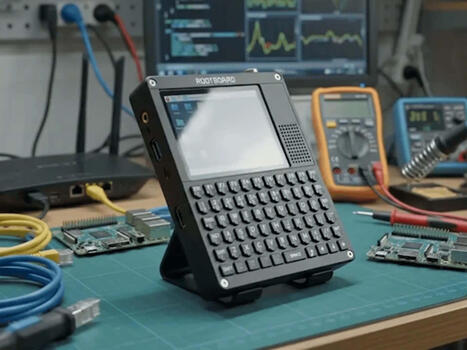
Lots of possibilities and a keyboard: A new handheld device is designed to be quite versatile and is based on the Raspberry Pi. It is essentially an open system and is compatible with various versions of the Raspberry Pi.
About 18 months ago, we brought you a sneak peek at a handheld that started life in the Dutch conference badge scene. At the time it showed promise, but its software wasn't ready for a fair review. No...
I’m starting a new build-in-public project: oomwoo, an open-source robot vacuum you build yourself. Raspberry Pi, ROS 2, 2D LiDAR, Home Assistant, 3D printed, local-first — and open from the first commit.
The Tanmatsu handheld is finally ready for a full review: stable operating setup, a repository of apps, and hacker-focused hardware including Wi‑Fi/me...
Votre écran LCD I2C affiche des carrés noirs, du texte invisible ou reste complètement éteint sur votre projet Arduino ? Pas de panique ! Dans ce tutoriel rapide, je vous montre les 3 vérifications indispensables pour débloquer votre affichage en moins d'une minute. 🛠️ Au programme : Ajustement du potentiomètre de contraste. Vérification du câblage de l'Arduino (VCC, GND, SDA, SCL). Correction de l'adresse I2C dans le code (0x27 ou 0x3F). 🔗 Code "I2C Scanner" pour trouver votre adresse : [Insérez votre lien si vous en avez un, sinon supprimez cette ligne
🔔 Abonnez-vous à CHEKAP-TECH pour ne rater aucun projet Arduino et tutoriel électronique ! 👍 Lâchez un pouce bleu si la vidéo vous a aidé ! www.youtube.com/@chekap-Tech
Immich 3.0 rolls out with major updates across mobile and web, improving editing, automation, video playback, and background syncing, plus many fixes and stability upgrades.
The case, GPS antenna, buttons, buzzer, and 64-color MIP display (including the touch panel and backlight!) are reused from the original unit. The ambient light sensor is positioned in the same location as the original, and components are reused.
To enable ANT+ communication, it is equipped with an nRF52840 and communicates via USB CDC. It also features the BMI270, BMM150, and BMP580 sensors.
Check out the incredible capabilities of the ESP32-C6 Mini WiFi Development Board (DC-10116)! 🛠️ Whether you're a beginner or an advanced electronics hobbyist, this tiny development board is a game-changer for your next IoT project. Featuring native WiFi 6 support and the super convenient Qwiic connector, it simplifies prototyping like never before. In this video: A close look at the ESP32-C6 Mini design. Why the Qwiic ecosystem makes building circuits a breeze. My thoughts on why this belongs in your component bin. Key Features: ESP32-C6 RISC-V SoC Integrated WiFi 6 & Bluetooth 5 Qwiic Connector for solderless sensor integration Ultra-compact form factor for wearable and space-constrained projects Don't forget to Like, Comment, and Subscribe for more electronics tutorials and gear reviews! #ESP32 #IoT #Electronics #DIY #Maker #TechReview #Arduino #WiFi6 #Qwiic
Raspberry Pi Cyberdeck Turns: A Raspberry Pi 4 and Teensy 4.1 team up as a pocket M8-tracker music workstation you can build in a single weekend, screen and battery included. Tagged with raspberrypi, teensy, cyberdeck, diyaudio.
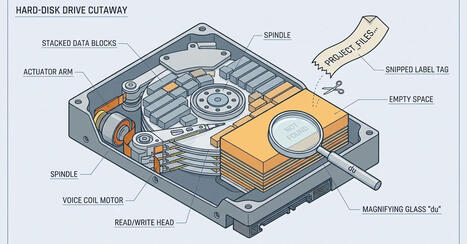
Linux disk-usage tools that find gigabytes du can't see — dust, ncdu, gdu — plus the lsof one-liner for deleted-but-open files. Tagged with linux, diskusage, lsof, du.
Discover how the $35 Raspberry Pi transformed education, DIY electronics, robotics, home automation, and programming around the world. Learn why this tiny computer became one of the most popular single-board computers ever made and how it continues to power amazing projects.
In this video you'll learn:
Why Raspberry Pi was created How it replaced traditional PCs for many tasks Real-world Raspberry Pi projects Why makers, students, and engineers love it The future of Raspberry Pi
👍 Like, Share, and Subscribe for more Raspberry Pi, ESP32, Arduino, AI, and electronics videos.
A new single-board computer is certainly an alternative to a Raspberry Pi, but it features a rather unique architecture. This should make the Debix T62P-01 particularly well-suited for critical real-time applications.
jetpax on GitHub has dropped PiZZa, running Arduino on the Raspberry Pi Zero 2 W. Write sketches in the Arduino IDE and run them on a Raspberry Pi Zero 2 W or the original Raspberry Pi Zero W. A small firmware on the SD card (a Zephyr “loader”) loads your compiled sketch as a runtime […]
Do you have an ancient laptop or desktop just lying around? Transform that aging PC into an NAS, experiment with a new OS, build your own security cam, and more.
Meet Micro Albert, a pocket-sized quadruped robot powered by an ESP32-C3, four SG90 servos, and a tiny OLED display. It can walk, sit, wave, shake hands, display the time and weather, and even show my live YouTube subscriber count over Wi-Fi. In this video I show: • How I redesigned my full-size Albert robot into a miniature version • The ESP32-C3 electronics and custom shield • A simple USB-C rechargeable battery hack using a recycled power bank • 3D printing and assembly steps • Servo calibration and firmware upload • Live data features and serial commands Everything is completely open source: ✅ Firmware ✅ STL files ✅ Wiring diagrams ✅ Bill of Materials ✅ Assembly instructions 📂 GitHub repository: link here If you build your own Micro Albert, post a picture in the comments—I’d love to see your version. Subscribe for more DIY robotics, ESP32 projects, and reinforcement learning experiments. #ESP32 #RobotDog #OpenSource #DIYRobotics #ESP32C3 #Arduino #Quadruped #Robotics #3DPrinting This title and description should work well for both people searching for ESP32 projects and viewers interested in small robots.
To get content containing either thought or leadership enter:
To get content containing both thought and leadership enter:
To get content containing the expression thought leadership enter:
You can enter several keywords and you can refine them whenever you want. Our suggestion engine uses more signals but entering a few keywords here will rapidly give you great content to curate.


 Your new post is loading...