Garlow is a mini GPS Watch that is based on the Arduino Nano board. It’s not really that “mini” compared to other commercial GPS watch like the Garmin, but I really made a great effort to bring the size down. In fact it looks more like a GPS clock. The first version Arduino GPS logger I built was based on the Arduino UNO, and it was larger than 2 packs of poker cards stacked together. It works just as well as a Garmin GPS watch.
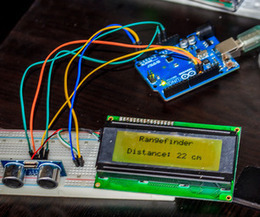
in this project i want to show and explain you a range sensor with ultrasonic and a 20x04 lcd screen. I wrote the code for this project myself and added lots of comments, so that everybody can understand it and use it for other projects (maybe a light range sensor?!). It is easy to build and much more easier to program, it just requires a few cheap parts and can run on battery, for a portable rangefinder.
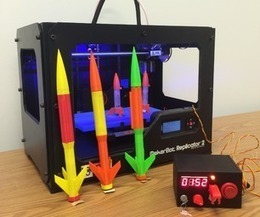
When I was a kid, I loved playing with Estes Rockets, so I decided to get back into the hobby but using all of my maker skizzls. So here's a really cool Arduino Rocket Launcher launching 3D Printed rockets from my MakerBot Rep2! Enjoy! Fully Open Source for anyone to make!
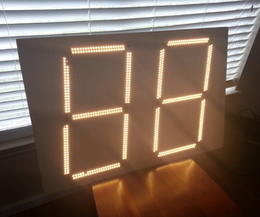
You don't have to be in Times Square to enjoy large bright displays of lights. You can create that in the comfort of your own home with some foam board, LEDs, and our little friend Arduino.
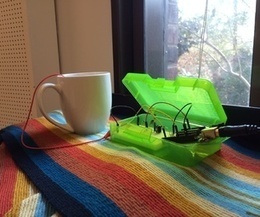
What if you could turn any conductive surface into an instrument? Like, say...a mug of water? Best of all, it's cheap; you'll only need $1 worth of extra electrical components (not including the Arduino).
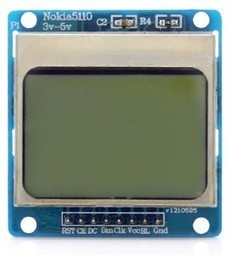
We purchased one of these very cheap, very cool 84×84 LCD backlit screens off of eBay a couple of weeks ago.
It’s a very nice product for adding visual elements to your projects at a very low price. We paid £3.89 for the screen and it was delivered a few days later.
Take a look below for connection instructions and example code from Adafruit on how to get this up and running with your Arduino.
The primary trick of this design is having milled cutouts made for surface mount components to be press fit into, using the circuit board as a kind of frame. Components selected have a thickness near that of the circuit board (1.6mm). Furthermore, to minimize the board thickness, the Atmega328P is inverted so that the bulk of its height below the surface. The result of equal thickness and recessed installation provides a flush appearance. The primary benefit beyond the aesthetic quality is the device is easily slid from a wallet. The high quality boards and the excellent service from oshpark also makes this build possible.
“Q. What is the MicroView? “A. The MicroView is the first chip-sized Arduino with a built-in OLED display.
“Q. Who makes the MicroView? “A. The MicroView was designed by Geek Ammo, and is manufactured by Sparkfun Electronics, in Boulder, Colorado USA. (((Okay, it’s not Ivrea, but who can’t like Boulder, Colorado.)))
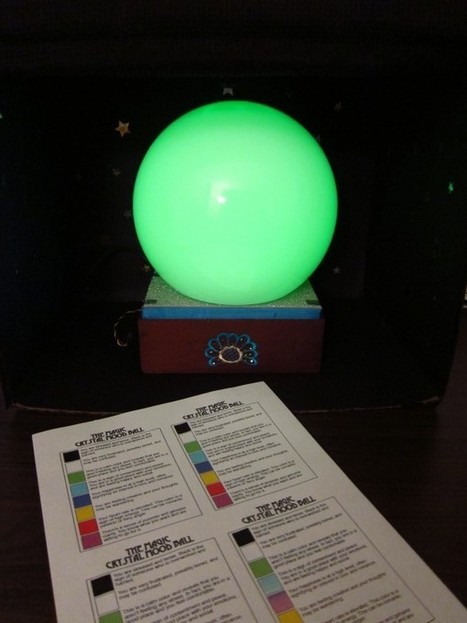
I tried to wire the LEDs couple of times and in different ways, but it didn’t look like a emoticon smile face at all. So after unsuccessful attempts, I decided to simplify the project and turn it into a mood lamp, playing along with RBG LEDs (that I bought in Radioshack) to change colors.
During my search for a cool design for my lamp, I found this plastic ball that looks like one of those future tellers crystal balls, and I decided to used it in a mystical way. Since my idea became a mood ball, I thought it would be fun to have the mysterious ambient surrounding the future teller’s world, in this case, not future, but present.
This instructable will show you how to build a portable Touch Screen Oscilloscope for less than 40 U$! The oscilloscope is one of the most powerful ...
Use a ATTiny85 (can be ATTiny45, ATTiny44) to make an Arduino just for US3.00 and name it as Tiny Arduino.
Tiny Arduino have only eight pins as shown in figure above, Pin4 is ground (Gnd), Pin8 is 5V (Vcc), Pin1 is Reset, Pin2 and Pin3 originally used to connecting the Crystal. In order to utilize all the IO, the internal oscillator (RC Oscillator) is used to replace the external clock which require a crystal. Therefore the Tiny Arduino is now come with five IO. Below shows the Arduino IO functions.
1. There are five IO, each IO can be Input or Output 2. Among the five IO, two of the IO can perform as PWM 3. Among the five IO, three of the IO can perform as Analog Input
I2C may require to extend the features of Tiny Arduino.
Recently, we scavenged an old Lego Mindstorms 1.5 set. It’s fully functional, but the RCX 1.5 Lego software is obsolete and does not run on recent Operating Systems. Besides, the brick has only few in/out ports: 3 inputs and 3 outputs. So, we decided to forget it and reuse Lego parts with an Arduino board.
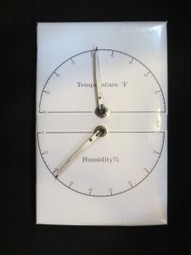
It seems that you can’t visit to a microcontroller website without seeing a digital thermometer/hygrometer build of some kind. After all, it is pretty easy to build and at the same time quite useful as well. In this post, I will show you yet another thermometer/hygrometer build. But instead of using an LCD or 7 segment display for the output, I decided to go retro, using two “needles” to display the temperature and humidity readings instead.
Thoughts about MOSFET configurations for my new Arduino PWM Solar Charge Controller project. I've settled on an N-channel, high-side MOSFET configuration which is the same as the Arduino MPPT controller configuration - some nice synergy there!
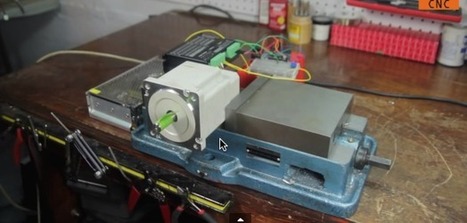
Any stepper motor is great, but the big ones are amazingly impressive. There are numerous stepper drivers dedicated for use with Arduino, but they are generally limited to Nema 17 and Nema 23. Luckily, using larger steppers (Nema 34 in this instance) with Arduino is still easy. Large steppers give you an amazing combination of precision, control and torque that can be useful for anything from home automation to DIY CNC machines. In these two videos, we walk through the setup of the motor, driver, and Arduino.
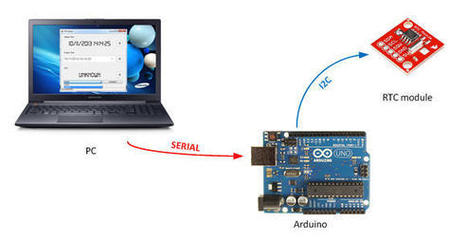
All of you certainly had to configure an RTC chip with the current date and time... today's project can help to perform that task!
The project RTCSetup is composed by two elements: GUI and sketch communicate through a serial connection, with a simple protocol. The source for both of them are available in my Github's repository.
The Edible Email Notifier (EEN) is a reward system for reading your emails. It indicates new emails by dropping M&Ms into a glass. Then, once the emails have been read, an LED lights up to indicate that you may eat the M&Ms. It was featured in Time Out New York's What You'll See at Maker Faire 2013 article, and in their print magazine. If this project continues further, the next steps would add additional functionality so the user may choose which reaction is rewarded. This way a user may unlock the M&M only after a response is sent or inbox zero is accomplished.
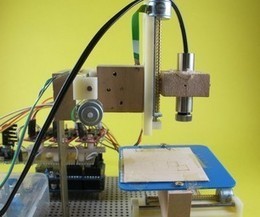
A polar plotter is a plotter with a rotating, extendable arm. Its characteristics differ greatly from those of a traditional plotter, which in most areas have a superior design. You could say the polar plotter is more portable or something, but mainly I made this one because it was more of a challenge.
Create your own 8x8x8 LED Cube 3-dimensional display!
We believe this Instructable is the most comprehensive step-by-step guide to build an 8x8x8 LED Cube ever published on the intertubes. It will teach you everything from theory of operation, how to build the cube, to the inner workings of the software. We will take you through the software step by step, both the low level drivers/routines and how to create awesome animations. The software aspect of LED cubes is often overlooked, but a LED cube is only as awesome as the software it runs.
About halfway through the Instructable, you will actually have a fully functional LED cube. The remaining steps will show you how to create the software.
To get content containing either thought or leadership enter:
To get content containing both thought and leadership enter:
To get content containing the expression thought leadership enter:
You can enter several keywords and you can refine them whenever you want. Our suggestion engine uses more signals but entering a few keywords here will rapidly give you great content to curate.


 Your new post is loading...


![[Beginer] Blink LED with Arduino | Arduino progz | Scoop.it](https://img.scoop.it/Go3dPdtlGTyR37y5VfepJjl72eJkfbmt4t8yenImKBVvK0kTmF0xjctABnaLJIm9)