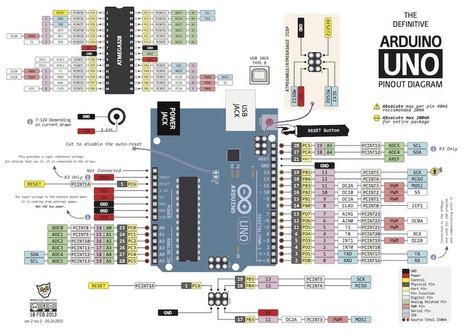
Learn how to use the NXP PCF 8591 8-bit A/D and D/A IC with Arduino in chapter fifty-two of my Arduino Tutorials. The first chapter is here, the complete series is detailed here. Updated 17/06/2013...

 Your new post is loading...
 Scoop.it! Learn how to use the NXP PCF 8591 8-bit A/D and D/A IC with Arduino in chapter fifty-two of my Arduino Tutorials. The first chapter is here, the complete series is detailed here. Updated 17/06/2013... 
No comment yet.
Sign up to comment
Scoop.it!

I’m a child of the 1980s. Miami Vice! Skinny ties! Big hair! Honest, I had hair then…and every town had at leastone good video game arcade.
Axel's insight:
Not Arduino based, but too cool not to be shared.
Scoop.it!
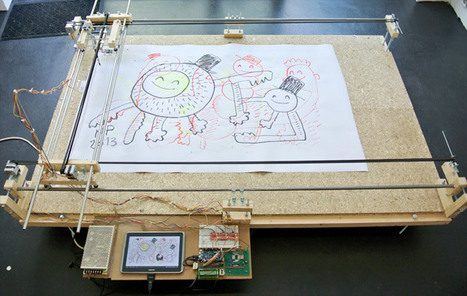
I was always interested to remove the perfection from computer graphics. So thought it would be fun to try to make the most obvious thing first. A machine that uses a paint brush to print a drawing. It runs on an Arduino DUE and an Android tablet.
Scoop.it!

LED cubes are a fascinating item, no matter where you come from the allure of blinking LEDs in various patterns is always attractive. And making your own is a fun challenge that most people can do after some experience with electronics hardware. However most people use single-colour LEDs, as wiring up RGB units triples the complexity of the circuit. Until now.
Scoop.it!

Write messages and show animations on this palm-sized heart-shaped LED display. Works seamlessly with Arduino, and requires only three pins to control. Want a heart matrix of your very own? You can buy this DIY kit for $17.95 on the product page.
Scoop.it!

Cars use an automatic transmission to most effectively change the gear ratio to accommodate driving conditions, without driver interaction. Motorcycles use a clutch and sequential gearbox to accomplish the same thing. Bicycles have no need for a clutch, but also require the rider to change gears themselves. What if the bike changed gears for you, so you (the rider) can focus on keeping your cadence and go up, down, and around as quickly as possible?
Scoop.it!

An Arduino voltmeter that displays voltage on an LCD display. The voltmeter has 4 channels for measuring four different voltages.
Scoop.it!

This project makes use of Seeedstudio's Grove Sound Sensor. Which essentially gives your Arduino ears ! The small sound sensor (microphone) attaches to an Analog pin on the Arduino and can be used to detect the level of noise in the surrounding environment. You could potentially use this sensor to turn a light on in your house after recognising a specific clap/whistle sequence. In this tutorial we are going to connect a few LEDs to the Arduino, and get it to listen for a click/clap, and respond accordingly. Have a look at the video below for this project in Action.
Scoop.it!

The bluetooth shield used in this project is a great way to detach the Arduino from your computer. What is even better, is that the shield allows you to control your arduino from your mobile phone or other bluetooth enabled device through simple Serial commands. In this tutorial we will connect a Grove Chainable RGB LED to the bluetooth shield directly, and send simple commands using the Bluetooth SPP app on a Samsung Galaxy S2 to change the colour of the LED (Red , Green and Blue)
Axel's insight:
Following a question on how to control an infrared LED over bluetooth, here is a nice little tutorial about remote controlling an Arduino over Bluetooth.
Scoop.it!

Digispark is an ATtiny85 based microcontroller development board come with USB interface. Coding is similar to Arduino, and it use the familiar Arduino IDE for development.

Szymon Mantey's curator insight,
January 19, 2015 2:34 PM
jeśli chodzi o USB to akurat ten powinien byc standardowych rozmairów, praktyczne zastosowanie tak małych usb nie wchdozi wgre ze wzgledu an to iż bd mozna go baardzo łątwo zgubic!
Scoop.it!

This article looks at the requirements for protecting the power and data lines in USB connections considering their hot-pluggability and the transients that need to be protected against.
|
Scoop.it!

After reviewing and scouring the internet like most hackers I decided what I wanted wasn't documented well. So I set out to not only do the project fo...
Scoop.it!

The new Arduino robot looks a bit like a robot vacuum cleaner, but it has a lot more going for it and it certainly doesn't suck - well not unless you add an air pump to it. Designed as a collaboration between Arduino and Complubot, the new robot can be used as an easy entry to the world of robotics, both hardware and software.
Scoop.it!

A Do It Yourself (DIY) remote controlled (RC) model maglev with electromagnetic propulsion. The linear motor is built of 6 home-wound 400' x 30 ga, enamel coated, copper wire solenoids in 3 phases mounted to an aluminum undercarriage mounted under a LEGO body containing four 1" x 1" x 3/16" Grade N42 NdFeB magnets for levitation. There are 2 parts to the electronics: the motor controller and the remote.
Scoop.it!

The heart rate, also referred to as pulse rate, has been recognized as a vital sign since the beginning of medicine, and it is directly related to a person’s cadiovascular health. Today, we are going to make a PC-based heart rate monitor system using an Arduino board and Easy Pulse V1.1 sensor. Easy Pulse is a pulse detecting sensor that uses the principle of transmission photo-plethysmography (PPG) to sense the pulse signal from a finger tip. The sensor output is read by the Arduino board, which then transfers the data to the PC through a serial interface. A PC application is developed using Processing programming language to display the received PPG signal and instantaneous heart rate.
Scoop.it!

I develop this MCP23017 Brekout Board to interface a 2×16 LCD display with any microcontroller using a standard I2C bus. Typical 2×16 displays needs at least 6 lines to work (when working in 4-byte mode); in some cases, this will be prohibited for some microcontrollers. With this board, you can control it with only two lines (I2C bus) and, by the same price, obtain a few more IO’s. I use the MCP23017 I2C expander as a bridge. This integrated circuit provides 16 IO’s over a standard I2C bus. All the pins can configure as inputs or outputs independently, and supports high speed I2C (up to 1,7MHz). Also, this device has three hardware address pins that allow connecting up to 8 devices in the same bus.
Scoop.it!

That’s a bucket of power, memory and I/O for not much money – you can get the LaunchPad board for around $15. This LaunchPad has the in-circuit debugger, two user buttons, an RGB LED and connectors for I/O and shield-like booster packs
Scoop.it!

The Free Arduino Shield Webinar teaches you how to create your own shields and how to get them manufactured as cheap as possible.
Scoop.it!

Connect to the internet in seconds. Access it from anywhere with no setup. Reprogram your Core wirelessly from our web IDE or through the command line. Use Wiring code, the same language and libraries that you know and love from Arduino. Everything about the Spark Core is designed to make your life easier.
Scoop.it!
Axel's insight:
The video below walks through the all the code and explains what is going on. Here are all the links that were used in the video.
Scoop.it!
Arduino driver for the ADNS2610 follows the cut, along with sample implementation and a fairly straightforward Processing app to read the data. The part most people will care about is the first chu...
Scoop.it!

From water sensors to weather stations, farm hacking takes off. Steve Spence, an amateur organic farmer in Andrew, South Carolina, has a smart way of irrigating his vegetables. He uses water from his pond and the fish waste to fertilize his plants, a technique known as aquaponics. But the critical balance between the makeup of the water and soil means Spence has to know exactly what’s going on in both. Real-time information about the pond’s make up is imperative to know he’s giving his veggies the best drink of water.
|