Your new post is loading...

|
Scooped by
mickael grad
June 26, 2012 6:19 AM
|
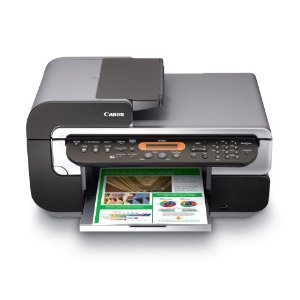
How to Install a Wireless Canon Printer
For many years, Canon printers have been a popular choice for both home and office. The manufacturer has created a number of wireless printers that make it easy to print your work from anywhere in your home or office network. If you have a wireless network, you can connect a Canon wireless-enabled printer to your network in minutes 1. Remove your printer from the box and remove all of the packaging material that came with it. Your printer will ship with a piece of tape holding the cover shut, so be sure you remove this tape before setting your printer in place. 2. Find a suitable spot for the printer on your desk, then install the print cartridges in the printer. Plug the printer in and power it on. 4. Log on to your computer and insert the software installation CD that came with your Canon printer. Allow the software to install and find your printer. You may be prompted for the name of your wireless network during the installation process. You can find this information by placing your mouse cursor over the wireless network icon in your system tray. You may also be prompted for the password you created to secure your wireless network, so make sure you have that available as well. 5. Connect the wireless USB setup cable when prompted by the software. Connect the square end of the USB cable to the printer, then connect the flat end to a free USB port on your computer. The USB slots on your computer will be small slots, two or three grouped 6. 6. together. Remove the USB cable when you receive notification that the installation is complete. The printer will now be communicating with your wireless router via its built-in wireless card
|
|
Scooped by
mickael grad
June 26, 2012 6:16 AM
|
Canon Printing Setting up a Wireless Printer in 5 Easy Steps
1. Determine the Type of Wireless Printer You'll be using the wireless router to connect the new wireless printer to your home network so make sure the router is up and running. Most new computers and wireless printers are equipped with either Bluetooth or Wi-Fi capabilities. If your printer is not wireless you can purchase a wireless card that plugs into a USB port. 2. Select the Location of the Wireless Printer The wireless printer should be set up in a place at home or in the office that is accessible to everyone and where there is ample space for paper, printer ink and other supplies. If you are using Bluetooth wireless you may want to give this some thought since Bluetooth printers have a smaller wireless range than Wi-Fi printers. 3. Enable Printer Sharing The server computer's operating system must be informed that the printer you are adding to the network is a wireless printer. (The server computer is the one the printer is connected to.) In Windows Vista, this is done by accessing the network settings in the Control Panel and then activating file and printer sharing in the local area network settings. For Windows XP go to Start, Control Panel, Printers and Other Hardware, "View installed printers or fax printers." Right-click on your printer and select "Sharing", then select "Share this Printer." Give the printer a name and click OK. 4. Add the Wireless Printer to any other Computers on your Network The other computers on the network must also be set up for using the wireless printer. To do this in Windows Vista, open the Control Panel in the classic view and then open Printers. Right click on the printer that is going to be shared, and then open Properties. In Properties, check the box that allows the printer to be a shared device. For Windows XP you will need to do the following: Open Control Panel, Printers and Faxes, and click on "Add a printer."This will take you into a wizard to find the printer you shared previously.Click Next until you are at the Local or Network Printer page.Select "A network printer or a printer attached to another computer" and click Next.Now click "Browse for a printer" and click Next. This will display your workgroup, the PCs connected to it and any printers that are attached to them.Click on the wireless printer you shared earlier and click Next. [This should install the driver automatically. If not, you may need to get the CD software that came with the printer.]Now click Yes to make the wireless printer the default printer for this PC (or No if the computer already has one attached to it).Click Finish. 5. Troubleshooting Wireless Printers Both this computer and the one the wireless printer is attached to might need a reboot. If you're not seeing the computer it is attached to, double-check that all computers have the same network name: go to Control Panel, Performance & Maintenance, "See basic information about your computer." From there click on "Computer Name" and your workgroup will be displayed. If you're not seeing the printer, make sure it's switched on. If printer still doesn't work, you may need to install the printer driver using the software CD that came with it.
|
|
Scooped by
mickael grad
June 20, 2012 5:47 PM
|
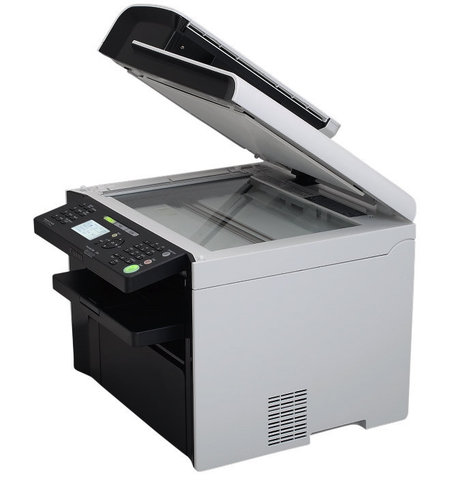
How to Clear a Paper Jam on a Canon Inkjet Printer
For many people, maintaining a Canon Inkjet Printer in the home or office can be expensive and frustrating. There are numerous error messages and they always come at inconvenient times. Many Canon printers today have LCD monitors to help us understand problems that arise, however, many inkjet printers do not come with such monitors. Most of us do not read the Canon Inkjet Printer manuals thoroughly and have little to no idea what the blinking error light means. Paper jams are among the most common problem with Canon Inkjet Printers. Follow these instructions to learn how to clear a paper jam on a Canon Inkjet Printer: Instructions 1 Protect yourself from shock. Disconnect the power cord from the back of the Canon Inkjet Printer. This is an important step when working inside ANY electronic device. 2 Unhinge the back access panel of the printer. It seems repetitive to say this, but this door will be in the BACK of the printer. 3 Look through the opened back panel and look for paper. Remove any and all paper you find jammed there. 4 Close the back access panel. Make sure that it latches into place and looks the same way that it did before you opened it. 5 Find the front or top access panel. This is the panel you would lift to change ink cartridges. Open this access panel. If the carriage that holds the ink cartridges moves, then you forgot to unplug the printer, go back and do that now. Look for paper that may be jammed in this area of the printer. 6 Remove any paper you find jammed here. When pulling from the front there will be resistance from the paper feeder. Pull slowly or the paper will rip and create a more stressful problem. 7 Close the front access panel. Make sure that it falls or latches back in place. It should look the same way that it did before you opened it. 8 Plug the printer's power cord into the wall outlet, and attempt to print again. If the printer prints the job, then you have successfully removed the paper jam.
|
|
Scooped by
mickael grad
June 18, 2012 7:19 PM
|
How to Troubleshoot a Canon Photo Inkjet Printer
Canon USA has an excellent technical support page, but before you seek out their help tries troubleshooting your Canon Photo Inkjet Printer on your own. There are a few basic steps you can do to troubleshoot a Canon Photo Inkjet Printer. Instructions 1 Make sure the printer is set up correctly. The printer must be plugged into the wall, powered on and connected to a computer to function properly. 2 Check for error messages. Occasionally, a printer will spell out what's wrong with it with a pop- up window. Check the status light on the printer too and read the manual to see what it means. 3 Check for paper. Make sure the paper is loaded correctly and is not jammed. Look over the manual to see how to clear paper jams without damaging your printer further. 4 Run a self-test. Many printers have a self-test feature that will help you pinpoint the problems. Operations will vary, consult the manual. 5 Run a driver test. This is done from the printer's software. Before you print, you have the option to enter "Printer Properties." From there, find a "Maintenance" or "Cleaning" tab. Here, you can run a test page. 6 Look over the test page. Bars, uneven patterns and white spots indicate dirty printheads. Faded or missing colors means its time to change a cartridge. 7 Clean and align printheads. This can be done from the same maintenance page from which you ran the test page. 8 Replace cartridges. When ink runs low, its time to replace the cartridge. Take note of the part number written on the cartridge and buy one just like it. 9 Reinstall the drivers. Try uninstalling the drivers and reinstalling from the disc that came with the printer. Or look for patches and updates on the Canon Web site.
|
|
Scooped by
mickael grad
June 4, 2012 4:30 PM
|
Why Does My Canon Multipass Printer Print Boxes Instead of Text?
The problem of a Canon Multipass printing only boxes is not uncommon. This issue actually can be seen on any printer, particularly older ones, and also will sometimes manifest in nonsense characters instead of just boxes. Driver Issues The most common reason for this problem is an incorrect or outdated print driver, which can be corrected easily by downloading the newest driver from the Canon website. Spooler Issues Sometimes the print spooler can become overwhelmed and lose track of jobs, causing nonsense printouts. This can be fixed by turning the printer off and then unplugging the connection to the computer for 30 seconds. Memory Overload Many printers (particularly older ones) have very little memory and are easily overloaded. Avoid this by limiting the amount of pages you send to your printer at once.
|
|
Scooped by
mickael grad
May 31, 2012 5:21 PM
|
Configuring the Wireless Print Server and Installing the Driver
Remove the installation disc for the MX700, then insert the installation disc for the wireless print server in the disc drive. An installation program will run. 8 Click on the button to start the installation. It may say "Next" or "Install Now." 9 Connect a USB cable to the print server and the printer. Click "Next" if required by the installation program. 10 Connect an Ethernet cable to the wireless print server and the wireless router. Click "Next" if required by the installation program. 11 Click on the option to obtain an IP address automatically, then click "Next," if required by the installation program. 12 Double-click on the wireless network the wireless print server will be using from the list of available networks. 13 Enter the wireless security key. You may need to select the wireless security type as well, depending on the brand of wireless print server. 14 Disconnect the Ethernet cable, then restart the wireless print server by unplugging it and replugging it. Once the print server has been set up, you will be required to install the Print Server's driver. If the program does not automatically proceed to the driver installation, click on the button to proceed. 15 Select the printer that is connected to the wireless print server from the list of printers, then click "Next," if necessary. After the driver copies, you may be asked to print a test page. If not, click on "Finish.
|
|
Scooped by
mickael grad
May 29, 2012 6:30 PM
|
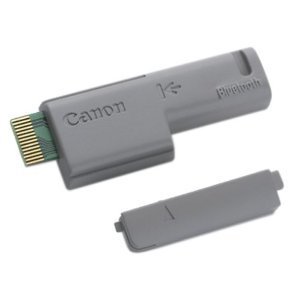
How to Change a Canon Printer From USB to Bluetooth
Some Canon printers possess the ability to connect to your computer via both USB and Bluetooth. When connecting through a Bluetooth connection, you do not need any wires or cables running between the computer and Canon printer. If you have been using the USB connection, you can change to Bluetooth at any time, as long as your Canon printer is Bluetooth enabled. If not, you can't adjust your printer to function as a Bluetooth device. Instructions 1 Remove the USB cable connection. You don't need to add any new drivers because the current printers are already installed from your USB connection. 2 Click the "Start" button on the desktop and select the "Run" option. A small window appears on your screen. 3 Type "bthprops.cpl" (without the quotation marks) and click "OK." This opens the Bluetooth settings window. 4 Click "Add" in the window then chose "My device is set up and ready to be found." Click "Next" and the computer scans for any nearby Bluetooth devices. 5 Choose your Canon Bluetooth printer from the list that pops up and click "Next." The printer now connects to your computer and you can begin using it with the wireless connection
|
|
Scooped by
mickael grad
May 29, 2012 6:25 PM
|
Canon Printer Won't Print
Canon is an electronics company that produces a variety of different products, including computer printers. These printers connect to your computer typically through a standard USB data cable and print any document you choose. However, if the Canon printer is not printing you need to determine what is causing the problem and correct whatever the issue is. Instructions 1 Check the cable connection running from the Canon printer to your computer. If the USB data cable is not completely connected into either the computer or the printer the print request is not going to reach the printer. 2 Fill the paper tray of the Canon printer. If there is no paper (or only a few sheets) the printer is unable to print the document. Fill the printer tray and retry to print the document. 3 Open the document you want to print and select the "Print" option. Click the printer selection and choose the Canon printer. If the Canon printer is not selected as the go-to printer it does not receive the printer request. 4 Install the Canon printer's drivers. Without the drivers the computer is unable to send the request to the printer. These drivers are available on a driver installation CD that came with the hardware. Insert the CD into the computer and follow the prompts of the installation wizard. 5 Change out the ink cartridges of the Canon printer. If the cartridges are running out of ink the printer is unable to produce the document.
|
|
Scooped by
mickael grad
May 18, 2012 3:21 PM
|
Duplex Printing in iMac Word on a Canon Printer
Duplex printing, or printing on both sides of a sheet of paper, is a great way to save paper. You have two options for duplex printing on a Canon printer from Microsoft Word on your iMac: manual duplex or automatic duplex printing Manual To duplex print manually, you print the odd numbered pages of your documents first, flip the printed sheets over, then print the even numbered pages. Microsoft Word makes this process easy. The Microsoft Word menu in the Copies & Pages drop-down menu in the Print dialog box allows you to select whether to print all odd or all even pages. Automatic The automatic duplex printing option in supported Cannon printers lets you print double-sided documents without printing one side and then turning over the pages to print the other side. If your Canon printer supports automatic duplex printing there will be a Duplex Printing & Margin option in the print dialog box. Advantages Duplex printing is good for the environment since it reduces by half the amount of paper required to print your business documents. From a business perspective, duplex printing can cut your expenses by reducing the amount of paper you need to purchase. By producing smaller, lighter documents, you can also lower storage and postage costs.
|
|
Scooped by
mickael grad
May 1, 2012 2:30 PM
|
Delete Queued Print Job in Windows XP / Windows 2000 in Canon
If a print job is corrupt and does not print clearly, does not print at all or is preventing other queued jobs from printing, delete the queued job. To perform this task, follow this procedure: On the Windows taskbar, double-click the printer icon located to the left of the time. At the Printer window, select the print job, under 'Document Name' column, to highlight it. From the 'Document' menu, select 'Cancel'. Repeat steps two and three to cancel another print job. If the printer icon is not located in the Windows taskbar, follow this procedure: Open the Printers FolderDouble-click the printer icon to open the print queue windowClick 'Printer'. Click "Cancel All Documents' Note: The document may remain displayed with the Deleting message. Wait for about 2 minutes. If the document remains displayed even after 2 minutes, follow this procedure: Turn off the printer.When the printer operations stop completely, try to click 'Cancel All Documents'. If the print job cannot be cancelled or will not stop printing, please follow these steps: Close the Printer window. Shut down the computer. Disconnect the printer cable (USB or parallel cable). Restart the computer. If a message window appears asking to cancel printing, select 'Yes'. After all print jobs have been cancelled, reconnect the cable to the printer and then try to print again. Install The Print Head And Inks Correctly IP90. Install the print head Install the print head by following the procedure below. Open the paper support and paper output slot cover of the printer. <1> Paper Support
<2> Paper Output Slot Cover Power the printer on.
|
|
Scooped by
mickael grad
April 26, 2012 7:31 PM
|
How to Install Canon Printers Without the Disks
canon printers are more commonly used for personal computers, as opposed to commercial use. These particular printers usually come with installation disks that are used to install the hardware's software drivers on the computer, but it's easy to misplace those disks over time. Luckily, the Canon support site provides software drivers for Canon printers, allowing users to install the software without the disks. 1 . Go to the official Canon Global website in your computer's Internet browser. 2 . Click the "Support <Drivers/Downloads>" tab along the left side of the Canon Global homepage. Select your region on the interactive map that appears on the right side of the tab options, and select the subregion where you are located. 3 . Select your product type, and click "Printers & Multifunction" to begin searching for your Canon product type. Click the product series that relates to your Canon printer. 4 . Scroll through the list of Canon printer models in the product series. Click the "Drivers & Software" link next to your Canon printer's thumbnail image. You will be redirected to the printer's product and overview page. 5 . Scroll down the Canon printer's product and overview page to the Drivers and Downloads section of the page. Click the "Select Your Operating System" drop-down bar. Select the name of your operating system, and click the red arrow to retrieve the software driver for your system. 6 . Click the .exe link under the firmware files that will be listed for the Canon "Software & Drivers" section. 7 . Run the Canon printer driver's .exe file from the File Download box that will appear. Click "Open" once the driver is processed. This file download will open the Canon installation wizard. 8 .Follow the system prompts in the Canon installation wizard to connect your Canon printer and complete the installation process.
|
|
Scooped by
mickael grad
April 26, 2012 7:28 PM
|
How to Install a Canon PIXMA MP160 Printer
the Canon PIXMA MP160 printer is an all-in-one photo printer. This printer offers high-quality resolution that gives photos a rich, dynamic finish. Using the Canon MP160 is a user-friendly process, and so is installing it, even for relatively inexperienced computer users. 1 Open the official Canon website (see Resources). When it opens, click on the "American" demographic symbol. 2 Click on the "Support and Drivers" tab on the left side of the screen. Select "Canon USA" and the screen will redirect to a popup screen. When the popup screen loads, click on the "Printer" icon. You will be prompted to locate and select your product's name and model number. 3 Choose your product's name and model number by clicking on the designated drop down bar in the middle of the screen. Click on the MP160 product name and model number. Your screen will be redirected to an operating system prompt. Choose your operating system in the designated drop down menu when the next screen loads. 4 Download the Canon MP160 setup application. Click on the Canon MP160 link that will be generated based on the information you provided. A file download dialog window will appear on your computer's screen. Click on the "Save" option that will be presented in this window. When the setup application download is complete, click on the "Open" action to access the Canon MP160 installation wizard. 5 Agree to the Canon Manufacturer Terms of Use. This will be the first screen that will be displayed in the Canon MP160 installation wizard. Once you have read and reviewed the Canon manufacturer user license agreement, follow the prompts that will be listed in the Canon MP160 installation wizard to complete the installation process. 6 Select all the default settings by simply clicking on the "Next" option that will be displayed at the bottom of the installation wizard's window. 7 Click the "Finish" option to complete and conclude the installation process. The Canon MP160 portal will open automatically once the installation wizard is closed. Choose all of the recommended settings in the Canon MP160 portal. The last screen will display the option to print a test page. Click on this option to test the printer's connection and installation, and ensure that it is printing correctly.
|
|
Scooped by
mickael grad
April 26, 2012 7:24 PM
|
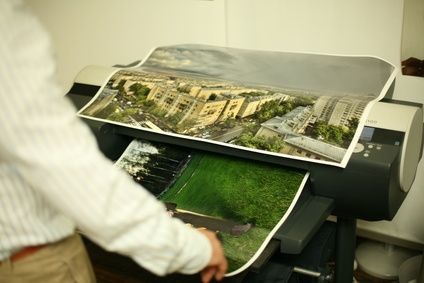
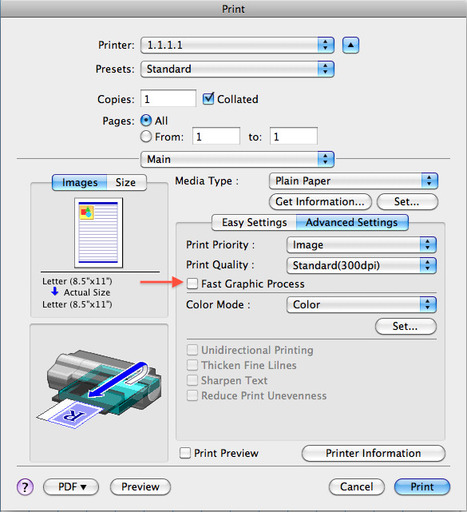
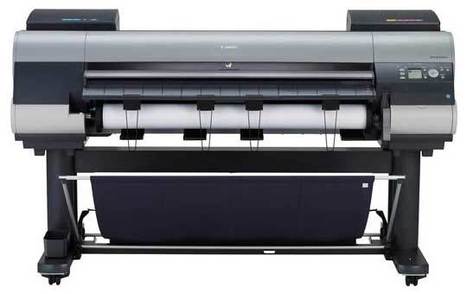
Printing Issues on Canon imagePROGRAF Large Format Printers (Mac OSX )
A number of users may come across problems printing from Vectorworks to Canon's imagePROGRAF line of large format printers. This problem may include missing text, incorrect scaling and randomly disappearing geometry. Normally the issue is not present when the user attempts to Export to PDF instead, but then can become apparent again when trying to print that PDF from Preview or Adobe Reader. (This is primarily an issue with the Canon print drivers in Mac OSX 10.6) This may be corrected by going to the File > Print > Printer Settings in Vectorworks, then under the Main menu, in the Advanced Settings tab, uncheck the option for "Fast Graphics Process
|
|
|
Scooped by
mickael grad
June 26, 2012 6:17 AM
|
How to Set Up Canon MX700 Wireless Printing
The Canon MX700 multi-function printer does not have wireless printing capabilities built in, but you can connect the printer to a wireless print server to achieve the same results. When setting up the wireless print server, you need to install both the printer and printer server driver on your computer, as well as configure the print server for the wireless network you intend to use Insert the installation disc for the MX700 into the computer's disc drive. A installation program will run.2 Click on "Easy Install." 3 Click "Install." On the next screen, click "Yes" to agree to the license agreement. 4 Click on "Use the printer via USB," then click "Next." 5 Connect the USB cable to the computer and the MX700. 6 Click "Next" twice. Click on "Agree" or "Do not agree" on whether you want to participate in the PIXMA extended survey program, then click "Exit." Configuring the Wireless Print Server and Installing the Driver 7 Remove the installation disc for the MX700, then insert the installation disc for the wireless print server in the disc drive. An installation program will run. 8 Click on the button to start the installation. It may say "Next" or "Install Now." 9 Connect a USB cable to the print server and the printer. Click "Next" if required by the installation program. 10 Connect an Ethernet cable to the wireless print server and the wireless router. Click "Next" if required by the installation program. 11 Click on the option to obtain an IP address automatically, then click "Next," if required by the installation program. 12 Double-click on the wireless network the wireless print server will be using from the list of available networks. 13 Enter the wireless security key. You may need to select the wireless security type as well, depending on the brand of wireless print server. 14 Disconnect the Ethernet cable, then restart the wireless print server by unplugging it and replugging it. Once the print server has been set up, you will be required to install the Print Server's driver. If the program does not automatically proceed to the driver installation, click on the button to proceed. 15 Select the printer that is connected to the wireless print server from the list of printers, then click "Next," if necessary. After the driver copies, you may be asked to print a test page. If not, click on "Finish.
|
|
Scooped by
mickael grad
June 20, 2012 5:52 PM
|
How to Troubleshoot a Canon Photo Inkjet Printer
Canon USA has an excellent technical support page, but before you seek out their help tries troubleshooting your Canon Photo Inkjet Printer on your own. There are a few basic steps you can do to troubleshoot a Canon Photo Inkjet Printer. Instructions 1 Make sure the printer is set up correctly. The printer must be plugged into the wall, powered on and connected to a computer to function properly. 2 Check for error messages. Occasionally, a printer will spell out what's wrong with it with a pop- up window. Check the status light on the printer too and read the manual to see what it means. 3 Check for paper. Make sure the paper is loaded correctly and is not jammed. Look over the manual to see how to clear paper jams without damaging your printer further. 4 Run a self-test. Many printers have a self-test feature that will help you pinpoint the problems. Operations will vary, consult the manual. 5 Run a driver test. This is done from the printer's software. Before you print, you have the option to enter "Printer Properties." From there, find a "Maintenance" or "Cleaning" tab. Here, you can run a test page. 6 Look over the test page. Bars, uneven patterns and white spots indicate dirty printheads. Faded or missing colors means its time to change a cartridge. 7 Clean and align printheads. This can be done from the same maintenance page from which you ran the test page. 8 Replace cartridges. When ink runs low, its time to replace the cartridge. Take note of the part number written on the cartridge and buy one just like it. 9 Reinstall the drivers. Try uninstalling the drivers and reinstalling from the disc that came with the printer. Or look for patches and updates on the Canon Web site.
|
|
Scooped by
mickael grad
June 20, 2012 5:45 PM
|
How to Diagnose Canon Printer Problems
Canon is one of the largest manufacturers of printers and copiers for home and office use. Canon printers come in several types and models, including laser, inkjet, photo and the very popular all-in-one printers that copy, scan, print and fax. As with all technical equipment, printers can misbehave. Follow the steps below to diagnose Canon printer problems. Instructions 1. General Issues 1 Check for a paper jam. Paper jams occur when one or more sheets of paper become stuck in the feeding or printing mechanism. Gently remove any jammed paper and reset the printer. 2 Check ink levels. Those ink cartridges run out fast. If your printer looks like it is printing but nothing comes out on the page, you might be out of ink. Try replacing the cartridge and printing again. 3 Check for a clogged print head. If you know you have ink, the print head might be clogged. Navigate to "Control Panel > Printer > Right Click > Properties > Maintenance > Clean Cartridges" to attempt to clean the print head. 4 Reinstall printer drivers and software. If none of the above helps, try uninstalling and reinstalling the printer and software to correct possible software bugs, errors or conflicts. 2. Canon-Specific Issues 5 Check printer drivers. Navigate to "Control Panel > Printers > Right Click > Properties > Update Driver" to check for a new driver for your printer. You can also find drivers and software on the Canon Support site (see Resources). 6 Resolve the Waste Ink Error. Press menu on the printer and press scan/copy to enter service more. Press the right arrow to access "NVRAM." Set ABS-M level to 0. Set ABS-P level to 0. Press "Stop" to exit. 7 Resolve Wrong Cartridge Message. Turn off the printer and unplug the power cord. Remove the cartridges and the print head. Clean the print head in lukewarm water. Set it aside to dry. Clean the contacts gently with an eraser and wipe with a tissue. Reinstall the print head and reinsert the cartridges. Run a cartridge alignment. 8 Resolve E0D02 error. Clean the cartridges and the sender strip. The sender strip is behind the rubber drive belt behind the main hatch. It runs horizontally across the machine. Wipe it gently with a lint free cloth.
|
|
Scooped by
mickael grad
June 4, 2012 4:31 PM
|
How to Hook Up a Printer to a LAN & USB at the Same Time
Most printers currently produced have multiple methods of connecting to computer systems. Some of these methods include a USB data cable and a LAN cable. LAN is an Ethernet-based cable connection that is usually used for networks and Internet connections. However, it is also possible to stream the printer request information from the connected computer to the printer if you want to keep the USB ports open or if you want to hook up the printer to a local network so multiple computers have access to the printer. Instructions 1 Insert the USB data cable into the USB port on the back of the printer. 2 Plug the other end of the USB cable into a USB port on the computer system. 3 Attach the LAN cable (Ethernet cable) into the LAN connection port on the rear of the printer. Make sure the printer has this connection. If there is no LAN cable connection you are unable to hook up the printer through this method. 4 Connect the opposite end of the LAN cable into either a network LAN port on the computer, or an "In" connection on the network hub you have multiple computers connected to.
|
|
Scooped by
mickael grad
May 31, 2012 5:24 PM
|
Canon Printer Won't Print
Canon is an electronics company that produces a variety of different products, including computer printers. These printers connect to your computer typically through a standard USB data cable and print any document you choose. However, if the Canon printer is not printing you need to determine what is causing the problem and correct whatever the issue is. Instructions 1 Check the cable connection running from the Canon printer to your computer. If the USB data cable is not completely connected into either the computer or the printer the print request is not going to reach the printer. 2 Fill the paper tray of the Canon printer. If there is no paper (or only a few sheets) the printer is unable to print the document. Fill the printer tray and retry to print the document. 3 Open the document you want to print and select the "Print" option. Click the printer selection and choose the Canon printer. If the Canon printer is not selected as the go-to printer it does not receive the printer request. 4 Install the Canon printer's drivers. Without the drivers the computer is unable to send the request to the printer. These drivers are available on a driver installation CD that came with the hardware. Insert the CD into the computer and follow the prompts of the installation wizard. 5 Change out the ink cartridges of the Canon printer. If the cartridges are running out of ink the printer is unable to produce the document.
|
|
Scooped by
mickael grad
May 31, 2012 5:19 PM
|
How to Set Up a Canon Wireless Printer
Power on your Canon wireless printer after you have removed it from the packaging. Insert the ink cartridges when prompted on the screen. Your first printer ink cartridges are included. If you have a computer already connected to a desktop or Windows XP, skip to step 7. Print and scan the alignment sheet as prompted on the printer screen. Press OK when done. Insert the setup CD even if you are connecting your Canon printer via wireless network. There are printer drivers created for wireless networks on this CD. Follow the CD setup instructions on the screen. Have the printer find the actual wi-fi network signal that you will be using and select that on the printer screen and on your computer. The wi-fi light will be on when the network is connected. Print a test page from your computer when everything is completed on the screen and if you are prompted by the Canon setup CD to do so. Go into printers and ensure Canon is set as your default printer. This will ensure all software will use this as your primary printer. There will be a check mark next to it. Go into printer setup and search for a printer connected via network on your computer. This may take a few minutes. You must enable printer and file sharing on both computers before you will be able to view a USB connected printer on a network. Select use this printer when it finds your printer. Make sure it is set to be the default printer and print a test page.
|
|
Scooped by
mickael grad
May 29, 2012 6:28 PM
|
How to Connect a Printer using Bluetooth
Bluetooth is a powerful wireless technology that lets your computer discover and share devices. Connecting a printer using Bluetooth is simple. Instructions 1 Make sure your printer is Bluetooth enabled. Some printers come this way (read the manual to verify) but others require adapters. Shop online or visit an electronics store to find an inexpensive Bluetooth printer adapter. 2 Set up your adapter. All you need do is connect one end to your computer and the other end to your printer and it will install itself. 3 Turn on the printer. Make sure it is connected to a working electrical outlet and the printer power is on correctly. 4 Open Bluetooth devices on your PC. After installing your Bluetooth adapter, go to the control panel and open "Bluetooth Devices." 5 Add printer automatically. This is less secure, but easier. From the options tab, make sure the options "Turn discover on" and "Allow Bluetooth devices to connect to this computer" are checked. Your printer and computer should then find each other automatically and begin working. If you'd rather not let other devices discover your computer, follow steps 6 and 7 instead. 6 Add device manually. From the devices tab, select "Add Device" and run the installation wizard to find your printer. 7 Use the "Add Printers" wizard. You can also add the printer by clicking "Start" and "Printers and Faxes" and then "Add a Printer." When the wizard pops up, select "Bluetooth printer" and Windows will search for your printer automatically.
|
|
Scooped by
mickael grad
May 25, 2012 6:16 PM
|
• How to Receive a Fax on a Canon Pixma Multifunction Printer
multifunction printer for Windows and Mac systems, the Canon Pixma accepts documents directly from your computer as well as digital photos from a memory card or microdrive. The plain-paper printer also lets you scan and fax documents to a stand-alone fax machines and other computers. Canon Pixma's fax component is accessible through the device's control panel. Before accepting faxes from another fax machine or computer, you must manually select the "receive fax" mode on the printer and specify the type of receiving mode you want the fax/printer to use Turn on your Cannon Pixma by pressing the "ON/OFF" button on the printer's control panel.2 Press the "FAX" button on the control panel, then the "Menu" button. The "Fax menu" will appear on your printer's display. Press the right or left arrow button to select "Receive Mode settings." 3 Press the up or down arrow button to select a receive mode: "Fax priority mode" for receiving faxes and sometimes voice telephone calls with the printer; "Fax only mode" for receiving faxes only with the printer. Use this setting if your Cannon Pixma is on a dedicated phone line and no voice calls are received on the phone line; "DRPD" for a phone line that contains a ring pattern detection service for voice calls and fax calls; or "Tel priority mode" for receiving mainly voice calls on this telephone line and only sometimes faxes. 4 Press the "OK" button to accept the receive mode. Press the "Back" button to exit the "Fax menu." The word "Standby" will appear next to the wording "Status:" on your printer's display panel, indicating that your Cannon Pixma is ready to receive faxes. Setting the Number of Rings For Receiving Faxes 5 Press the "FAX" button on the control panel, then the "Menu" button. The "Fax menu" will appear on your printer's display. 6 Press the right or left arrow button to select "Maintenance/settings. Press the "OK" button. The "Maintenance/settings" menu will appear on the display. Press the right or left arrow button to select "Device settings," then press the "OK" button. 7 Press the right or left arrow button to select "FAX settings. Press the "OK" button. Press the right or left arrow button to select "RX settings," then press the "OK" button. 8 Press the up or down arrow button to select "Incoming ring," if using the "Fax priority mode" or "Fax only mode." Or select "DRPD: Set FAX ring pat," if using the "DRPD" mode. Press the "OK" button. 9 Press the up or down arrow button to select "Double Ring," "Short-short-long," "Short-long-short" or "Other ring type." Press the "OK" button to accept the ring pattern. Press the "Back" button to exit the "Fax menu.
|
|
Scooped by
mickael grad
May 1, 2012 2:39 PM
|
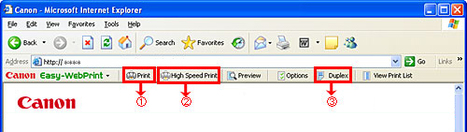
Easy-WebPrint is unavailable with Internet Explorer 7.0. in Canon Printer
Internet Explorer 7.0 includes many of the same printer functions as Easy-WebPrint. Therefore, Easy-WebPrint cannot be installed on a computer with Internet Explorer 7.0 installed. Also, after upgrading IE6.0 to IE7.0 on a PC with the latest Easy-WebPrint installed, Easy-WebPrint will not be available and an error message dialog will be displayed upon starting IE7.0 . When upgrading IE6.0 to IE7.0 in the PC with the latest Easy-WebPrint already installed : When IE7.0 is launched, the following message dialog is displayed, and Easy-WebPrint is not available. In such a case, click OK to close the dialog. When installing Easy-WebPrint on the PC with IE7.0 already installed : At the Easy-WebPrint installation, as the following message dialog is displayed, Easy-WebPrint cannot be installed. In such a case, click OK to close the dialog. When any of the following phenomena occurs, confirm the version of Internet Explorer. Easy-WebPrint cannot be installed.Printing from Easy-WebPrint cannot be performed.The Easy-WebPrint toolbar is not displayed. Internet Explorer 7.0 has similar functions that users of Easy-WebPrint have appreciated : Print(print with a full image) High Speed Print Duplex See the following instructions to find out how to perform these useful functions. (1) --- Print (printing with a full image) (2) --- High Speed Print (3) --- Duplex How to perform printing with a full image Internet Explorer 7.0 enables web page printing with a full image.
Click 'Print' from the File menu, or click the printer icon on the tool bar; printing will start. When clicking Print from the File menu : * The above image shows the beta version of Internet Explorer 7.0. When clicking the printer icon : How to perform High Speed Print To perform High Speed Print, select 'Fast' in Print Quality in the printer driver. a. Click 'Preferences' in the Print window to open the Printing Preferences window. b. Select 'Fast' in Print Quality. How to perform Duplex printing To perform Duplex printing, specify duplex printing in the printer driver. a. Click 'Preferences' in the Print window to open the Printing Preferences window. b. Open 'Page Setup' and select 'Duplex Printing' before printing.
|
|
Scooped by
mickael grad
May 1, 2012 1:52 PM
|
Printer Sharing (Mac OS X) in Canon Printer
By sharing the printer connected to a Mac OS X computer, printing can also be performed with other Mac OS X (10.2.x or later) computers on the same network. Setting outline Install the MP or printer drivers in the print server and the client.Specify the network settings for the print server and the client.Specify the print sharing settings in the print server.Specify the settings of the computer name of the print server.Confirm that the shared printer can be used in the client as well. Procedures Before specifying network settings to share the printer, install the MP or printer drivers on the print server and the client.In the Apple menu, select 'System Preferences'. Click 'Print & Fax' **Mac OS X 10.5.x and 10.6.x users click here. Click 'Sharing'. * The image is an example using the MP500 model. Click 'Share these printers with other computers' to place a checkmark in the box. * The image is an example using the MP500 model. Click 'Printing' to display the Printing tab, and then click 'Printer Setup'. * The image is an example using the MP500 model. In the pop-up menu, select 'Name & Location', and enter information regarding the printer location in 'Location' and then click 'Apply Changes'. * The image is an example using the MP500 model.Confirm that the shared printer can be used in the client as well.In the File menu, select 'Print'. In the Printer pop-up menu, select 'Printer Sharing'* to confirm that the shared printer name, which is set in step 7, is displayed in the sub menu.
|
|
Scooped by
mickael grad
April 26, 2012 7:29 PM
|
How to Install a Canon Printer in Mac Classic
Mac Classic is any version of Mac that came before Mac OS X, but it usually refers to Mac OS 9 and Mac OS 8 since they were the most recent operating systems before OS X came along. While all Mac OS X computers have printer drivers installed on them, most Mac Classic computers do not. To install a Canon printer on Mac Classic, it must be compatible with Mac OS 9 or lower and have an install CD. 1 Put the Canon printer install CD into your Mac and click the icon. Click on the "Install.pkg" to install the printer drivers on your Mac. Click "Continue" and then "Install." 2 Plug your Canon printer into an outlet and connect it to the Mac via the printer port or USB port. Turn the printer on. 3 Eject the disk from your Mac and open the "Chooser" in the Apple menu. 4 Choose the Canon printer's icon from the list and click on "Select a port." 5 Select the printer icon and click "Close." A new window will open prompting you to set up the printer. 6 Align your Canon printer following the directions on your screen and click "Close" when it is finished.
|
|
Scooped by
mickael grad
April 26, 2012 7:26 PM
|
How Do I Install My Canon Printer
How to Install Canon Printers Canon printers typically come with installation discs that contain software drivers to assist with installations. Canon software drivers are also available on the manufacturer's website. Installing a Canon printer takes about 10 minutes How to Install a Canon Printer for Vista Having a printer allows one to print out pictures from your digital camera and documents for work or school. Most printers include software that streamlines the installation of necessary software and drivers. Even if you've lost this CD, How to Install a Wireless Canon Printer For many years, Canon printers have been a popular choice for both home and office. The manufacturer has created a number of wireless printers that make it easy to print your work from anywhere in your home or office network.
|