Canon Printer Support
67.8K views | +0 today
Follow
Canon Printer Support
Get Canon Printer Support from Printer expert technicians of TechBuddies to fix and troubleshoot all Canon Printer installation, uninstallation, drivers, software issues. Call Now Toll Free number +1-855.517-2433.
Curated by mickael grad
Your new post is loading...
Scooped by mickael grad
May 2, 2012 12:52 PM
Scoop.it!

Perform Print Head Cleaning (Mac OS 9) I80 / IP90 in Canon Printer

Perform Print Head Cleaning (Mac OS 9) I80 / IP90 in Canon Printer | Canon Printer Support | Scoop.it

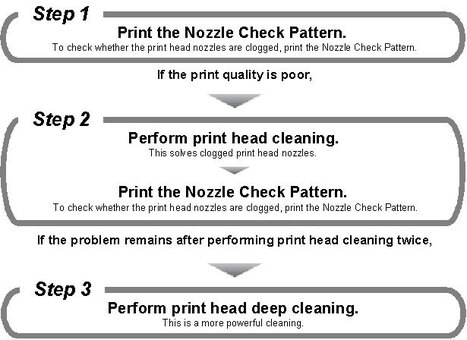
Follow the steps below to perform Print Head Cleaning (Mac OS 9):

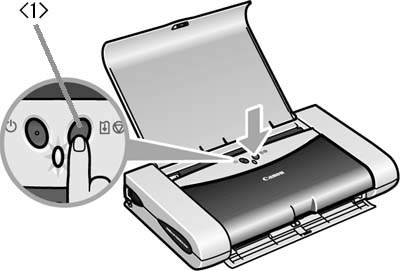
After confirming that the cable is connected and the printer is powered on, perform the following:

From the File menu, select 'Page Setup'.
In the Page Setup dialog, click 'Utilities'.
From the pop-up menu, select 'Cleaning' and click the and click 'Cleaning' icon.
Select the ink tank for cleaning, and then click 'OK'.
Click 'OK'. The power lamp will flash and print head cleaning will start. Do not perform any other operations until printhead cleaning completes.
Print nozzle check pattern by clicking on the 'Print Check Pattern' button to determine if further cleaning is necessary.
Once the page has printed examine the nozzle check pattern.
If the pattern does not print correctly, click the 'OK' button to return to the Printer Utility.Click the 'Deep Cleaning' icon.
Select the ink tank for deep cleaning, and then click 'OK'.
When the confirmation message is displayed, click 'OK'. The Power lamp will flash and print head deep cleaning will start.
Print another nozzle test pattern by holding down the <Resume> button on the printer until the Power light flashes twice. If the pattern still does not print correctly, replace any ink tank that may be low, and then perform another deep print head cleaning.

If printing is still not satisfactory, there may be a problem with the print head

No comment yet.
Scooped by mickael grad
May 2, 2012 11:43 AM
Scoop.it!

How to print the Nozzle Check Pattern in Canon Printer

How to print the Nozzle Check Pattern in Canon Printer | Canon Printer Support | Scoop.it

1. In the Maintenance window, click 'Nozzle Check'.

.

2. When the Nozzle Check window is displayed, move the paper thickness lever to the left, and load a sheet of letter size paper in the auto sheet feeder. Then, click 'Print Check Pattern'.

3. When the confirming message is displayed, click 'OK'. Printing starts. Do not perform any other operations until printing is completed.

4. Examine the nozzle check pattern output.

When the output is normal:

Black ink: The grid pattern is regular without missing lines.
Color ink: White streaks are not visible in the pattern.

**The pattern may vary depending on the printer.

When the output is not normal:

If the following situations are encountered, perform the print head cleaning .

No color is printed. (Nothing appears on the output.)There is any color which is not printed at all. (In the sample below, black ink is not printed at all.)

There are missing lines partially in the pattern for the black ink.

There are white streaks in the color ink pattern.

No comment yet.
Scooped by mickael grad
May 2, 2012 11:14 AM
Scoop.it!

Easy-WebPrint is unavailable with Internet Explorer 7.0. in Canon Printer

Easy-WebPrint is unavailable with Internet Explorer 7.0. in Canon Printer | Canon Printer Support | Scoop.it

Internet Explorer 7.0 includes many of the same printer functions as Easy-WebPrint. Therefore, Easy-WebPrint cannot be installed on a computer with Internet Explorer 7.0 installed. Also, after upgrading IE6.0 to IE7.0 on a PC with the latest Easy-WebPrint installed, Easy-WebPrint will not be available and an error message dialog will be displayed upon starting IE7.0 .

When upgrading IE6.0 to IE7.0 in the PC with the latest Easy-WebPrint already installed :

When IE7.0 is launched, the following message dialog is displayed, and Easy-WebPrint is not available. In such a case, click OK to close the dialog.

When installing Easy-WebPrint on the PC with IE7.0 already installed :

At the Easy-WebPrint installation, as the following message dialog is displayed, Easy-WebPrint cannot be installed. In such a case, click OK to close the dialog.

When any of the following phenomena occurs, confirm the version of Internet Explorer.

Easy-WebPrint cannot be installed.Printing from Easy-WebPrint cannot be performed.The Easy-WebPrint toolbar is not displayed.

Internet Explorer 7.0 has similar functions that users of Easy-WebPrint have appreciated :

Print(print with a full image)

High Speed Print

Duplex

See the following instructions to find out how to perform these useful functions.

(1) --- Print (printing with a full image)

(2) --- High Speed Print

(3) --- Duplex

How to perform printing with a full image

Internet Explorer 7.0 enables web page printing with a full image.
Click 'Print' from the File menu, or click the printer icon on the tool bar; printing will start.

When clicking Print from the File menu :

* The above image shows the beta version of Internet Explorer 7.0.

When clicking the printer icon :

How to perform High Speed Print

To perform High Speed Print, select 'Fast' in Print Quality in the printer driver.

a. Click 'Preferences' in the Print window to open the Printing Preferences window.

b. Select 'Fast' in Print Quality.

How to perform Duplex printing

To perform Duplex printing, specify duplex printing in the printer driver.

a. Click 'Preferences' in the Print window to open the Printing Preferences window.

b. Open 'Page Setup' and select 'Duplex Printing' before printing.

No comment yet.
Scooped by mickael grad
May 2, 2012 11:02 AM
Scoop.it!

Delete Queued Print Job in Windows XP / Windows 2000 in Canon

Delete Queued Print Job in Windows XP / Windows 2000 in Canon | Canon Printer Support | Scoop.it

Location of the Share this printer checkbox varies depending on OS version

Delete Queued Print Job in Windows XP / Windows 2000 in Canon

If a print job is corrupt and does not print clearly, does not print at all or is preventing other queued jobs from printing, delete the queued job.

To perform this task, follow this procedure:

On the Windows taskbar, double-click the printer icon located to the left of the time.

At the Printer window, select the print job, under 'Document Name' column, to highlight it. From the 'Document' menu, select 'Cancel'. Repeat steps two and three to cancel another print job.

If the printer icon is not located in the Windows taskbar, follow this procedure:

Open the Printers FolderDouble-click the printer icon to open the print queue windowClick 'Printer'.Click "Cancel All Documents'

Turn off the printer.When the printer operations stop completely, try to click 'Cancel All Documents'.

If the print job cannot be cancelled or will not stop printing, please follow these steps:

Close the Printer window. Shut down the computer. Disconnect the printer cable (USB or parallel cable). Restart the computer. If a message window appears asking to cancel printing, select 'Yes'. After all print jobs have been cancelled, reconnect the cable to the printer and then try to print again.

No comment yet.
Scooped by mickael grad
May 2, 2012 12:45 PM
Scoop.it!

How to perform Cleaning in Canon Printer

How to perform Cleaning in Canon  Printer | Canon Printer Support | Scoop.it

If a print job is corrupt and does not print clearly, does not print at all or is preventing other queued jobs from printing, delete the queued job.

On the Windows taskbar, double-click the printer icon located to the left of the time.

At the Printer queue window, select the print job, under 'Document Name' column, to highlight it.From the 'Document' menu, select 'Cancel'.Repeat steps two and three to cancel another print job.If the print job cannot be cancelled or will not stop printing, shut down the computer, disconnect the printer cable and then restart the computer.

Close the Printer window.Shut down the computer.Disconnect the printer cable (USB or parallel cable).Restart the computer.If a message window appears asking to cancel printing, select 'Yes'.Verify the printer icon no longer appears on the Windows taskbar. If the icon appears, double-click it and cancel the remaining print jobs as instructed on steps two and three.After all print jobs have been cancelled, reconnect the cable to the printer and then try to print again.

If the print job does not complete, it may be necessary to disconnect the printer cable, power off and on the printer and then reconnecting the cable

No comment yet.
Scooped by mickael grad
May 2, 2012 11:37 AM
Scoop.it!

Print the Nozzle Check Pattern in Canon printer

Print the Nozzle Check Pattern in Canon printer | Canon Printer Support | Scoop.it

.

Cleaning, Deep Cleaning, and Nozzle Check are performed through the Maintenance window.
Do the following to open Maintenance.

1. First, open the 'Preferences' / 'Properties' window.

For Windows 7

Click the 'Start' button from the bottom left of the Windows screen, and then click on 'Devices and Printers'.Click your right mouse button on the listing for your printer, and then select 'Printing Preferences' from the menu that appears.

For Windows Vista

Click / Select the 'Start' from the bottom left of the Windows screen, 'Control Panel', 'Hardware and Sound', and then click on 'Printers'. Click your right mouse button on the listing for your printer, and then select 'Preferences' from the menu that appears.

For Windows XP Home Edition

Click / Select the 'Start' button from the bottom left of the Windows screen, 'Control Panel,' 'Printers and Other Hardware,' and 'Printers and Faxes.'Click your right mouse button on the listing for your printer, and then select 'Preferences' from the menu that appears.

For Windows XP Professional Edition

Click 'Start' from the bottom left of the Windows screen, and 'Printers and Faxes.'Click your right mouse button on the listing for your printer, and then select 'Preferences' from the menu that appears.

For Windows 2000

Click / Select 'Start' from the bottom left of the Windows screen, and 'Settings,' then 'Printers.'Click your right mouse button on the listing for your printer, and then select 'Properties' from the menu that appears.

2. Select the 'Maintenance' tab

No comment yet.
Scooped by mickael grad
May 2, 2012 11:07 AM
Scoop.it!

Install the print head in canon Printer

Install the print head in canon Printer | Canon Printer Support | Scoop.it

Install the print head by following the procedure below.

Open the paper support and paper output slot cover of the printer.

<1> Paper Support
<2> Paper Output Slot Cover Power the printer on.

<1> Power Button Open the print head cover. The print head holder moves to the center.

<1> Print Head Cover
<2> Print Head Holder Pinch and lift the print head lock lever at the front of the print head holder.

<1> Print Head Lock Lever

. Remove the print head from its package and remove the orange protective cap that covers the bottom of the print head.

<1> Protective Cap
<2> Print Head Face

Insert the print head into the print head holder so that the "^" mark faces the "V" mark.

<1> Print Head Arrow
<2> Ink Supply Filter

Lower and close the print head lock lever fully until you hear a click.

<1> Print Head Lock Lever

Next, set the ink tanks. Remove the black ink tank (BCI-15 Black) from its package. Hold the ink tank as shown in the illustration, and remove the orange protective cap, while lifting in the direction of the arrow.

<1> Black Ink Tank (BCI-15 Black)
<2> Protective Cap
<3> Ink Outlet

Set the Black ink tank at an angle in the back so that the ">" mark on the ink tank faces the "<" mark on the print head lock lever.

<1> Ink Tank and Print Head Lock Lever Marks Press down on the <PUSH> mark on the ink tank until you hear a click.

<1> <PUSH> Mark Insert the color ink tank (BCI-16 Color) in the same way.

<1> Color Ink Tank (BCI-16 Color)
<2> <PUSH> Mark

Close the print head cover. The print head moves to the right.

<1> Print Head Cover

No comment yet.
Scooped by mickael grad
May 2, 2012 10:59 AM
Scoop.it!

Printer Sharing (Mac OS X) in Canon Printer

Printer Sharing (Mac OS X) in Canon Printer | Canon Printer Support | Scoop.it

By sharing the printer connected to a Mac OS X computer, printing can also be performed with other Mac OS X (10.2.x or later) computers on the same network.

Setting outline

Install the MP or printer drivers in the print server and the client.Specify the network settings for the print server and the client.Specify the print sharing settings in the print server.Specify the settings of the computer name of the print server.Confirm that the shared printer can be used in the client as well.

Procedures

Before specifying network settings to share the printer, install the MP or printer drivers on the print server and the client.In the Apple menu, select 'System Preferences'.Click 'Print & Fax'.

**Mac OS X 10.5.x and 10.6.x users click here.Click 'Sharing'.

* The image is an example using the MP500 model.
Click 'Share these printers with other computers' to place a checkmark in the box.

* The image is an example using the MP500 model.Click 'Printing' to display the Printing tab, and then click 'Printer Setup'.

* The image is an example using the MP500 model.In the pop-up menu, select 'Name & Location', and enter information regarding the printer location in 'Location' and then click 'Apply Changes'.

* The image is an example using the MP500 model.Confirm that the shared printer can be used in the client as well.In the File menu, select 'Print'.In the Printer pop-up menu, select 'Printer Sharing'* to confirm that the shared printer name, which is set in step 7, is displayed in the sub menu.

* In OS X 10.5.x / 10.6.x select the shared printer name in the dropdown list. If the printer has not yet been added to the client computer, click Add Printer (10.5) or Nearby Printers (10.6) and select the printer

To use the shared printer, select the displayed printer name and perform printing.
If the printer name is not displayed, confirm that the printer and the computer are powered ON and properly connected.

Printing can now be performed on the client.

If you are using OS X 10.5.x or 10.6.x, after selecting Print & Fax, simply select in the printer list the printer to be shared, then check the Share this Printer checkbox..

Location of the Share this printer checkbox varies depending on OS version

Location information to be used on the client computer(s) will be listed below the checkbox.

**If the Printer Sharing is turned off message appears (see below), uncheck and then recheck the Share this printercheckbox. Printer sharing will be turned on.

:

Location of the Share this printer checkbox varies depending on OS version

No comment yet.