Your new post is loading...

|
Scooped by
mickael grad
June 29, 2012 9:49 AM
|
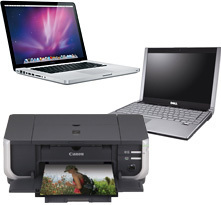
Types of Printing Problems in canon printer
Printing problems can be divided into three basic types: The printer equipment may be causing the problem. Examples of equipment problems are: Faulty rollers; broken paper trays; printer display menu "maintenance" messages; odd sounds; paper jams; "low toner" messages. This problem is handled by LBIS printer technicians.The print queue on the network may be causing the problem. Examples of print queue problems are: Error messages saying queue is "unavailable" or "cannot connect; "printer busy or error" messages, indicating print job is stuck in the queue; problems adding a network printer; printer not communicating with the network. Queue problems are handled by LBIS network managers.The software through which the print job is being printed may be causing the problem. Examples of software problems are: corrupt printer drivers (software)have to be re-installed; error messages in application being used, stating that paper trays, paper feeds or paper sizes are incorrect; "error initializing output device" messages, indicating a temporary glitch in communication between the software and network; "insufficient memory" error messages, indicating an (image) file size may be too large for the printer. Software problems are investigated by LBIS academic or adminstrative liaisons. Two Kinds of Printers: Networked and Attached Printers There are two kinds of printers on campus. Attached printers are those that are directly connected to a single computer. Networked printers are available for use by many users working from many different computers on the network. Print job requests for a particular networked printer are sent to a print queue on the server. If an attached printer won't print, here are some preliminary things to check: Check to see that the printer is powered on.Make sure that the printer cable between printer and computer isn't loose.If both computer and printer are on but computer can't find the printer: Turn both devices off and wait 20 seconds. Power printer back on first and then power on the computer. If, after all of the above, the computer still can't find the printer, the drivers may have become corrupt ted and need to be re-installed. Call the dept. liaison for this.If the computer can find the printer but it still won't print, check the local print queue screen in the software(Word or WP, for example). A print job may be stuck in the local print queue and deleting it from the queue may help. If a networked printer won't print: here are some preliminary things to check: Check to see that the printer is powered on and the network cable is properly connected to both the printer and the wall jack.Check the network print queue to see if any jobs have become stuck. Clear them if necessary (instructions for doing this are given in the next section).Try sending a test print job to see if the printer is working.If you get a "printer unavailable" error message when trying to view a print queue, the printer server may be down.If the print queue appears to be available and a test job causes a "printer busy or error" message, try to ping the printer's IP address to see if it is still communicating with the network. The printer may need to be recycled to reestablish its connection.Note: Detailed instructions for performing the diagnostic techniques mentioned above are given in the remaining sections of this document.
|
|
Scooped by
mickael grad
June 27, 2012 11:55 AM
|
How to Set Up a Canon Wireless Printer
Power on your Canon wireless printer after you have removed it from the packaging. Insert the ink cartridges when prompted on the screen. Your first printer ink cartridges are included. If you have a computer already connected to a desktop or Windows XP, skip to step 7. Print and scan the alignment sheet as prompted on the printer screen. Press OK when done. Insert the setup CD even if you are connecting your Canon printer via wireless network. There are printer drivers created for wireless networks on this CD. Follow the CD setup instructions on the screen. Have the printer find the actual wi-fi network signal that you will be using and select that on the printer screen and on your computer. The wi-fi light will be on when the network is connected. Print a test page from your computer when everything is completed on the screen and if you are prompted by the Canon setup CD to do so. Go into printers and ensure Canon is set as your default printer. This will ensure all software will use this as your primary printer. There will be a check mark next to it. Go into printer setup and search for a printer connected via network on your computer. This may take a few minutes. You must enable printer and file sharing on both computers before you will be able to view a USB connected printer on a network. Select use this printer when it finds your printer. Make sure it is set to be the default printer and print a test page.
|
|
Scooped by
mickael grad
June 26, 2012 6:13 AM
|
How to Set Up a Canon Wireless Printer
Power on your Canon wireless printer after you have removed it from the packaging. Insert the ink cartridges when prompted on the screen. Your first printer ink cartridges are included. If you have a computer already connected to a desktop or Windows XP, skip to step 7. Print and scan the alignment sheet as prompted on the printer screen. Press OK when done. Insert the setup CD even if you are connecting your Canon printer via wireless network. There are printer drivers created for wireless networks on this CD. Follow the CD setup instructions on the screen. Have the printer find the actual wi-fi network signal that you will be using and select that on the printer screen and on your computer. The wi-fi light will be on when the network is connected. Print a test page from your computer when everything is completed on the screen and if you are prompted by the Canon setup CD to do so. Go into printers and ensure Canon is set as your default printer. This will ensure all software will use this as your primary printer. There will be a check mark next to it. Go into printer setup and search for a printer connected via network on your computer. This may take a few minutes. You must enable printer and file sharing on both computers before you will be able to view a USB connected printer on a network.
|
|
Scooped by
mickael grad
June 26, 2012 6:09 AM
|
Canon MX870 prints incredibly slow via WIFI
I have an MX870 with an iMac quad core running OSX 10.6 and a net gear router. I don't use a USB cable because the run would exceed 15' because of the way the furniture is layed out where the computer and printer are, and the USB cable is too long to power the connection. This has happened with every printer I've used. However, the printer/computer and router are all physically within about 6 feet of each other at most (I'm just trying to avoid running a USB cable directly across the carpet in the middle of the living room). So I use the wireless printing option. However, even when i have a document that is composed of nothing more than 1 black and white sentence and nothing else on the page, or a envelope that I'm putting nothing more on than an address, it always takes between 2-3 minutes from the time I hit print, to the time the paper comes out of the printer. Even with wireless printing, this can't be right. There has to be some way of speeding up the process. Any suggestions would be welcome. Thanks
|
|
Scooped by
mickael grad
June 18, 2012 7:24 PM
|
How to Troubleshoot a Canon Photo Inkjet Printer
Canon USA has an excellent technical support page, but before you seek out their help tries troubleshooting your Canon Photo Inkjet Printer on your own. There are a few basic steps you can do to troubleshoot a Canon Photo Inkjet Printer. Instructions 1 Make sure the printer is set up correctly. The printer must be plugged into the wall, powered on and connected to a computer to function properly. 2 Check for error messages. Occasionally, a printer will spell out what's wrong with it with a pop- up window. Check the status light on the printer too and read the manual to see what it means. 3 Check for paper. Make sure the paper is loaded correctly and is not jammed. Look over the manual to see how to clear paper jams without damaging your printer further. 4 Run a self-test. Many printers have a self-test feature that will help you pinpoint the problems. Operations will vary, consult the manual. 5 Run a driver test. This is done from the printer's software. Before you print, you have the option to enter "Printer Properties." From there, find a "Maintenance" or "Cleaning" tab. Here, you can run a test page. 6 Look over the test page. Bars, uneven patterns and white spots indicate dirty printheads. Faded or missing colors means its time to change a cartridge. 7 Clean and align printheads. This can be done from the same maintenance page from which you ran the test page. 8 Replace cartridges. When ink runs low, its time to replace the cartridge. Take note of the part number written on the cartridge and buy one just like it. 9 Reinstall the drivers. Try uninstalling the drivers and reinstalling from the disc that came with the printer. Or look for patches and updates on the Canon Web site.
|
|
Scooped by
mickael grad
June 5, 2012 6:19 PM
|
Canon Printing Setting up a Wireless Printer in 5 Easy Steps
1. Determine the Type of Wireless Printer You'll be using the wireless router to connect the new wireless printer to your home network so make sure the router is up and running. Most new computers and wireless printers are equipped with either Bluetooth or Wi-Fi capabilities. If your printer is not wireless you can purchase a wireless card that plugs into a USB port. 2. Select the Location of the Wireless Printer The wireless printer should be set up in a place at home or in the office that is accessible to everyone and where there is ample space for paper, printer ink and other supplies. If you are using Bluetooth wireless you may want to give this some thought since Bluetooth printers have a smaller wireless range than Wi-Fi printers. 3. Enable Printer Sharing The server computer's operating system must be informed that the printer you are adding to the network is a wireless printer. (The server computer is the one the printer is connected to.) In Windows Vista, this is done by accessing the network settings in the Control Panel and then activating file and printer sharing in the local area network settings. For Windows XP go to Start, Control Panel, Printers and Other Hardware, "View installed printers or fax printers." Right-click on your printer and select "Sharing", then select "Share this Printer." Give the printer a name and click OK. 4. Add the Wireless Printer to any other Computers on your Network The other computers on the network must also be set up for using the wireless printer. To do this in Windows Vista, open the Control Panel in the classic view and then open Printers. Right click on the printer that is going to be shared, and then open Properties. In Properties, check the box that allows the printer to be a shared device. For Windows XP you will need to do the following: Open Control Panel, Printers and Faxes, and click on "Add a printer."This will take you into a wizard to find the printer you shared previously.Click Next until you are at the Local or Network Printer page.Select "A network printer or a printer attached to another computer" and click Next.Now click "Browse for a printer" and click Next. This will display your workgroup, the PCs connected to it and any printers that are attached to them.Click on the wireless printer you shared earlier and click Next. [This should install the driver automatically. If not, you may need to get the CD software that came with the printer.]Now click Yes to make the wireless printer the default printer for this PC (or No if the computer already has one attached to it).Click Finish. 5. Troubleshooting Wireless Printers Both this computer and the one the wireless printer is attached to might need a reboot. If you're not seeing the computer it is attached to, double-check that all computers have the same network name: go to Control Panel, Performance & Maintenance, "See basic information about your computer." From there click on "Computer Name" and your workgroup will be displayed. If you're not seeing the printer, make sure it's switched on. If printer still doesn't work, you may need to install the printer driver using the software CD that came with it.
|
|
Scooped by
mickael grad
May 29, 2012 6:35 PM
|
How to Troubleshoot a Canon Pixma MX860 on Mac
The Canon Pixma MX860 is a printer designed for both Windows and Mac use. When using the printer on a Mac, you do need to follow specific connection options; otherwise, the computer will be unable to detect the Pixma MX860. This includes installing a service driver onto the Mac and ensuring everything is connected completely. Instructions 1 Check the USB data cable running from the Mac to the Canon printer. If the USB cable is not completely inserted into both devices, the Mac will fail to detect the printer. 2 Install the Canon Pixma MX860 driver onto the computer. Download the driver from the link provided in "Resources," then double-click the downloaded file and follow the prompts of the installation wizard to install the driver. 3 Disconnect the USB cable from the Mac, then insert it into a different USB port. Occasionally, some ports on the Mac will fail to detect the printer, or even die out. Plug the cable into a different USB port to correct this issue. 4 Restart the Mac and the printer. The Mac may not have detected the printer when first booting up, so restarting the equipment corrects this problem.
|
|
Scooped by
mickael grad
May 24, 2012 2:44 PM
|
Unable to scan for canon printer
Check if the Port Setting is Correct (Windows) If the Port setting in Windows is incorrect, the printer and computer will not be able to communicate with each other. Windows Log on to the computer as a user account with administrator privilege.Open the printer's Properties. For Windows 7 Click the 'Start' button from the bottom left of the Windows screen, and then click on 'Devices and Printers'.Click your right mouse button on the listing for your printer, and then select 'Printer Properties' from the menu that appears. For Windows Vista Click / Select 'Start' from the bottom left of the Windows screen, 'Control Panel', 'Hardware and Sound', and then click on 'Printers'Click your right mouse button on the listing for your printer, and then select 'Properties' from the menu that appears. For Windows XP Home Edition Click / Select 'Start' from the bottom left of the Windows screen, 'Control Panel,' 'Printers and Other Hardware,' and 'Printers and Faxes.'Click your right mouse button on the listing for your printer, and then select 'Properties' from the menu that appears. For Windows XP Professional Edition Click 'Start' from the bottom left of the Windows screen, and 'Printers and Faxes.'Click your right mouse button on the listing for your printer, and then select 'Properties' from the menu that appears. In the printer's Properties dialog box, select the Ports tab and locate the port with a check mark. Check the printer name of the selected port "USBnnn" (nnn denotes numbers). If the printer name is the same as the model connected, the correct port is set. If a different port is selected, find the port that the printer is actually connected to and click to put a check mark. . * The example Properties dialog box is with the USB port selected. Click OK to apply the selected port setting. Windows Me/98 (if applicable) Open the printer's Properties. For Windows Me/98Click / Select 'Start' from the bottom left of the Windows screen, and 'Settings,' then 'Printers.'Click your right mouse button on the listing for your printer, and then select 'Properties' from the menu that appears. In the printer's Properties dialog box, select the Details tab, and confirm the 'Print to The Following Port' contents. The correct port displays the connected printer name to the right of \"USBPRNxxx\" (xxx denotes numbers). If a different port is displayed, select the proper port from the drop-down menu or re-install the printer driver. * The example Properties dialog box is with the LPT port selected. Click OK to apply the selected port setting
|
|
Scooped by
mickael grad
May 23, 2012 5:52 PM
|
Canon Printing Setting up a Wireless Printer in 5 Easy Steps
1. Determine the Type of Wireless Printer You'll be using the wireless router to connect the new wireless printer to your home network so make sure the router is up and running. Most new computers and wireless printers are equipped with either Bluetooth or Wi-Fi capabilities. If your printer is not wireless you can purchase a wireless card that plugs into a USB port. 2. Select the Location of the Wireless Printer The wireless printer should be set up in a place at home or in the office that is accessible to everyone and where there is ample space for paper, printer ink and other supplies. If you are using Bluetooth wireless you may want to give this some thought since Bluetooth printers have a smaller wireless range than Wi-Fi printers. 3. Enable Printer Sharing The server computer's operating system must be informed that the printer you are adding to the network is a wireless printer. (The server computer is the one the printer is connected to.) In Windows Vista, this is done by accessing the network settings in the Control Panel and then activating file and printer sharing in the local area network settings. For Windows XP go to Start, Control Panel, Printers and Other Hardware, "View installed printers or fax printers." Right-click on your printer and select "Sharing", then select "Share this Printer." Give the printer a name and click OK. 4. Add the Wireless Printer to any other Computers on your Network The other computers on the network must also be set up for using the wireless printer. To do this in Windows Vista, open the Control Panel in the classic view and then open Printers. Right click on the printer that is going to be shared, and then open Properties. In Properties, check the box that allows the printer to be a shared device. For Windows XP you will need to do the following: Open Control Panel, Printers and Faxes, and click on "Add a printer."This will take you into a wizard to find the printer you shared previously.Click Next until you are at the Local or Network Printer page.Select "A network printer or a printer attached to another computer" and click Next.Now click "Browse for a printer" and click Next. This will display your workgroup, the PCs connected to it and any printers that are attached to them.Click on the wireless printer you shared earlier and click Next. [This should install the driver automatically. If not, you may need to get the CD software that came with the printer.]Now click Yes to make the wireless printer the default printer for this PC (or No if the computer already has one attached to it).Click Finish. 5. Troubleshooting Wireless Printers Both this computer and the one the wireless printer is attached to might need a reboot. If you're not seeing the computer it is attached to, double-check that all computers have the same network name: go to Control Panel, Performance & Maintenance, "See basic information about your computer." From there click on "Computer Name" and your workgroup will be displayed. If you're not seeing the printer, make sure it's switched on. If printer still doesn't work, you may need to install the printer driver using the software CD that came with it.
|
|
Scooped by
mickael grad
May 21, 2012 6:08 PM
|
I. Get your printer’s LPR Queue Name from CUPS admin in Canon Printer
On your Mac, open a browser and go to http://127.0.0.1:631 — the CUPS admin page.Click the Printers tab and look at the list of printers.If you’re using Snow Leopard, you’ll see a Queue Name column. Take note of the Queue Name for the printer you want to access from Windows 7. If you’re using Leopard or earlier, the Queue Name is the reddish link above a horizontal black line. (See pic below.) There are no spaces allowed in queue names, so if your printer shows up as Canon MP830 in the Print & Fax pref pane in System Preferences, the queue name will likely be Canon_MP830.On your Windows 7 computer, go to your Control Panel and select the Programs item.Under the Programs and Features section, click Turn Windows features on or off. II. Enable LPR Port Monitor in Windows 7 Expand the Print and Document Services item and then enable the LPR Port Monitor item. Click OK and wait for the change to be implemented. You should not need to reboot. III. Add a new LPR printer 1. Click the Start menu and select Devices and Printers.2. Click Add a printer in the toolbar. Select Add a local printer. Select Create a new port and then select LPR Port from the menu. Click Next. Type the name or IP address of your Mac in the first field and then enter the Queue Name you got in step I above in the second field. Click OK. The computer will attempt to verify the destination. If Printer Sharing is enabled on your Mac and you entered the info correctly, then you should not get any errors. If you see the following error, verify the settings on your Mac. You should now see the Install the print driver screen. Choose a postscript printer driver, regardless of the kind of printer you are connecting to. This is very important. You do not need to pick a matching driver for your device. The only consideration is whether to use a color driver or a b&w driver. (I’m using an HP Color LaserJet 3000 PS driver and it works well.) When you’ve selected a driver, click Next. Name your printer and click Next. The printer will now be installed. Select Do not share this printer and click Next. If you want this printer to be the default, check Set as default printer. Now click Print a test page.
|
|
Scooped by
mickael grad
May 18, 2012 3:05 PM
|
How to Receive a Fax on a Canon Pixma Multifunction Printer
multifunction printer for Windows and Mac systems, the Canon Pixma accepts documents directly from your computer as well as digital photos from a memory card or microdrive. The plain-paper printer also lets you scan and fax documents to a stand-alone fax machines and other computers. Canon Pixma's fax component is accessible through the device's control panel. Before accepting faxes from another fax machine or computer, you must manually select the "receive fax" mode on the printer and specify the type of receiving mode you want the fax/printer to use Turn on your Cannon Pixma by pressing the "ON/OFF" button on the printer's control panel.2 Press the "FAX" button on the control panel, then the "Menu" button. The "Fax menu" will appear on your printer's display. Press the right or left arrow button to select "Receive Mode settings." 3 Press the up or down arrow button to select a receive mode: "Fax priority mode" for receiving faxes and sometimes voice telephone calls with the printer; "Fax only mode" for receiving faxes only with the printer. Use this setting if your Cannon Pixma is on a dedicated phone line and no voice calls are received on the phone line; "DRPD" for a phone line that contains a ring pattern detection service for voice calls and fax calls; or "Tel priority mode" for receiving mainly voice calls on this telephone line and only sometimes faxes. 4 Press the "OK" button to accept the receive mode. Press the "Back" button to exit the "Fax menu." The word "Standby" will appear next to the wording "Status:" on your printer's display panel, indicating that your Cannon Pixma is ready to receive faxes. Setting the Number of Rings For Receiving Faxes 5 Press the "FAX" button on the control panel, then the "Menu" button. The "Fax menu" will appear on your printer's display. 6 Press the right or left arrow button to select "Maintenance/settings. Press the "OK" button. The "Maintenance/settings" menu will appear on the display. Press the right or left arrow button to select "Device settings," then press the "OK" button. 7 Press the right or left arrow button to select "FAX settings. Press the "OK" button. Press the right or left arrow button to select "RX settings," then press the "OK" button. 8 Press the up or down arrow button to select "Incoming ring," if using the "Fax priority mode" or "Fax only mode." Or select "DRPD: Set FAX ring pat," if using the "DRPD" mode. Press the "OK" button. 9 Press the up or down arrow button to select "Double Ring," "Short-short-long," "Short-long-short" or "Other ring type." Press the "OK" button to accept the ring pattern. Press the "Back" button to exit the "Fax menu.
|
|
Scooped by
mickael grad
May 3, 2012 1:47 PM
|
Can’t Detect Connected Canon Wireless Printer [SOLUTION]
Over the past few weeks, the computers in my house have been unable to detect my Cannon MG5200 printer. The printer itself said it successfully connected to the wireless network, which left me quite puzzled. After a while, I found the root cause, and it left me quite baffled It May Be Your iPhone If you are an iPhone user, you may have decided to try out Canon’s Easy-PhotoPrint iPhone app. The app allows you to print directly from your iPhone. If you are unable to detect your wireless printer and you have used this app, check out your router settings. Your router settings can usually be accessed by typing the address 192.168.1.1 in the address bar. The default username is usually “admin” and default password is usually “password”. If you click on “Attached Devices” (or some variation of the phrase), you may notice that your iPhone name is listed twice. The iPhone seems to HiJack the name of your Printer, causing your computers to not be able to locate your printer. The Solution You’ll need to do a hard reset on your router. Generally, unplugging the router and plugging it back in does not accomplish this. There may be a “RESET” button on the back of the router, or you may need to take a paper clip and insert it into a small reset hole at the back of the router. Check with your instruction manual if you’re unable to find these. The hard reset will cause all machines attached to the router to disconnect. This allows the proper name of the printer to come through. After this, you should be able to install your Canon printer driver normally. ________________________________________
|
|
Scooped by
mickael grad
May 2, 2012 12:59 PM
|
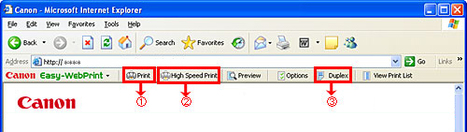
Selecting A Photo In Easy-PhotoPrint in Canon Printer
Click Start, select (All) Programs, Canon Utilities, Easy-PhotoPrint, and then click Easy-PhotoPrint. Easy-PhotoPrint starts and the 1. Image Selection tab appears. Select the folder containing the image you want to print from the folder window on the left portion of the screen. Thumbnails of the images in the folder appear. Reference Only the image saved in the data format of JPEG (file extension .jpg, .jpeg) and Easy-PhotoPrint image files (file extension .epp) appear. Thumbnails are arranged in numerical then alphabetical order by file name. You can also select images from multiple folders.| In the Preferences Dialog Box in the File menu select 'Select images from multiple folders' in the Advanced tab and click 'OK'. Click the thumbnail of the image you want to print. The number of copies appears as "1" below the clicked thumbnail. Reference To print two or more copies, click until the number of copies you want is reached. To reduce the number of copies, click . Clicking Zoom in after clicking the image, or simply double-clicking the image displays the enlarged image in a separate window. The thumbnail size can be changed with Thumbnail Size in the View menu. Clicking Select All after selecting the folder allows you to select one of each image in the folder at once. Clicking Clear All resets the number of copies for all images.
|
|
|
Scooped by
mickael grad
June 29, 2012 9:45 AM
|
Do you have a power failure in canon printer
Have you checked that your printer problem is not due to a power failure? A printer that is switched on normally have a green indicator light lit. If the light is not green, check that your power button is set to on, that you have electricity in your wall outlet and that the power cable is connected at both ends. When power is applied, you should be able to hear the printing mechanism move inside or the printer should start to "hum". If above is checked and the printer still not seems to indicate that it is switched on, it could be that your printer has a serious problem and you need to contact your printer maker. First of all, check the instructions that are given for this error in the printer manual before proceeding contacting your printer manufacturer. Links to most printer manufacturers can be found on our printer manufacturer list. It's worth the effort to visit your printer makers website since your printing problem might be model specific. Some printer makers have their own printer troubleshooting forums or Q&A guides where you can find answers to the most common printer problems.
|
|
Scooped by
mickael grad
June 27, 2012 11:53 AM
|
Canon Printer support, Dell-Support, HP-Printer, Canon-printer, Network, MS-Office, Windows, Microsoft, Blackberry, Ciso, wireless, PC-Security, Outlook, Office-2010, IBM-support, Lenovo, IPhone, Linksys...
|
|
Scooped by
mickael grad
June 26, 2012 6:11 AM
|
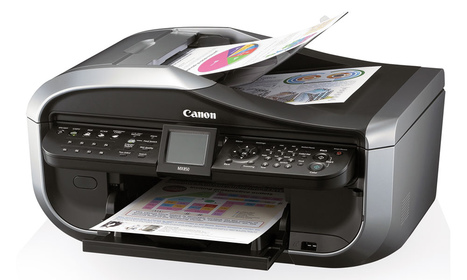
Canon Pixma MX870 Office All-In-One Printer Wireless Printing Problems
The Canon Pixma MX870 Office All-In-One Printer wirelessly brings professional-quality printing, copying, scanning, and faxing to your small business or home office. This Pixma is ready for networking from within range of your wireless router or you can network via its wired Ethernet interface. You can enjoy computer-free printing capabilities via compatible memory cards, PictBridge, and optional Bluetooth, while images are easily viewed on a 2.5" LCD. This printer boasts 9600 x 2400dpi resolution which combines with a 5-ink cartridge system that includes a pigment black ink and 4 dye-based color inks to deliver documents with crisp, clear text, and professional-looking photos with rich colors and contrast. The MX870 is operated via an Easy Scroll Wheel which makes it easy to view and correct your photos for printing and to access the various features available for faster operation. Its 35-page Automatic Document Feeder (ADF) keeps your workflow going and can save you money with automatic two-sided printing. This Pixma features Canon's Auto Photo Fix II technology which automatically categorizes your images into one of five types - Portrait, Scenery, Night Scenery, Snapshot with Scenery, and Snapshot with Night Scenery - then applies optimal image and multi-zone exposure correction. With Dual Color Gamut Technology, your copies and scans will be superb as the MX870 automatically optimizes your originals so copies stay true, even when copying from a copy. The MX870's versatility goes beyond previous models, allowing you to print your photos wirelessly from compatible iPhone 3G, 3GS and iPod touch models with the new Easy-PhotoPrint for iPhone App, available for free on the app store. Note! The MX870 does NOT provide direct fax capability under Mac OS X. To send a fax using a Mac is a two-step process: one must print the document and then send the FAX. Direct print from a PC is supported. Extraordinary Resolution Realize the power of 9600 x 2400 maximum color dpi firing with ink droplets as little as 1 picoliter. The MX870 delivers incredible quality and detail in both your business documents and photos. High Performance Individual Ink System This 5-color ink system consists of four dye-based inks plus a pigment-based black ink, producing exceptional photos and crisp, laser-quality text. Only replace the color ink tank that runs out. So, you save money on ink. Fully-Integrated Duplex Auto Document Feeder The built-in 35 sheet Duplex Automatic Document Feeder (ADF) makes it easy to copy, scan or fax multiple documents without having to load them one at a time. Its full integration makes it easier to fit into tight spots and once it's loaded you can do whatever else you want. Auto Duplex Printing Built-in Auto Duplex Printing prints 2-sided documents without having to manually flip the pages and can reduce your paper consumption by 50%. This means you can automatically copy two sided documents without having to flip any paper manually at all. Easy Scroll Wheel With the Easy Scroll Wheel you can quickly access and select the various features available for faster operation. 2.5" LCD Screen The MX870's 2.5" color LCD screen lets you easily view, select and edit your images for simple computer-free printing. No downloading needed, Auto Scan Mode In the Auto Scan Mode, the MX870 automatically recognizes the type of original, then scans and saves the suitable settings. For network users, Auto Scan Mode is only available when scanning at a computer using MP Navigator. Dual Color Gamut Technology Copy with confidence as this built-in technology automatically optimizes your originals so copies stay true to it, time after time, copy after copy. Quick Start Powering up your printer is now faster than ever. After pressing the power button you can begin inputting commands in approximately two seconds. So, full operation is possible in a much shorter time. Auto Photo Fix II This built-in technology automatically categorizes your images into one of five types - Portrait, Scenery, Night Scenery, Snapshot with Scenery, and Snapshot with Night Scenery - then applies optimal image and multi-zone exposure correction. So, unexposed areas of the photo will be optimized, area by area, and faces that are backlit and under-exposed will automatically be brightened with correct color cast to help ensure more accurate skin tones for gorgeous images. Built-In Wireless Connectivity Print or scan wirelessly from any Wi-Fi enabled computer around the house. Wireless printing requires a network with wireless 802.11b/g capability. Wireless performance may vary based on terrain and distance between the printer and wireless network clients. Built-In Ethernet The wired LAN interface lets you connect to a home or office network, with connected computers sharing the power of this versatile machine, each being able to display the printer's status at any moment. Super G3 Fax The business fax standard for color and PC facsimiles on plain paper meets the home office workhorse with 100 coded speed dials and up to 250 incoming pages to meet your every communication need. Note: The Public Switched Telephone Network currently supports fax modem speeds of 28.8 Kbps or lower, depending on telephone line conditions. Sending and receiving fax machines need to conform to ITU-T v.34 guidelines. Note:The MX870 does NOT provide direct FAX capability under Mac OS X. To send a FAX using a Mac is a two-step process: one must print the document and then send the FAX. Direct print from a PC is supported. iPhone Printing Take full advantage of Canon's fantastic Wi-Fi printing technology to unlock, print and share your stored images right on the spot. Print your photos wirelessly from compatible iPhone 3G, 3GS and iPod touch models. Memory Cards, USB, PictBridge & Optional Bluetooth Just insert a compatible memory card into the built in card slot, select images on the LCD display, and print. Thanks to a PictBridge connection you can also print photos directly from your USB Flash Drive and digital camera, DV camcorder or camera phone. Plus, you can print from the optional BU-30 wireless Bluetooth. Requires mobile phone (or other device) equipped with Bluetooth technology v2.0 and optional Bluetooth unit BU-30. Bluetooth operation depends on the devices and software version used. Operating distance is approximately 10 meters but may vary due to obstacles, radio signals, locations where radio interference occurs, magnetic fields from microwave ovens, device sensitivity and/or antenna performance.
|
|
Scooped by
mickael grad
June 21, 2012 7:45 PM
|
How to Troubleshoot a Canon Photo Inkjet Printer
Canon USA has an excellent technical support page, but before you seek out their help tries troubleshooting your Canon Photo Inkjet Printer on your own. There are a few basic steps you can do to troubleshoot a Canon Photo Inkjet Printer. Instructions 1 Make sure the printer is set up correctly. The printer must be plugged into the wall, powered on and connected to a computer to function properly. 2 Check for error messages. Occasionally, a printer will spell out what's wrong with it with a pop- up window. Check the status light on the printer too and read the manual to see what it means. 3 Check for paper. Make sure the paper is loaded correctly and is not jammed. Look over the manual to see how to clear paper jams without damaging your printer further. 4 Run a self-test. Many printers have a self-test feature that will help you pinpoint the problems. Operations will vary, consult the manual. 5 Run a driver test. This is done from the printer's software. Before you print, you have the option to enter "Printer Properties." From there, find a "Maintenance" or "Cleaning" tab. Here, you can run a test page. 6 Look over the test page. Bars, uneven patterns and white spots indicate dirty printheads. Faded or missing colors means its time to change a cartridge. 7 Clean and align printheads. This can be done from the same maintenance page from which you ran the test page. 8 Replace cartridges. When ink runs low, its time to replace the cartridge. Take note of the part number written on the cartridge and buy one just like it. 9 Reinstall the drivers. Try uninstalling the drivers and reinstalling from the disc that came with the printer. Or look for patches and updates on the Canon Web site.
|
|
Scooped by
mickael grad
June 6, 2012 4:38 PM
|
How to Connect a Printer using Bluetooth
Bluetooth is a powerful wireless technology that lets your computer discover and share devices. Connecting a printer using Bluetooth is simple. Instructions 1 Make sure your printer is Bluetooth enabled. Some printers come this way (read the manual to verify) but others require adapters. Shop online or visit an electronics store to find an inexpensive Bluetooth printer adapter. 2 Set up your adapter. All you need do is connect one end to your computer and the other end to your printer and it will install itself. 3 Turn on the printer. Make sure it is connected to a working electrical outlet and the printer power is on correctly. 4 Open Bluetooth devices on your PC. After installing your Bluetooth adapter, go to the control panel and open "Bluetooth Devices." 5 Add printer automatically. This is less secure, but easier. From the options tab, make sure the options "Turn discover on" and "Allow Bluetooth devices to connect to this computer" are checked. Your printer and computer should then find each other automatically and begin working. If you'd rather not let other devices discover your computer, follow steps 6 and 7 instead. 6 Add device manually. From the devices tab, select "Add Device" and run the installation wizard to find your printer. 7 Use the "Add Printers" wizard. You can also add the printer by clicking "Start" and "Printers and Faxes" and then "Add a Printer." When the wizard pops up, select "Bluetooth printer" and Windows will search for your printer automatically. Bluetooth is a powerful wireless technology that lets your computer discover and share devices. Connecting a printer using Bluetooth is simple. Instructions 1 Make sure your printer is Bluetooth enabled. Some printers come this way (read the manual to verify) but others require adapters. Shop online or visit an electronics store to find an inexpensive Bluetooth printer adapter. 2 Set up your adapter. All you need do is connect one end to your computer and the other end to your printer and it will install itself. 3 Turn on the printer. Make sure it is connected to a working electrical outlet and the printer power is on correctly. 4 Open Bluetooth devices on your PC. After installing your Bluetooth adapter, go to the control panel and open "Bluetooth Devices." 5 Add printer automatically. This is less secure, but easier. From the options tab, make sure the options "Turn discover on" and "Allow Bluetooth devices to connect to this computer" are checked. Your printer and computer should then find each other automatically and begin working. If you'd rather not let other devices discover your computer, follow steps 6 and 7 instead. 6 Add device manually. From the devices tab, select "Add Device" and run the installation wizard to find your printer. 7 Use the "Add Printers" wizard. You can also add the printer by clicking "Start" and "Printers and Faxes" and then "Add a Printer." When the wizard pops up, select "Bluetooth printer" and Windows will search for your printer automatically.
|
|
Scooped by
mickael grad
May 29, 2012 6:38 PM
|
Why Does My Canon Multipass Printer Print Boxes Instead of Text?
The problem of a Canon Multipass printing only boxes is not uncommon. This issue actually can be seen on any printer, particularly older ones, and also will sometimes manifest in nonsense characters instead of just boxes. Driver Issues The most common reason for this problem is an incorrect or outdated print driver, which can be corrected easily by downloading the newest driver from the Canon website. Spooler Issues Sometimes the print spooler can become overwhelmed and lose track of jobs, causing nonsense printouts. This can be fixed by turning the printer off and then unplugging the connection to the computer for 30 seconds. Memory Overload Many printers (particularly older ones) have very little memory and are easily overloaded. Avoid this by limiting the amount of pages you send to your printer at once.
|
|
Scooped by
mickael grad
May 24, 2012 2:47 PM
|
Delete queued print jobs to resolve printing errors (Windows) in Canon Printer
Delete Queued Print Job If a print job is corrupt and does not print clearly, does not print at all or is preventing other queued jobs from printing, delete the queued job. On the Windows taskbar, double-click the printer icon located to the left of the time. At the Printer queue window, select the print job, under 'Document Name' column, to highlight it.From the 'Document' menu, select 'Cancel'.Repeat steps two and three to cancel another print job.If the print job cannot be cancelled or will not stop printing, shut down the computer, disconnect the printer cable and then restart the computer.Close the Printer window.Shut down the computer.Disconnect the printer cable (USB or parallel cable).Restart the computer.If a message window appears asking to cancel printing, select 'Yes'.Verify the printer icon no longer appears on the Windows taskbar. If the icon appears, double-click it and cancel the remaining print jobs as instructed on steps two and three.After all print jobs have been cancelled, reconnect the cable to the printer and then try to print again. If the print job does not complete, it may be necessary to disconnect the printer cable, power off and on the printer and then reconnecting the cable. Unable to fax for canon printer Start Print Spooler Service (Windows XP / 2000 / Windows Vista / Windows 7) Accessing Services To resolve the error shown below , right-click Print Spooler service and then select Start. Error Text : 'No printers are installed. To install a printer, point to Settings on the Windows Start menu, click Printers, and then double-click Add Printer. Follow the instructions in the wizard.' ex. Windows XP Computer Management Open Computer Management.On the right-hand side pane of Computer Management window, scroll down to locate 'Print Spooler'.Right-click on 'Print Spooler' and select 'Start'. Close the Computer Management window and attempt to print again. Accessing Services and Applications Click the Start button . Click your right mouse button on Computer.Select Manage from the menu that appears. Click the plus (+) next to Services and Applications.Select Services.
|
|
Scooped by
mickael grad
May 24, 2012 2:41 PM
|
. Get your printer’s LPR Queue Name from CUPS admin in Canon Printer
On your Mac, open a browser and go to http://127.0.0.1:631 — the CUPS admin page.Click the Printers tab and look at the list of printers.If you’re using Snow Leopard, you’ll see a Queue Name column. Take note of the Queue Name for the printer you want to access from Windows 7. If you’re using Leopard or earlier, the Queue Name is the reddish link above a horizontal black line. (See pic below.) There are no spaces allowed in queue names, so if your printer shows up as Canon MP830 in the Print & Fax pref pane in System Preferences, the queue name will likely be Canon_MP830.On your Windows 7 computer, go to your Control Panel and select the Programs item.Under the Programs and Features section, click Turn Windows features on or off. II. Enable LPR Port Monitor in Windows 7 Expand the Print and Document Services item and then enable the LPR Port Monitor item. Click OK and wait for the change to be implemented. You should not need to reboot. III. Add a new LPR printer 1. Click the Start menu and select Devices and Printers.2. Click Add a printer in the toolbar. Select Add a local printer. Select Create a new port and then select LPR Port from the menu. Click Next. Type the name or IP address of your Mac in the first field and then enter the Queue Name you got in step I above in the second field. Click OK. The computer will attempt to verify the destination. If Printer Sharing is enabled on your Mac and you entered the info correctly, then you should not get any errors. If you see the following error, verify the settings on your Mac. You should now see the Install the print driver screen. Choose a postscript printer driver, regardless of the kind of printer you are connecting to. This is very important. You do not need to pick a matching driver for your device. The only consideration is whether to use a color driver or a b&w driver. (I’m using an HP Color LaserJet 3000 PS driver and it works well.) When you’ve selected a driver, click Next. Name your printer and click Next. The printer will now be installed. Select Do not share this printer and click Next. If you want this printer to be the default, check Set as default printer. Now click Print a test page.
|
|
Scooped by
mickael grad
May 23, 2012 5:51 PM
|
How to Set Up a Canon Wireless Printer
Power on your Canon wireless printer after you have removed it from the packaging. Insert the ink cartridges when prompted on the screen. Your first printer ink cartridges are included. If you have a computer already connected to a desktop or Windows XP, skip to step 7. Print and scan the alignment sheet as prompted on the printer screen. Press OK when done. Insert the setup CD even if you are connecting your Canon printer via wireless network. There are printer drivers created for wireless networks on this CD. Follow the CD setup instructions on the screen. Have the printer find the actual wi-fi network signal that you will be using and select that on the printer screen and on your computer. The wi-fi light will be on when the network is connected. Print a test page from your computer when everything is completed on the screen and if you are prompted by the Canon setup CD to do so. Go into printers and ensure Canon is set as your default printer. This will ensure all software will use this as your primary printer. There will be a check mark next to it. Go into printer setup and search for a printer connected via network on your computer. This may take a few minutes. You must enable printer and file sharing on both computers before you will be able to view a USB connected printer on a network. Select use this printer when it finds your printer. Make sure it is set to be the default printer and print a test page.
|
|
Scooped by
mickael grad
May 21, 2012 6:05 PM
|
Print from Windows 7 to a Mac Shared Canon Printer
I recently upgraded my wife’s laptop from Windows Vista to Windows 7 Home Premium. (The laptop manufacturer sent us a free upgrade coupon since we purchased it not too long before Windows 7 was released.) This morning she discovered that she can’t print to the Canon MP830 that is shared from the G5 Mac (running Mac OS X 10.5.8) in our living room. In Vista, I had it working via Bonjour. I’ve now learned a little too late that Bonjour doesn’t work in Windows 7. I googled for a solution, but all I was able to find was a bunch of other people complaining about the same thing: printing from Windows 7 to a printer shared from Mac OS X wasn’t working as it had been in Windows XP or Vista. Not to worry, though. After about 30 minutes of trying various solutions and just poking around in Windows 7, I found that the solution is pretty simple. The following procedure assumes you already have Printer Sharing enabled on your Mac.
|
|
Scooped by
mickael grad
May 18, 2012 3:01 PM
|
How to Install Canon Printers Without the Disks
canon printers are more commonly used for personal computers, as opposed to commercial use. These particular printers usually come with installation disks that are used to install the hardware's software drivers on the computer, but it's easy to misplace those disks over time. Luckily, the Canon support site provides software drivers for Canon printers, allowing users to install the software without the disks. 1 . Go to the official Canon Global website in your computer's Internet browser. 2 . Click the "Support <Drivers/Downloads>" tab along the left side of the Canon Global homepage. Select your region on the interactive map that appears on the right side of the tab options, and select the subregion where you are located. 3 . Select your product type, and click "Printers & Multifunction" to begin searching for your Canon product type. Click the product series that relates to your Canon printer. 4 . Scroll through the list of Canon printer models in the product series. Click the "Drivers & Software" link next to your Canon printer's thumbnail image. You will be redirected to the printer's product and overview page. 5 . Scroll down the Canon printer's product and overview page to the Drivers and Downloads section of the page. Click the "Select Your Operating System" drop-down bar. Select the name of your operating system, and click the red arrow to retrieve the software driver for your system. 6 . Click the .exe link under the firmware files that will be listed for the Canon "Software
|
|
Scooped by
mickael grad
May 3, 2012 1:33 PM
|
Unable to print on a networked Canon printer using 64bit OS
I have a Canon MP970 connected to a machine running Vista. I can address the printer in Ubuntu but selecting print does not produce a print. Checking the print que shows my job as 'processing'. I´m thinking it may be a firewall or permissions issue but not sure what settings to look out for. My machine is running Ubuntu 11.04 64bit and the other with printer attached is Windoze Vista 32bit with file and printer sharing turned on and Norton 360. I´ve tried disabling the firewall with no effect. While browsing other posts I saw one that made mention of using Samba to link Linux and Windoze for file and printer sharing. Software Center shows a SMB/CIFS client installed but I´m not sure how to configure it. Tried another Samba client with a GUI but it didn´t seem to make a difference (it did find the printer share and list it in it’s GUI). I opened a print window in the PDF Viewer which showed the printer status as unavailable. I contacted Canon asking them directly if they have an alternate driver for the printer for Linux. They said no, and the age of the printer puts it out of support of that kind. I found another printer that had a Linux driver for it (MP880) and attempted to install it to see what happened. The install failed (incorrect architecture). I believe it is due to the driver being 32bit and my OS being 64bit. I read a post about recompiling a 32bit driver into a 64bit one (however unstable) but I do not have that much experience to follow that path yet. Seems that despite the amount of time we have had 64bit processors and 64bit OS´ there is a complete lack of support for 64bit functions. I fear the day we migrate to 128bit! answer It is quite satisfying to be able to answer your own question sometimes. Downloaded the 32bit Linux driver for the MX860 and extracted it. (cnijfilter-mx860series-3.10-1-i386.deb) Opened a terminal window and typed the following:cd Desktop/cnijfilter-mx860series-3.10-1-i386-deb/packagessudo dpkg -i --force-all *.debentered password Opened printing manager .Deleted previous attempt at installing the printerClicked ADD and behold the printer showed up in the network list with the URI detais and all! (Canon-MP970-cnijnet:/00-00-85-E7-54-36)Followed the prompts and test page printed OK!!!!!! Hope this helps all who are using 64bit systems and are having trouble finding 64bit drivers
|


![Can’t Detect Connected Canon Wireless Printer [SOLUTION] | Canon Printer Support | Scoop.it](https://img.scoop.it/6PAJxSN0VxaQX0JLYVnoiTl72eJkfbmt4t8yenImKBVvK0kTmF0xjctABnaLJIm9)