21st Century Learning and Teaching
792.3K views | +97 today
21st Century Learning and Teaching
Related articles to 21st Century Learning and Teaching as also tools...
Curated by Gust MEES
Your new post is loading...

Popular Tags

Current selected tag: 'makered'. Clear
Scooped by Gust MEES
July 26, 2018 5:11 AM
Scoop.it!

Build an ESP8266 Web Server - Code and Schematics | #Coding #IoT #NodeMCU #Maker #MakerED #MakerSpaces

Build an ESP8266 Web Server - Code and Schematics | #Coding #IoT #NodeMCU #Maker #MakerED #MakerSpaces | 21st Century Learning and Teaching | Scoop.it

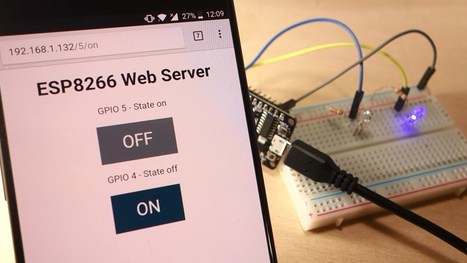
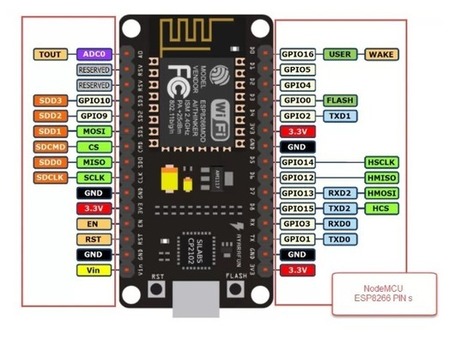
This tutorial is a step-by-step guide that shows you how to build a standalone ESP8266 Web Server that controls two outputs (two LEDs). This ESP8266 Web Server is mobile responsive and it can be accessed with any device that as a browser in your local network.


Learn more / En savoir plus / Mehr erfahren:


https://www.scoop.it/t/21st-century-learning-and-teaching/?&tag=NodeMCU


https://www.scoop.it/t/21st-century-learning-and-teaching/?&tag=ESP8266+WiFi+Module


Gust MEES's insight:

This tutorial is a step-by-step guide that shows you how to build a standalone ESP8266 Web Server that controls two outputs (two LEDs). This ESP8266 Web Server is mobile responsive and it can be accessed with any device that as a browser in your local network.


Learn more / En savoir plus / Mehr erfahren:


https://www.scoop.it/t/21st-century-learning-and-teaching/?&tag=NodeMCU


https://www.scoop.it/t/21st-century-learning-and-teaching/?&tag=ESP8266+WiFi+Module


No comment yet.
Scooped by Gust MEES
July 22, 2018 9:03 AM
Scoop.it!

Securing the Internet of Things | #CyberSecurity #Coding #Arduino #IoT

Securing the Internet of Things | #CyberSecurity #Coding #Arduino #IoT | 21st Century Learning and Teaching | Scoop.it

Aside from cool cat feeders, it is possible to find multiple maker projects for controlling garage doors, blind windows, smart locks, tracking cars, control temperature and humidity levels, and so on. However, the security aspect of these devices needs to take some extra attention, starting from the connection between the device and the Cloud infrastructure.


Most microcontrollers today are not powerful enough to handle secure connections, like SSL or TLS, so all the communication between the device and the server is open to attacks, like sniffing values, tacking device credentials, faking values, granting unauthorized access to physical facilities, unlocking doors, and many other possibilities. This way, securing the communications for all the Internet-connected devices should be a priority, especially if they can jeopardize our security or privacy.

The security of the Internet of Things does not only rely on secure communications, but it is a great start. The maker community must be aware of the security concerns of untrusted communications, and must have the appropriate resources to handle it. This way it is common to see different alternatives to offer secure communications in the microcontrollers, like porting SSL/TLS libraries to cheap devices like ESP8266, or device vendors that already integrates a crypto chip that process all this stuff by hardware, like the recent Arduino MKR1000.

In thinger.io we are concerned about this security aspect, so our cloud supports secure connections for any device with this capability. In the recent Arduino library update, starting from version 2.4.1, we have introduced support for the Arduino MKR1000, including secure TLS connections by default. Just start with the following sample sketch for the MKR1000, and you will have encrypted connections by default.


Learn more / En savoir plus / Mehr erfahren:


https://www.scoop.it/t/21st-century-learning-and-teaching/?&tag=ARDUINO


https://www.scoop.it/t/21st-century-learning-and-teaching/?&tag=IoT


Gust MEES's insight:

Aside from cool cat feeders, it is possible to find multiple maker projects for controlling garage doors, blind windows, smart locks, tracking cars, control temperature and humidity levels, and so on. However, the security aspect of these devices needs to take some extra attention, starting from the connection between the device and the Cloud infrastructure.


Most microcontrollers today are not powerful enough to handle secure connections, like SSL or TLS, so all the communication between the device and the server is open to attacks, like sniffing values, tacking device credentials, faking values, granting unauthorized access to physical facilities, unlocking doors, and many other possibilities. This way, securing the communications for all the Internet-connected devices should be a priority, especially if they can jeopardize our security or privacy.

The security of the Internet of Things does not only rely on secure communications, but it is a great start. The maker community must be aware of the security concerns of untrusted communications, and must have the appropriate resources to handle it. This way it is common to see different alternatives to offer secure communications in the microcontrollers, like porting SSL/TLS libraries to cheap devices like ESP8266, or device vendors that already integrates a crypto chip that process all this stuff by hardware, like the recent Arduino MKR1000.

In thinger.io we are concerned about this security aspect, so our cloud supports secure connections for any device with this capability. In the recent Arduino library update, starting from version 2.4.1, we have introduced support for the Arduino MKR1000, including secure TLS connections by default. Just start with the following sample sketch for the MKR1000, and you will have encrypted connections by default.


Learn more / En savoir plus / Mehr erfahren:


https://www.scoop.it/t/21st-century-learning-and-teaching/?&tag=ARDUINO


https://www.scoop.it/t/21st-century-learning-and-teaching/?&tag=IoT

No comment yet.
Scooped by Gust MEES
July 22, 2018 8:02 AM
Scoop.it!

Robot facial expressions with Arduino, led matrix and MAX7219 - YouTube

Simple facial expressions for use in my interactive robot projects.
See more @ http://letsmakerobots.com/node/37367


Learn more / En savoir plus / Mehr erfahren:


https://www.scoop.it/t/21st-century-learning-and-teaching/?&tag=ARDUINO


https://www.scoop.it/t/21st-century-learning-and-teaching/?&tag=LEDs


Gust MEES's insight:

Simple facial expressions for use in my interactive robot projects.
See more @ http://letsmakerobots.com/node/37367


Learn more / En savoir plus / Mehr erfahren:


https://www.scoop.it/t/21st-century-learning-and-teaching/?&tag=ARDUINO


https://www.scoop.it/t/21st-century-learning-and-teaching/?&tag=LEDs


No comment yet.
Scooped by Gust MEES
July 21, 2018 9:55 AM
Scoop.it!

First Steps with the Arduino-UNO R3 | Maker, MakerED, Coding | 24×8 LED MATRIX | Rolling Animated Eyes 

First Steps with the Arduino-UNO R3 | Maker, MakerED, Coding | 24×8 LED MATRIX | Rolling Animated Eyes  | 21st Century Learning and Teaching | Scoop.it

Rolling Animated Eyes: Since very long I was looking for the How-To of "Rolling Eyes" on a LED-Matrix for one of my projects with Arduino. I found it through my searches on Google on a tutorial using Raspberry PI from "SunFounder"; a tutorial which shows as well the use with an Arduino UNO.…


Learn more / En savoir plus / Mehr erfahren:


https://www.scoop.it/t/21st-century-learning-and-teaching/?&tag=ARDUINO


https://www.scoop.it/t/21st-century-learning-and-teaching/?&tag=LEDs


Gust MEES's insight:

Rolling Animated Eyes: Since very long I was looking for the How-To of "Rolling Eyes" on a LED-Matrix for one of my projects with Arduino. I found it through my searches on Google on a tutorial using Raspberry PI from "SunFounder"; a tutorial which shows as well the use with an Arduino UNO.…


Learn more / En savoir plus / Mehr erfahren:


https://www.scoop.it/t/21st-century-learning-and-teaching/?&tag=ARDUINO


https://www.scoop.it/t/21st-century-learning-and-teaching/?&tag=LEDs


No comment yet.
Scooped by Gust MEES
July 17, 2018 12:48 PM
Scoop.it!

Simple Led Control With Blynk and NodeMCU Esp8266 12E | #Maker #MakerED #MakerSpace

Simple Led Control With Blynk and NodeMCU Esp8266 12E | #Maker #MakerED #MakerSpace | 21st Century Learning and Teaching | Scoop.it

With this awesome board and app in your hand the projects will become more compact and efficient!!

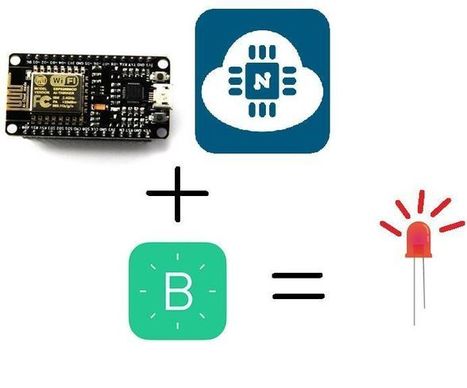
So fasten your seat belt and get ready , we are going to build a simple project were you can control an LED connected with Node MCU board by BLYNK app and whooop!! there you go:)


Learn more / En savoir plus / Mehr erfahren:


https://www.scoop.it/t/21st-century-learning-and-teaching/?&tag=ARDUINO


https://www.scoop.it/t/21st-century-learning-and-teaching/?&tag=ESP8266+WiFi+Module


https://www.scoop.it/t/21st-century-learning-and-teaching/?&tag=Internet+of+Things


https://www.scoop.it/t/21st-century-learning-and-teaching/?&tag=Blynk


Gust MEES's insight:

With this awesome board and app in your hand the projects will become more compact and efficient!!

So fasten your seat belt and get ready , we are going to build a simple project were you can control an LED connected with Node MCU board by BLYNK app and whooop!! there you go:)


Learn more / En savoir plus / Mehr erfahren:


https://www.scoop.it/t/21st-century-learning-and-teaching/?&tag=ARDUINO


https://www.scoop.it/t/21st-century-learning-and-teaching/?&tag=ESP8266+WiFi+Module


https://www.scoop.it/t/21st-century-learning-and-teaching/?&tag=Internet+of+Things


https://www.scoop.it/t/21st-century-learning-and-teaching/?&tag=Blynk


No comment yet.
Scooped by Gust MEES
July 14, 2018 9:45 AM
Scoop.it!

Read any sensor data over Virtual Pins in Blynk app. DHT11, DHT22. - YouTube

What is virtual pins:
http://help.blynk.cc/blynk-basics/wha...

DHT11 wiring diagram
http://www.getmicros.net/wp-content/u...

Example code (choose your hardware)
http://examples.blynk.cc/?board=Ardui...


Learn more / En savoir plus / Mehr erfahren:


https://www.scoop.it/t/21st-century-learning-and-teaching/?&tag=ARDUINO


https://www.scoop.it/t/21st-century-learning-and-teaching/?&tag=ESP8266+WiFi+Module


https://www.scoop.it/t/21st-century-learning-and-teaching/?&tag=Internet+of+Things


https://www.scoop.it/t/21st-century-learning-and-teaching/?&tag=Blynk


Gust MEES's insight:

What is virtual pins:
http://help.blynk.cc/blynk-basics/wha...

DHT11 wiring diagram
http://www.getmicros.net/wp-content/u...

Example code (choose your hardware)
http://examples.blynk.cc/?board=Ardui...


Learn more / En savoir plus / Mehr erfahren:


https://www.scoop.it/t/21st-century-learning-and-teaching/?&tag=ARDUINO


https://www.scoop.it/t/21st-century-learning-and-teaching/?&tag=ESP8266+WiFi+Module


https://www.scoop.it/t/21st-century-learning-and-teaching/?&tag=Internet+of+Things


https://www.scoop.it/t/21st-century-learning-and-teaching/?&tag=Blynk


No comment yet.
Scooped by Gust MEES
July 9, 2018 11:36 AM
Scoop.it!

How Blynk Works | #Coding #IoT #Maker #MakerED #MakerSpaces #Apps

How Blynk Works | #Coding #IoT #Maker #MakerED #MakerSpaces #Apps | 21st Century Learning and Teaching | Scoop.it

This guide will help you understand how to get started using Blynk and give a comprehensive overview of all the features.

If you want to jump straight into playing with Blynk, check out Getting Started.

How Blynk Works


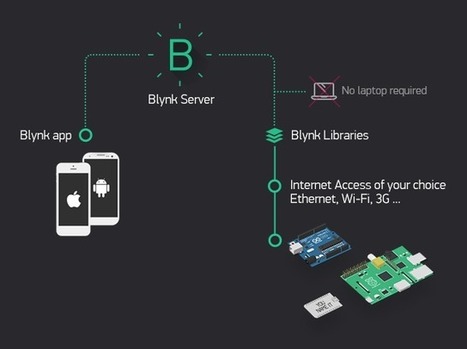
Blynk was designed for the Internet of Things. It can control hardware remotely, it can display sensor data, it can store data, vizualize it and do many other cool things.


Learn more / En savoir plus / Mehr erfahren:


https://www.scoop.it/t/21st-century-learning-and-teaching/?&tag=ARDUINO


https://www.scoop.it/t/21st-century-learning-and-teaching/?&tag=ESP8266+WiFi+Module


https://www.scoop.it/t/21st-century-learning-and-teaching/?&tag=Internet+of+Things


https://www.scoop.it/t/21st-century-learning-and-teaching/?&tag=Blynk


Gust MEES's insight:

This guide will help you understand how to get started using Blynk and give a comprehensive overview of all the features.

If you want to jump straight into playing with Blynk, check out Getting Started.

How Blynk Works


Blynk was designed for the Internet of Things. It can control hardware remotely, it can display sensor data, it can store data, vizualize it and do many other cool things.


Learn more / En savoir plus / Mehr erfahren:


https://www.scoop.it/t/21st-century-learning-and-teaching/?&tag=ARDUINO


https://www.scoop.it/t/21st-century-learning-and-teaching/?&tag=ESP8266+WiFi+Module


https://www.scoop.it/t/21st-century-learning-and-teaching/?&tag=Internet+of+Things


https://www.scoop.it/t/21st-century-learning-and-teaching/?&tag=Blynk


No comment yet.
Scooped by Gust MEES
July 2, 2018 9:22 AM
Scoop.it!

Using a PIR w/Arduino | PIR Motion Sensor | Adafruit Learning System | #Coding #Maker #MakerED #MakerSpaces

Reading PIR Sensors
Connecting PIR sensors to a microcontroller is really simple. The PIR acts as a digital output, it can be high voltage or low voltage, so all you need to do is listen for the pin to flip high (detected) or low (not detected) by listening on a digital input on your Arduino

Its likely that you'll want reriggering, so be sure to put the jumper in the H position!

Power the PIR with 5V and connect ground to ground. Then connect the output to a digital pin. In this example we'll use pin 2.


Learn more / En savoir plus / Mehr erfahren:


https://www.scoop.it/t/21st-century-learning-and-teaching/?&tag=ARDUINO


Gust MEES's insight:

Reading PIR Sensors
Connecting PIR sensors to a microcontroller is really simple. The PIR acts as a digital output, it can be high voltage or low voltage, so all you need to do is listen for the pin to flip high (detected) or low (not detected) by listening on a digital input on your Arduino

Its likely that you'll want reriggering, so be sure to put the jumper in the H position!

Power the PIR with 5V and connect ground to ground. Then connect the output to a digital pin. In this example we'll use pin 2.


Learn more / En savoir plus / Mehr erfahren:


https://www.scoop.it/t/21st-century-learning-and-teaching/?&tag=ARDUINO


No comment yet.
Scooped by Gust MEES
July 1, 2018 3:31 PM
Scoop.it!

How To Build Custom Android App for your Arduino Project using MIT App Inventor | #Coding #IoT #Apps #Maker #MakerED #MakerSpaces

How To Build Custom Android App for your Arduino Project using MIT App Inventor | #Coding #IoT #Apps #Maker #MakerED #MakerSpaces | 21st Century Learning and Teaching | Scoop.it

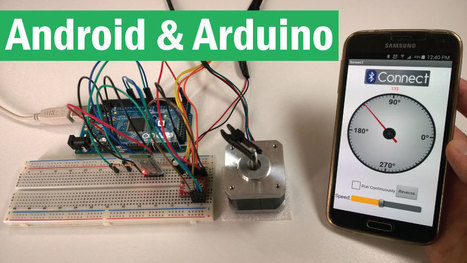
In this Arduino Tutorial we will learn how to build custom Android applications for controlling Arduino using the MIT App Inventor online application. You can watch the following video or read the written tutorial below.

Learn more / En savoir plus / Mehr erfahren:


https://www.scoop.it/t/21st-century-learning-and-teaching/?&tag=ARDUINO


Gust MEES's insight:

In this Arduino Tutorial we will learn how to build custom Android applications for controlling Arduino using the MIT App Inventor online application. You can watch the following video or read the written tutorial below.

Learn more / En savoir plus / Mehr erfahren:


https://www.scoop.it/t/21st-century-learning-and-teaching/?&tag=ARDUINO


No comment yet.
Scooped by Gust MEES
June 29, 2018 4:11 PM
Scoop.it!

Cayenne IoT + ESP8266: driving a mini kit Pan-Tilt FPV SG90 in WiFi with a smartphone or tablet | #Coding #Maker #MakerED #MakerSpaces 

Cayenne IoT + ESP8266: driving a mini kit Pan-Tilt FPV SG90 in WiFi with a smartphone or tablet | #Coding #Maker #MakerED #MakerSpaces  | 21st Century Learning and Teaching | Scoop.it

In this new tutorial on Cayenne IoT, we will learn how to control an articulated Pan-Tilt PTZ SG90 system in WiFi. In the previous tutorial, we saw how to do with the Blynk library and application. Cayenne IoT is fairly similar. It is necessary to pass through the servers of myDevices.com which can cause a small delay of latency (quality of Internet connection, server load …).


Learn more / en savoir plus / Mehr erfahren:


https://www.scoop.it/t/21st-century-learning-and-teaching/?&tag=ESP8266+WiFi+Module


https://www.scoop.it/t/21st-century-learning-and-teaching/?&tag=Internet+of+Things


https://www.scoop.it/t/21st-century-learning-and-teaching/?&tag=ARDUINO


Gust MEES's insight:

In this new tutorial on Cayenne IoT, we will learn how to control an articulated Pan-Tilt PTZ SG90 system in WiFi. In the previous tutorial, we saw how to do with the Blynk library and application. Cayenne IoT is fairly similar. It is necessary to pass through the servers of myDevices.com which can cause a small delay of latency (quality of Internet connection, server load …).


Learn more / en savoir plus / Mehr erfahren:


https://www.scoop.it/t/21st-century-learning-and-teaching/?&tag=ESP8266+WiFi+Module


https://www.scoop.it/t/21st-century-learning-and-teaching/?&tag=Internet+of+Things


https://www.scoop.it/t/21st-century-learning-and-teaching/?&tag=ARDUINO


No comment yet.
Scooped by Gust MEES
June 27, 2018 5:26 PM
Scoop.it!

How PIR Sensor Works and How To Use It with Arduino | #Coding #Maker #MakerED #MakerSpaces

How PIR Sensor Works and How To Use It with Arduino | #Coding #Maker #MakerED #MakerSpaces | 21st Century Learning and Teaching | Scoop.it

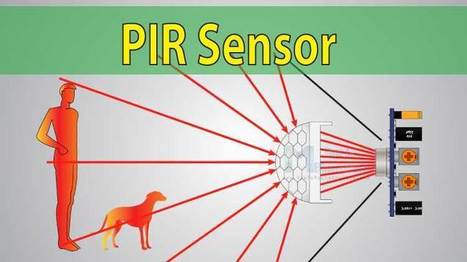
In this Arduino Tutorial we will learn how a PIR Sensor works and how to use it with the Arduino Board for detecting motion. You can watch the following video or read the written tutorial below.

Learn more / En savoir plus / Mehr erfahren:


https://www.scoop.it/t/21st-century-learning-and-teaching/?&tag=ARDUINO


Gust MEES's insight:

In this Arduino Tutorial we will learn how a PIR Sensor works and how to use it with the Arduino Board for detecting motion. You can watch the following video or read the written tutorial below.

Learn more / En savoir plus / Mehr erfahren:


https://www.scoop.it/t/21st-century-learning-and-teaching/?&tag=ARDUINO


No comment yet.
Scooped by Gust MEES
June 25, 2018 6:14 PM
Scoop.it!

Guide for 8x8 Dot Matrix MAX7219 with Arduino | #Coding #Maker #MakerED #MakerSpaces

Guide for 8x8 Dot Matrix MAX7219 with Arduino | #Coding #Maker #MakerED #MakerSpaces | 21st Century Learning and Teaching | Scoop.it

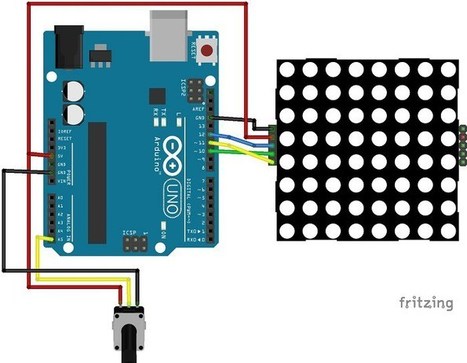
The dot matrix that we’re going to use in this guide is a 8×8 matrix which means that it has 8 columns and 8 rows, so it contains a total of 64 LEDs.

The MAX7219 chip makes it easier to control the dot matrix, by just using 3 digital pins of the Arduino board.

I think the best option is to buy the dot matrix with the MAX7219 chip as a module, it will simplify the wiring. You can check the dot matrix at Maker Advisor and find the best price.

You can control more than one matrix at a time. For that you just need to connect them to each other, as they have pins in both sides to extend the dot matrix.


Learn more / En savoir plus / Mehr erfahren: 


https://www.scoop.it/t/21st-century-learning-and-teaching/?&tag=ARDUINO


https://www.scoop.it/t/21st-century-learning-and-teaching/?&tag=LEDs


Gust MEES's insight:

The dot matrix that we’re going to use in this guide is a 8×8 matrix which means that it has 8 columns and 8 rows, so it contains a total of 64 LEDs.

The MAX7219 chip makes it easier to control the dot matrix, by just using 3 digital pins of the Arduino board.

I think the best option is to buy the dot matrix with the MAX7219 chip as a module, it will simplify the wiring. You can check the dot matrix at Maker Advisor and find the best price.

You can control more than one matrix at a time. For that you just need to connect them to each other, as they have pins in both sides to extend the dot matrix.


Learn more / En savoir plus / Mehr erfahren: 


https://www.scoop.it/t/21st-century-learning-and-teaching/?&tag=ARDUINO


https://www.scoop.it/t/21st-century-learning-and-teaching/?&tag=LEDs


No comment yet.
Scooped by Gust MEES
June 25, 2018 12:40 PM
Scoop.it!

DigDice - Digital Dice | #Coding #Maker #MakerED #MakerSpaces

DigDice - Digital Dice | #Coding #Maker #MakerED #MakerSpaces | 21st Century Learning and Teaching | Scoop.it

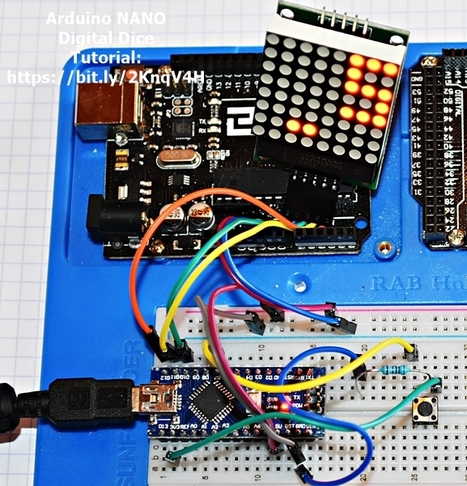
A simple game disse/roulette with Arduino and a MAX7219 8x8 led matrix. Find this and other hardware projects on Hackster.io.


It's a 5-10 minutes project ONLY!


Learn more / En savoir plus / Mehr erfahren: 


https://www.scoop.it/t/21st-century-learning-and-teaching/?&tag=ARDUINO


https://www.scoop.it/t/21st-century-learning-and-teaching/?&tag=LEDs


Gust MEES's insight:

A simple game disse/roulette with Arduino and a MAX7219 8x8 led matrix. Find this and other hardware projects on Hackster.io.


It's a 5-10 minutes project ONLY!


Learn more / En savoir plus / Mehr erfahren: 


https://www.scoop.it/t/21st-century-learning-and-teaching/?&tag=ARDUINO


https://www.scoop.it/t/21st-century-learning-and-teaching/?&tag=LEDs


No comment yet.
Scooped by Gust MEES
July 25, 2018 9:41 AM
Scoop.it!

ESP8266 DHT11/DHT22 Web Server Arduino IDE | #NodeMCU #Coding #IoT #Maker #MakerED #MakerSpaces 

ESP8266 DHT11/DHT22 Web Server Arduino IDE | #NodeMCU #Coding #IoT #Maker #MakerED #MakerSpaces  | 21st Century Learning and Teaching | Scoop.it

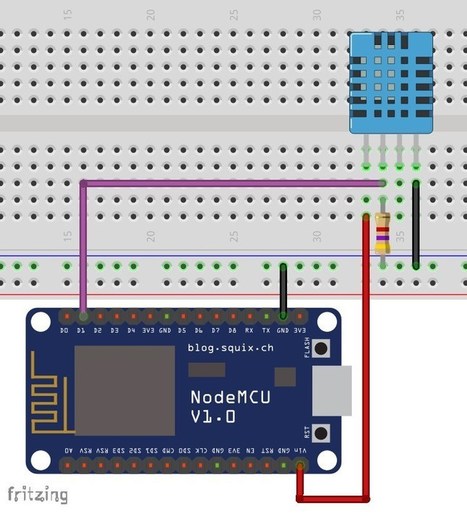
In this project you’ll create a standalone web server with an ESP8266 that displays the temperature and humidity with a DHT11 or DHT22 sensor using the Arduino IDE. The web server you’ll build can be accessed by any device that has a browser on your local network.


Learn more / En savoir plus / Mehr erfahren:


https://www.scoop.it/t/21st-century-learning-and-teaching/?&tag=NodeMCU


https://www.scoop.it/t/21st-century-learning-and-teaching/?&tag=ESP8266+WiFi+Module


Gust MEES's insight:

In this project you’ll create a standalone web server with an ESP8266 that displays the temperature and humidity with a DHT11 or DHT22 sensor using the Arduino IDE. The web server you’ll build can be accessed by any device that has a browser on your local network.


Learn more / En savoir plus / Mehr erfahren:


https://www.scoop.it/t/21st-century-learning-and-teaching/?&tag=NodeMCU


https://www.scoop.it/t/21st-century-learning-and-teaching/?&tag=ESP8266+WiFi+Module


No comment yet.
Scooped by Gust MEES
July 22, 2018 8:39 AM
Scoop.it!

Animating Multiple LED Backpacks | Adafruit Learning System

Animating Multiple LED Backpacks | Adafruit Learning System | 21st Century Learning and Teaching | Scoop.it

Adafruit LED backpacks make it incredibly simple to add small bitmapped displays to a project. Each requires just four wires: power, ground and two communication lines to a microcontroller.

Two common questions we receive:


How can I use more than one 8x8 matrix backpack in an Arduino sketch?


Can I have two (or more) matrices always showing the same image?


This tutorial demonstrates both.

We’ve had spooky Halloween displays on the brain lately, but the concepts here are equally applicable to more innocent schemes!


Learn more / En savoir plus / Mehr erfahren:


https://www.scoop.it/t/21st-century-learning-and-teaching/?&tag=ARDUINO


https://www.scoop.it/t/21st-century-learning-and-teaching/?&tag=LEDs


Gust MEES's insight:

Adafruit LED backpacks make it incredibly simple to add small bitmapped displays to a project. Each requires just four wires: power, ground and two communication lines to a microcontroller.

Two common questions we receive:


How can I use more than one 8x8 matrix backpack in an Arduino sketch?


Can I have two (or more) matrices always showing the same image?


This tutorial demonstrates both.

We’ve had spooky Halloween displays on the brain lately, but the concepts here are equally applicable to more innocent schemes!


Learn more / En savoir plus / Mehr erfahren:


https://www.scoop.it/t/21st-century-learning-and-teaching/?&tag=ARDUINO


https://www.scoop.it/t/21st-century-learning-and-teaching/?&tag=LEDs

No comment yet.
Scooped by Gust MEES
July 21, 2018 6:45 PM
Scoop.it!

KidBright32 Board is Thailand's BBC Micro:Bit Equivalent | #Coding #Maker #MakerED #MakerSpaces 

KidBright32 Board is Thailand's BBC Micro:Bit Equivalent | #Coding #Maker #MakerED #MakerSpaces  | 21st Century Learning and Teaching | Scoop.it

BBC Micro:Bit board was first announced in July 2015. Designed for STEM education, the board was then offered to UK schools in March 2016, and a few months later UK store would start selling it worldwide. It’s now available pretty much anywhere, and you can likely find it in a local store or online.

The Thai government must have seen this, and thought to themselves “If the British can do it, we can do it too!”, as the National Electronics and Computer Technology Center (NECTEC) part of Thailand’s Ministry of Science and Technology designed KidBright32 board and courses to teach STEM to Thai students.


Learn more / En savoir plus / Mehr erfahren:


https://www.scoop.it/t/21st-century-learning-and-teaching/?&tag=Coding


Gust MEES's insight:

BBC Micro:Bit board was first announced in July 2015. Designed for STEM education, the board was then offered to UK schools in March 2016, and a few months later UK store would start selling it worldwide. It’s now available pretty much anywhere, and you can likely find it in a local store or online.

The Thai government must have seen this, and thought to themselves “If the British can do it, we can do it too!”, as the National Electronics and Computer Technology Center (NECTEC) part of Thailand’s Ministry of Science and Technology designed KidBright32 board and courses to teach STEM to Thai students.


Learn more / En savoir plus / Mehr erfahren:


https://www.scoop.it/t/21st-century-learning-and-teaching/?&tag=Coding


No comment yet.
Scooped by Gust MEES
July 17, 2018 5:12 PM
Scoop.it!

DHT11 with NodeMCU and Blynk | #Coding #Maker #MakerED #MakerSpaces #IoT

DHT11 with NodeMCU and Blynk | #Coding #Maker #MakerED #MakerSpaces #IoT | 21st Century Learning and Teaching | Scoop.it

What will you make:

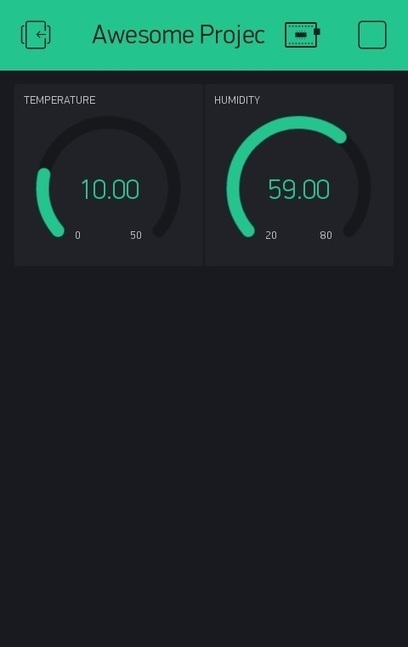
In this article, we will learn how to monitor temperature and humidity with your smartphone device, using a platform called Blynk. Blynk allows you to control Arduino, ESP8266, Raspberry Pi and other such boards through their iOS and Android apps. It provides an easy to use dashboard through which you can monitor various sensors and control actuators. If you are completely new to Blynk, checkout our Getting Started with Blynk guide.


Learn more / En savoir plus / Mehr erfahren:


https://www.scoop.it/t/21st-century-learning-and-teaching/?&tag=ARDUINO


https://www.scoop.it/t/21st-century-learning-and-teaching/?&tag=ESP8266+WiFi+Module


https://www.scoop.it/t/21st-century-learning-and-teaching/?&tag=Internet+of+Things


https://www.scoop.it/t/21st-century-learning-and-teaching/?&tag=Blynk


Gust MEES's insight:

What will you make:

In this article, we will learn how to monitor temperature and humidity with your smartphone device, using a platform called Blynk. Blynk allows you to control Arduino, ESP8266, Raspberry Pi and other such boards through their iOS and Android apps. It provides an easy to use dashboard through which you can monitor various sensors and control actuators. If you are completely new to Blynk, checkout our Getting Started with Blynk guide.


Learn more / En savoir plus / Mehr erfahren:


https://www.scoop.it/t/21st-century-learning-and-teaching/?&tag=ARDUINO


https://www.scoop.it/t/21st-century-learning-and-teaching/?&tag=ESP8266+WiFi+Module


https://www.scoop.it/t/21st-century-learning-and-teaching/?&tag=Internet+of+Things


https://www.scoop.it/t/21st-century-learning-and-teaching/?&tag=Blynk


No comment yet.
Scooped by Gust MEES
July 14, 2018 9:55 AM
Scoop.it!

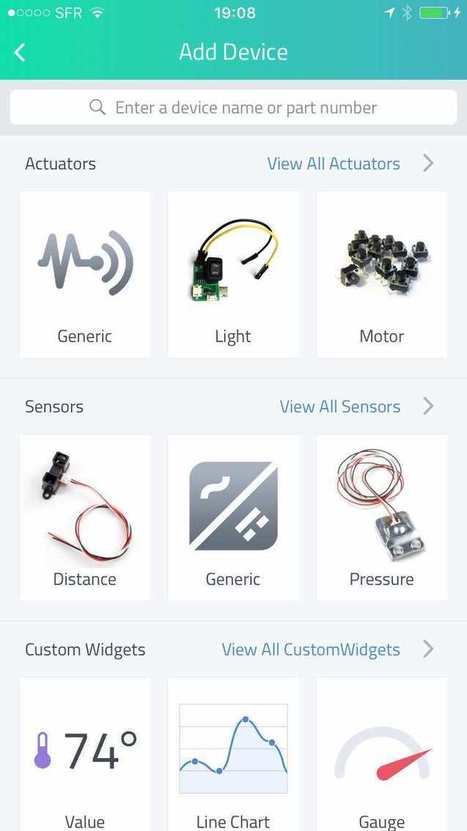
What is Virtual Pins | Blynk Help Center | #Apps #Coding #IoT #Maker #MakerED #MakerSpaces #LEARNingbyDoing 

What is Virtual Pins | Blynk Help Center | #Apps #Coding #IoT #Maker #MakerED #MakerSpaces #LEARNingbyDoing  | 21st Century Learning and Teaching | Scoop.it

Exchange any data between Blynk app and your hardware.


What is Virtual Pins
Exchange any data between Blynk app and your hardware
 

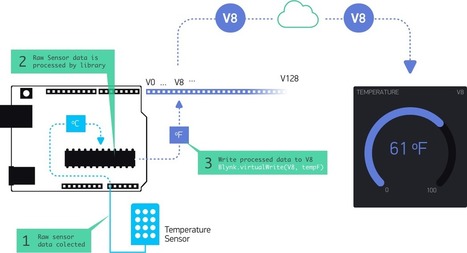
Virtual Pin is a concept invented by Blynk Inc. to provide exchange of any data between hardware and Blynk mobile app. 

Virtual pins are different than  Digital and Analog Input/Output (I/O) pins. They are physical pins on your microcontroller board where you connect sensors and actuators.


Blynk lets you control any hardware connected to Digital and Analog pins without having to write any additional code.

For example, if you need to turn On/Off LED connected to Digital pin, you don't have to write any code: 

  1. Just use BlynkBlink code for your hardware. 
  2. In the Blynk app - add Button Widget and set it to pin D8
  3. That's it! No additional code is required. Simply press Play in the app.


Learn more / En savoir plus / Mehr erfahren:


https://www.scoop.it/t/21st-century-learning-and-teaching/?&tag=ARDUINO


https://www.scoop.it/t/21st-century-learning-and-teaching/?&tag=ESP8266+WiFi+Module


https://www.scoop.it/t/21st-century-learning-and-teaching/?&tag=Internet+of+Things


https://www.scoop.it/t/21st-century-learning-and-teaching/?&tag=Blynk


Gust MEES's insight:

Exchange any data between Blynk app and your hardware.


What is Virtual Pins
Exchange any data between Blynk app and your hardware
 

Virtual Pin is a concept invented by Blynk Inc. to provide exchange of any data between hardware and Blynk mobile app. 

Virtual pins are different than  Digital and Analog Input/Output (I/O) pins. They are physical pins on your microcontroller board where you connect sensors and actuators.


Blynk lets you control any hardware connected to Digital and Analog pins without having to write any additional code.

For example, if you need to turn On/Off LED connected to Digital pin, you don't have to write any code: 

  1. Just use BlynkBlink code for your hardware. 
  2. In the Blynk app - add Button Widget and set it to pin D8
  3. That's it! No additional code is required. Simply press Play in the app.


Learn more / En savoir plus / Mehr erfahren:


https://www.scoop.it/t/21st-century-learning-and-teaching/?&tag=ARDUINO


https://www.scoop.it/t/21st-century-learning-and-teaching/?&tag=ESP8266+WiFi+Module


https://www.scoop.it/t/21st-century-learning-and-teaching/?&tag=Internet+of+Things


https://www.scoop.it/t/21st-century-learning-and-teaching/?&tag=Blynk


No comment yet.
Scooped by Gust MEES
July 14, 2018 9:32 AM
Scoop.it!

Make your own IOT apps with Blynk. NodeMCU (ESP8266) Tutorial - YouTube

Step by step tutorial on how to export projects from Blynk into your own apps that will work with any connected product you build.


Learn more / En savoir plus / Mehr erfahren:


https://www.scoop.it/t/21st-century-learning-and-teaching/?&tag=Coding


https://www.scoop.it/t/21st-century-learning-and-teaching/?&tag=ARDUINO


Gust MEES's insight:

Step by step tutorial on how to export projects from Blynk into your own apps that will work with any connected product you build.


Learn more / En savoir plus / Mehr erfahren:


https://www.scoop.it/t/21st-century-learning-and-teaching/?&tag=Coding


https://www.scoop.it/t/21st-century-learning-and-teaching/?&tag=ARDUINO


No comment yet.
Scooped by Gust MEES
July 4, 2018 5:41 PM
Scoop.it!

First Steps with the NodeMCU ESP8266 Wi-Fi Module | Maker, MakerED, Coding | Tips 

First Steps with the NodeMCU ESP8266 Wi-Fi Module | Maker, MakerED, Coding | Tips  | 21st Century Learning and Teaching | Scoop.it

First Steps with the NodeMCU ESP8266 Wi-Fi Module. In our previous tutorials we were using already the NodeMCU ESP8266 Wi-Fi Module and we discussed about "Security", "Cyber-Security" issues while using "IoT", "Internet of Things" and the importance that the router MUST be protected by a NEW password and NOT ALLOW to let connect any…


Learn more / En savoir plus / Mehr erfahren:


https://www.scoop.it/t/21st-century-learning-and-teaching/?&tag=ARDUINO


https://www.scoop.it/t/21st-century-learning-and-teaching/?&tag=ESP8266+WiFi+Module


Gust MEES's insight:

First Steps with the NodeMCU ESP8266 Wi-Fi Module. In our previous tutorials we were using already the NodeMCU ESP8266 Wi-Fi Module and we discussed about "Security", "Cyber-Security" issues while using "IoT", "Internet of Things" and the importance that the router MUST be protected by a NEW password and NOT ALLOW to let connect any…


Learn more / En savoir plus / Mehr erfahren:


https://www.scoop.it/t/21st-century-learning-and-teaching/?&tag=ARDUINO


https://www.scoop.it/t/21st-century-learning-and-teaching/?&tag=ESP8266+WiFi+Module


No comment yet.
Scooped by Gust MEES
July 1, 2018 3:57 PM
Scoop.it!

HC-SR501 with Arduino & Raspberry Pi | PIR Motion Sensor | #Coding #Maker #MakerED #MakerSpaces

HC-SR501 with Arduino & Raspberry Pi | PIR Motion Sensor | #Coding #Maker #MakerED #MakerSpaces | 21st Century Learning and Teaching | Scoop.it

Motion sensing devices are commonly used in burglar alarms and automated lighting systems. The HC-SR501 is a motion sensor module that is inexpensive and very versatile.  It can be used all by itself or combined with a micrrocontroller or microcomputer to create a number of motion sensing products.

In this article you’ll learn how PIR (Passive Infrared) motion sensors work and how to use them with an Arduino or Raspberry Pi.


Learn more / En savoir plus / Mehr erfahren:


https://www.scoop.it/t/21st-century-learning-and-teaching/?&tag=ARDUINO


Gust MEES's insight:

Motion sensing devices are commonly used in burglar alarms and automated lighting systems. The HC-SR501 is a motion sensor module that is inexpensive and very versatile.  It can be used all by itself or combined with a micrrocontroller or microcomputer to create a number of motion sensing products.

In this article you’ll learn how PIR (Passive Infrared) motion sensors work and how to use them with an Arduino or Raspberry Pi.


Learn more / En savoir plus / Mehr erfahren:


https://www.scoop.it/t/21st-century-learning-and-teaching/?&tag=ARDUINO


No comment yet.
Scooped by Gust MEES
July 1, 2018 12:35 PM
Scoop.it!

PIR Motion Sensor | HC-SR501 Arduino Tutorial and Manual | #Coding #Maker #MakerED #MakerSpaces

PIR Motion Sensor | HC-SR501 Arduino Tutorial and Manual | #Coding #Maker #MakerED #MakerSpaces | 21st Century Learning and Teaching | Scoop.it

The HC-SR501 Passive Infrared (PIR) Motion Sensor This  motion sensor module uses the LHI778 Passive Infrared Sensor and the BISS0001 IC to control how motion is detected. The module features adjus…


Learn more / En savoir plus / Mehr erfahren:


https://www.scoop.it/t/21st-century-learning-and-teaching/?&tag=ARDUINO


Gust MEES's insight:

The HC-SR501 Passive Infrared (PIR) Motion Sensor This  motion sensor module uses the LHI778 Passive Infrared Sensor and the BISS0001 IC to control how motion is detected. The module features adjus…


Learn more / En savoir plus / Mehr erfahren:


https://www.scoop.it/t/21st-century-learning-and-teaching/?&tag=ARDUINO


No comment yet.
Scooped by Gust MEES
June 28, 2018 3:15 PM
Scoop.it!

Wi-Servo: Wi-Fi Browser Controlled Servomotors | #Coding #Maker #MakerED #MakerSpaces

This tutorial shows how to control some servomotors remotely in a Wi-Fi network, using an ordinary internet browser.


Learn more / En savoir plus / Mehr erfahren:


https://www.scoop.it/t/21st-century-learning-and-teaching/?&tag=ESP8266+WiFi+Module


Gust MEES's insight:

This tutorial shows how to control some servomotors remotely in a Wi-Fi network, using an ordinary internet browser.


Learn more / En savoir plus / Mehr erfahren:


https://www.scoop.it/t/21st-century-learning-and-teaching/?&tag=ESP8266+WiFi+Module


No comment yet.
Scooped by Gust MEES
June 25, 2018 6:41 PM
Scoop.it!

Controlling a MAX7219 dot led matrix module with an Arduino Nano | #Coding #Maker #MakerED #MakerSpaces 

Controlling a MAX7219 dot led matrix module with an Arduino Nano | #Coding #Maker #MakerED #MakerSpaces  | 21st Century Learning and Teaching | Scoop.it

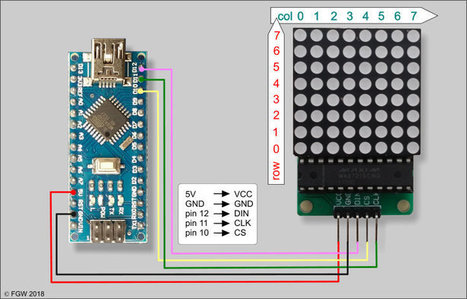
An 8×8 dot led matrix is a very interesting device because with proper instructions the individual leds or any group of leds can be programmed to fire. This characteristic, plus the feature that up to eight modules can be daisy chained, forms the basis for a nearly endless series of visual effects. Here we discuss the very basics of working with one MAX7219 dot led matrix module. A simple sketch is provided that creates a ‘smiley’ followed by a simulation of a bouncing ball.


Learn more / En savoir plus / Mehr erfahren:


https://www.scoop.it/t/21st-century-learning-and-teaching/?&tag=ARDUINO


Gust MEES's insight:

An 8×8 dot led matrix is a very interesting device because with proper instructions the individual leds or any group of leds can be programmed to fire. This characteristic, plus the feature that up to eight modules can be daisy chained, forms the basis for a nearly endless series of visual effects. Here we discuss the very basics of working with one MAX7219 dot led matrix module. A simple sketch is provided that creates a ‘smiley’ followed by a simulation of a bouncing ball.


Learn more / En savoir plus / Mehr erfahren:


https://www.scoop.it/t/21st-century-learning-and-teaching/?&tag=ARDUINO

collectedsolo's comment, June 29, 2018 2:57 AM
Nice
Scooped by Gust MEES
June 25, 2018 12:54 PM
Scoop.it!

DC Electronic Fuse Circuit Construction & Working | #Electronics #Maker #MakerED #MakerSpaces 

DC Electronic Fuse Circuit Construction & Working | #Electronics #Maker #MakerED #MakerSpaces  | 21st Century Learning and Teaching | Scoop.it

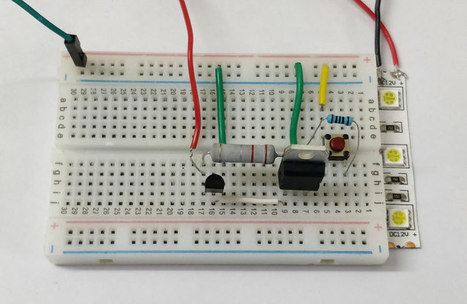
Fuse is a vital protection device for many electronic devices. They simply monitor the current consumed by the circuit/load and in the event of unsafe current flowing through the circuit the fuse will blow itself and thus prevent the load/circuit form getting damaged by that high current. This type of fuse is called a mechanical fuse and there are many types of fuse such as fast blow, slow blow etc, but they suffer from one common draw back. When a fuse is blown it has to be replaced by the consumer/operator to make the device function normal again. This is the reason why many old electronic devices like toaster or electric kettle had a spare fuse provided along with the product.

To overcome this drawback, most of the modern electronic devices use an Electronic Fuse. An Electronic Fuse serves the same purpose of that of a mechanical fuse but it requires no replacement. It has a power electronic switch inside with closes and opens the circuit as required. In the unlikely event of a failure the switch is open the circuit and isolate it from the power supply, once the favorable condition returns the fuse can be reset by just clicking on a button. There is no hassle of purchasing a suitable value of fuse and replacing it for the old one. Interesting right?!! So, In this tutorial we will learn how to construct an Electronic Fuse circuit, how it works and how you could use one in your designs.


Learn more / En savoir plus / Mehr erfahren:


https://www.scoop.it/t/21st-century-learning-and-teaching/?&tag=electronics


Gust MEES's insight:

Fuse is a vital protection device for many electronic devices. They simply monitor the current consumed by the circuit/load and in the event of unsafe current flowing through the circuit the fuse will blow itself and thus prevent the load/circuit form getting damaged by that high current. This type of fuse is called a mechanical fuse and there are many types of fuse such as fast blow, slow blow etc, but they suffer from one common draw back. When a fuse is blown it has to be replaced by the consumer/operator to make the device function normal again. This is the reason why many old electronic devices like toaster or electric kettle had a spare fuse provided along with the product.

To overcome this drawback, most of the modern electronic devices use an Electronic Fuse. An Electronic Fuse serves the same purpose of that of a mechanical fuse but it requires no replacement. It has a power electronic switch inside with closes and opens the circuit as required. In the unlikely event of a failure the switch is open the circuit and isolate it from the power supply, once the favorable condition returns the fuse can be reset by just clicking on a button. There is no hassle of purchasing a suitable value of fuse and replacing it for the old one. Interesting right?!! So, In this tutorial we will learn how to construct an Electronic Fuse circuit, how it works and how you could use one in your designs.


Learn more / En savoir plus / Mehr erfahren:


https://www.scoop.it/t/21st-century-learning-and-teaching/?&tag=electronics


No comment yet.