21st Century Learning and Teaching
791.6K views | +12 today
21st Century Learning and Teaching
Related articles to 21st Century Learning and Teaching as also tools...
Curated by Gust MEES
Your new post is loading...

Popular Tags

Current selected tag: 'Coding'. Clear
Scooped by Gust MEES
May 9, 2018 4:35 PM
Scoop.it!

0.96 Inch OLED I2C Display 128 x 64 | Arduino Tutorial | #Coding #Maker #MakerED #MakerSpaces #LEARNingByDoing 

0.96 Inch OLED I2C Display 128 x 64 | Arduino Tutorial | #Coding #Maker #MakerED #MakerSpaces #LEARNingByDoing  | 21st Century Learning and Teaching | Scoop.it

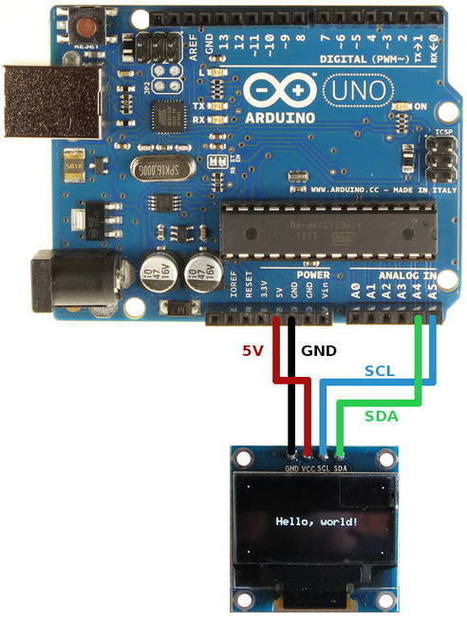
How to connect and program the Geekcreit 0.96 inch 4 pin white I2C OLED module with Arduino. OLED display based on a SSD1306 OLED driver IC.

In this tutorial a 0.96 inch monochrome OLED display from Geekcreit is connected or interfaced to an Arduino. Libraries are then installed and some example programs run which show how to use the display in an Arduino sketch.

The display connects to Arduino using only four wires – two for power and two for data, making the wiring very simple. The data connection is I2C (I²C, IIC or Inter-Integrated Circuit). This interface is sometimes called TWI (Two Wire Interface).

At the very lowest level, the Arduino Wire library is used to communicate with the display. Libraries are available that make it easy to start using the display right away to display text and graphics. These libraries are installed in this tutorial.


[Gust MEES] It works with THIS OLED <===> https://www.amazon.de/dp/B01L9GC470


Learn more / En savoir plus / Mehr erfahren:


https://www.scoop.it/t/21st-century-learning-and-teaching/?&tag=ARDUINO


Gust MEES's insight:

How to connect and program the Geekcreit 0.96 inch 4 pin white I2C OLED module with Arduino. OLED display based on a SSD1306 OLED driver IC.

In this tutorial a 0.96 inch monochrome OLED display from Geekcreit is connected or interfaced to an Arduino. Libraries are then installed and some example programs run which show how to use the display in an Arduino sketch.

The display connects to Arduino using only four wires – two for power and two for data, making the wiring very simple. The data connection is I2C (I²C, IIC or Inter-Integrated Circuit). This interface is sometimes called TWI (Two Wire Interface).

At the very lowest level, the Arduino Wire library is used to communicate with the display. Libraries are available that make it easy to start using the display right away to display text and graphics. These libraries are installed in this tutorial.


[Gust MEES] It works with THIS OLED <===> https://www.amazon.de/dp/B01L9GC470


Learn more / En savoir plus / Mehr erfahren:


https://www.scoop.it/t/21st-century-learning-and-teaching/?&tag=ARDUINO
 

No comment yet.
Scooped by Gust MEES
May 7, 2018 6:28 AM
Scoop.it!

Installing a Library on Windows | All About Arduino Libraries | #Coding #Maker #MakerED #MakerSpaces #LEARNingByDoing

Installing a Library on Windows 


Follow these steps to install a library in Windows.
Close the Arduino IDE
First make sure that all instances of the Arduino IDE are closed. The IDE only scans for libraries at startup. It will not see your new library as long as any instance of the IDE is open!


Learn more / En savoir plus / Mehr erfahren:


https://www.scoop.it/t/21st-century-learning-and-teaching/?&tag=ARDUINO
 

Gust MEES's insight:

Installing a Library on Windows 


Follow these steps to install a library in Windows.
Close the Arduino IDE
First make sure that all instances of the Arduino IDE are closed. The IDE only scans for libraries at startup. It will not see your new library as long as any instance of the IDE is open!


Learn more / En savoir plus / Mehr erfahren:


https://www.scoop.it/t/21st-century-learning-and-teaching/?&tag=ARDUINO


No comment yet.
Scooped by Gust MEES
May 5, 2018 7:06 AM
Scoop.it!

Die Uhrzeit des RTC DS3231 Modul vom Arduino einstellen | #Coding #Maker #MakerED #MakerSpaces #LEARNingByDoing 

Die Uhrzeit des RTC DS3231 Modul vom Arduino einstellen | #Coding #Maker #MakerED #MakerSpaces #LEARNingByDoing  | 21st Century Learning and Teaching | Scoop.it

Die Uhrzeit des RTC DS3231 Modul vom Arduino einstellen

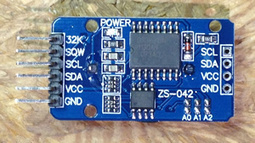
Die Uhrzeit des RTC DS3231 Uhrzeitmoduls soll vom Arduino einmalig eingestellt werden. Danach speichert das Modul die richtige Uhrzeit und läuft mit der angebauten Batterie weiter.
Die Verkabelung wurde im vorherigen Beitrag beschrieben.

Die aktuelle Uhrzeit +1min wird manuell eingegeben unter setup(). Dann wird das Programm ca. 4 Sekunden vor der Uhrzeit übersetzt und hochgeladen. Es sollte nun ungefähr zur richtigen Uhrzeit im RTC Chip ankommen. Ansonsten ein wenig mit den 4 Sekunden herum spielen.


Learn more / En savoir plus / Mehr erfahren:


https://www.scoop.it/t/21st-century-learning-and-teaching/?&tag=ARDUINO


Gust MEES's insight:

Die Uhrzeit des RTC DS3231 Modul vom Arduino einstellen

Die Uhrzeit des RTC DS3231 Uhrzeitmoduls soll vom Arduino einmalig eingestellt werden. Danach speichert das Modul die richtige Uhrzeit und läuft mit der angebauten Batterie weiter.
Die Verkabelung wurde im vorherigen Beitrag beschrieben.

Die aktuelle Uhrzeit +1min wird manuell eingegeben unter setup(). Dann wird das Programm ca. 4 Sekunden vor der Uhrzeit übersetzt und hochgeladen. Es sollte nun ungefähr zur richtigen Uhrzeit im RTC Chip ankommen. Ansonsten ein wenig mit den 4 Sekunden herum spielen.


Learn more / En savoir plus / Mehr erfahren:


https://www.scoop.it/t/21st-century-learning-and-teaching/?&tag=ARDUINO
 

No comment yet.
Scooped by Gust MEES
May 1, 2018 4:37 PM
Scoop.it!

Ugly Bug | #Coding #Maker #MakerED #MakerSpaces #ServoMotors | #LEARNingByDoing

Ugly Bug | #Coding #Maker #MakerED #MakerSpaces #ServoMotors | #LEARNingByDoing | 21st Century Learning and Teaching | Scoop.it

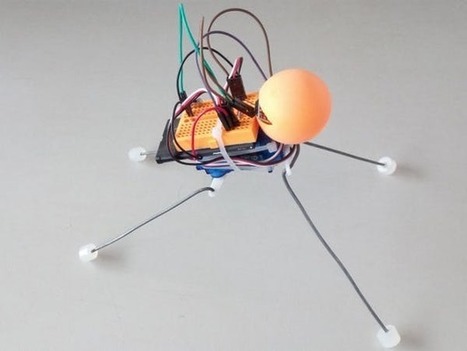
Here is a quick and easy little robot that can be built and assembled in about half an hour with the right tools and parts.

I didn't invent it. I saw a video of a thing like this on YouTube and thought 'Hey, that looks fun, I'll build one.'

So I grabbed some servos out of my junk box, an old cellphone battery I had kept in the hope of finding something cool to do with it, an arduino pro 3.3v that I had bought on a whim because I needed to reach the quota for free delivery and went to work.

An hour or so later, here it was!

Let's start with the basic assembly.

Cut off the mounting arm that's opposite the side where the wires come out on one of the servos (This will be your back servo). The back servo points down and the other forward. You can use glu or cable ties to keep them together.


Learn more / En savoir plus / Mehr erfahren:


https://www.scoop.it/t/21st-century-learning-and-teaching/?&tag=ARDUINO
 

Gust MEES's insight:

Here is a quick and easy little robot that can be built and assembled in about half an hour with the right tools and parts.

I didn't invent it. I saw a video of a thing like this on YouTube and thought 'Hey, that looks fun, I'll build one.'

So I grabbed some servos out of my junk box, an old cellphone battery I had kept in the hope of finding something cool to do with it, an arduino pro 3.3v that I had bought on a whim because I needed to reach the quota for free delivery and went to work.

An hour or so later, here it was!

Let's start with the basic assembly.

Cut off the mounting arm that's opposite the side where the wires come out on one of the servos (This will be your back servo). The back servo points down and the other forward. You can use glu or cable ties to keep them together.


Learn more / En savoir plus / Mehr erfahren:


https://www.scoop.it/t/21st-century-learning-and-teaching/?&tag=ARDUINO


Heidi Counsell's curator insight, May 4, 2018 3:34 AM
This rather ugly interesting bot makes for a quick ICT Robotics class project. - So many ideas can come from this...
 
Scooped by Gust MEES
April 29, 2018 10:59 AM
Scoop.it!

Arduino DS3231 Real Time Clock With Color TFT | #Coding #Maker #MakerED #MakerSpaces #LEARNingByDoing

Arduino DS3231 Real Time Clock With Color TFT | #Coding #Maker #MakerED #MakerSpaces #LEARNingByDoing | 21st Century Learning and Teaching | Scoop.it

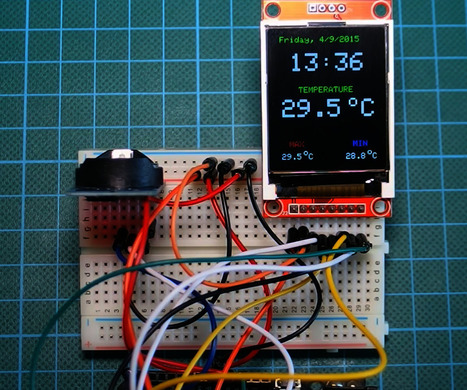
Building a real time clock with a color TFT display is extremely easy using Arduino. The display shows the time, the date, the currect temperature along the MAX and MIN temperature that it has measured. Let's build it!


Learn more / En savoir plus / Mehr erfahren:


https://www.scoop.it/t/21st-century-learning-and-teaching/?&tag=ARDUINO
 

https://www.scoop.it/t/21st-century-learning-and-teaching/?&tag=TFT+Screen


Gust MEES's insight:

Building a real time clock with a color TFT display is extremely easy using Arduino. The display shows the time, the date, the currect temperature along the MAX and MIN temperature that it has measured. Let's build it!


Learn more / En savoir plus / Mehr erfahren:


https://www.scoop.it/t/21st-century-learning-and-teaching/?&tag=ARDUINO
 

https://www.scoop.it/t/21st-century-learning-and-teaching/?&tag=TFT+Screen


No comment yet.
Scooped by Gust MEES
April 25, 2018 3:28 PM
Scoop.it!

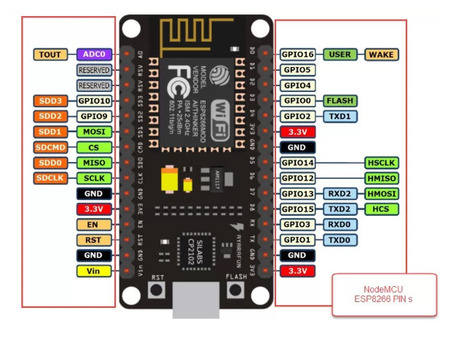
NodeMCU ESP8266 PINs – PINOUT | #Coding #Maker #MakerED #MakerSpaces #IoT

NodeMCU ESP8266 PINs – PINOUT | #Coding #Maker #MakerED #MakerSpaces #IoT | 21st Century Learning and Teaching | Scoop.it

Der NodeMCU ESP8266 ist wohl derzeit das Lieblings-Controller-Board vieler Bastler. Denn es vereint viele Vorteile unter einem Dach. Hier ein kleiner Auszug, was zum Erfolg des NodeMCU ESP8266 geführt hat:


  • kompakt und klein
  • WLAN on Board
  • viel Speicherplatz
  • USB-Schnittstelle (Bootloader) 
  • lässt sich über Arduino IDE programmieren
  • große Anzahl an Schnittstellen


Tja, und um genau diese Schnittstellen geht es hier in diesem Beitrag.


Hier zeigen wir Euch z.B. wo welche GPIO Ports liegen, wo ihr den Ground findet, an welcher Stelle das Board 3,3 Volt liefert. Welche PIN Stecker für RX und TX verwendet werden können – einfach alles, was man so über die PINs des NodeMCU ESP8266 wissen muss.


Learn more / En savoir plus / Mehr erfahren:


https://www.scoop.it/t/21st-century-learning-and-teaching/?&tag=ARDUINO
 

https://www.scoop.it/t/21st-century-learning-and-teaching/?&tag=ESP8266+WiFi+Module


Gust MEES's insight:

Der NodeMCU ESP8266 ist wohl derzeit das Lieblings-Controller-Board vieler Bastler. Denn es vereint viele Vorteile unter einem Dach. Hier ein kleiner Auszug, was zum Erfolg des NodeMCU ESP8266 geführt hat:


  • kompakt und klein
  • WLAN on Board
  • viel Speicherplatz
  • USB-Schnittstelle (Bootloader) 
  • lässt sich über Arduino IDE programmieren
  • große Anzahl an Schnittstellen


Tja, und um genau diese Schnittstellen geht es hier in diesem Beitrag.


Hier zeigen wir Euch z.B. wo welche GPIO Ports liegen, wo ihr den Ground findet, an welcher Stelle das Board 3,3 Volt liefert. Welche PIN Stecker für RX und TX verwendet werden können – einfach alles, was man so über die PINs des NodeMCU ESP8266 wissen muss.


Learn more / En savoir plus / Mehr erfahren:


https://www.scoop.it/t/21st-century-learning-and-teaching/?&tag=ARDUINO
 

https://www.scoop.it/t/21st-century-learning-and-teaching/?&tag=ESP8266+WiFi+Module


No comment yet.
Scooped by Gust MEES
April 24, 2018 8:19 PM
Scoop.it!

10 oled Projects - Arduino Project Hub | #Coding #Maker #MakerED #MakerSpaces #LEARNingByDoing

10 oled Projects - Arduino Project Hub | #Coding #Maker #MakerED #MakerSpaces #LEARNingByDoing | 21st Century Learning and Teaching | Scoop.it

Interested in oled? Explore 10 projects tagged with 'oled'. Find these and other hardware projects on Arduino Project Hub.


Learn more / En savoir plus / Mehr erfahren:


https://www.scoop.it/t/21st-century-learning-and-teaching/?&tag=ARDUINO
 

Gust MEES's insight:

Interested in oled? Explore 10 projects tagged with 'oled'. Find these and other hardware projects on Arduino Project Hub.


Learn more / En savoir plus / Mehr erfahren:


https://www.scoop.it/t/21st-century-learning-and-teaching/?&tag=ARDUINO
 

Jèét Sãlvî's curator insight, May 3, 2018 1:38 AM
Share your insight
Scooped by Gust MEES
April 23, 2018 3:21 PM
Scoop.it!

First Steps with the ESP8266 Wi-Fi Module | Maker, MakerED, Coding | Scrolling Text (Time, Temp., Humidity…) with 8×8 LED MATRIX 

First Steps with the ESP8266 Wi-Fi Module | Maker, MakerED, Coding | Scrolling Text (Time, Temp., Humidity…) with 8×8 LED MATRIX  | 21st Century Learning and Teaching | Scoop.it

In our previous blog post (Tutorial…), we were playing around with a LED MATRIX <===> First Steps with the Arduino-UNO R3 | Maker, MakerED, Coding | Scrolling Text with 8×8 LED MATRIX  <===> and we will continue to use the LED MATRIX, but this time with a Wi-Fi connection. We will use the module “ESP8266” which you can purchase worldwide around as it is very popular and it costs ONLY 7.49 €.


Learn more / En savoir plus / Mehr erfahren:


https://www.scoop.it/t/21st-century-learning-and-teaching/?&tag=ARDUINO
 

https://www.scoop.it/t/21st-century-learning-and-teaching/?&tag=ESP8266+WiFi+Module


Gust MEES's insight:

In our previous blog post (Tutorial…), we were playing around with a LED MATRIX <===> First Steps with the Arduino-UNO R3 | Maker, MakerED, Coding | Scrolling Text with 8×8 LED MATRIX  <===> and we will continue to use the LED MATRIX, but this time with a Wi-Fi connection. We will use the module “ESP8266” which you can purchase worldwide around as it is very popular and it costs ONLY 7.49 €.


Learn more / En savoir plus / Mehr erfahren:


https://www.scoop.it/t/21st-century-learning-and-teaching/?&tag=ARDUINO
 

https://www.scoop.it/t/21st-century-learning-and-teaching/?&tag=ESP8266+WiFi+Module


No comment yet.
Scooped by Gust MEES
April 20, 2018 8:52 AM
Scoop.it!

How I2C Communication Works and How To Use It with Arduino - YouTube | #Coding #Maker #MakerED #MakerSpaces #LEARNingByDoing 

https://howtomechatronics.com/tutoria... ► Find more details, circuit schematics and source codes here.

In this tutorial we will learn how the I2C communication protocol works and also we will make a practical example of it with the Arduino Board and a sensor which uses this protocol. You can watch the following video or read the written tutorial below.

Visit HowToMechatronics.com for more Tutorials, Tips, Projects and How It Works videos:
► https://howtomechatronics.com/


Learn more / En savoir plus / Mehr erfahren:


https://www.scoop.it/t/21st-century-learning-and-teaching/?&tag=ARDUINO


Gust MEES's insight:

https://howtomechatronics.com/tutoria... ► Find more details, circuit schematics and source codes here.

In this tutorial we will learn how the I2C communication protocol works and also we will make a practical example of it with the Arduino Board and a sensor which uses this protocol. You can watch the following video or read the written tutorial below.

Visit HowToMechatronics.com for more Tutorials, Tips, Projects and How It Works videos:
► https://howtomechatronics.com/


Learn more / En savoir plus / Mehr erfahren:


https://www.scoop.it/t/21st-century-learning-and-teaching/?&tag=ARDUINO
 

No comment yet.
Scooped by Gust MEES
April 15, 2018 10:30 AM
Scoop.it!

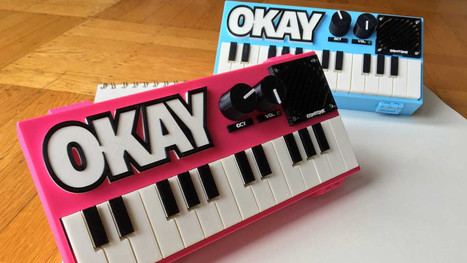
Weekend Project: 3D Printed OKAY 2 Synth Brings Music to the Maker's Ears | #MakerED #MakerSpaces #LEARNingByDoing #3DPrinting #Coding #Electronics

Weekend Project: 3D Printed OKAY 2 Synth Brings Music to the Maker's Ears | #MakerED #MakerSpaces #LEARNingByDoing #3DPrinting #Coding #Electronics | 21st Century Learning and Teaching | Scoop.it

Oskitone’s new and improved OKAY 2 is a mind-blowing DIY synth that you can 3D print and put together on your own. Hone your 3D printing and soldering skills with this sweet musical instrument and let the sounds sweep you away!

Looking for a new musical instrument to play? Why not use your 3D printer to create a synthesizer that is completely tailored to your style? Well, we’ve got a great project for all the musically-minded makers to take on over the weekend.

Last year, the San Francisco-based one-man musical instrument studio Oskitone released its first version of the OKAY synth, and has since refined the concept in a variety of ways. The new and improved OKAY 2 is an analog, monophonic, square wave synthesizer that is largely made up of 3D printed parts. It was designed on OpenSCAD and EAGLE by a man named Tommy, who is in charge of Oskitone.


Learn more / En savoir plus / Mehr erfahren:


https://www.scoop.it/t/21st-century-learning-and-teaching/?&tag=makered


Gust MEES's insight:

Oskitone’s new and improved OKAY 2 is a mind-blowing DIY synth that you can 3D print and put together on your own. Hone your 3D printing and soldering skills with this sweet musical instrument and let the sounds sweep you away!

Looking for a new musical instrument to play? Why not use your 3D printer to create a synthesizer that is completely tailored to your style? Well, we’ve got a great project for all the musically-minded makers to take on over the weekend.

Last year, the San Francisco-based one-man musical instrument studio Oskitone released its first version of the OKAY synth, and has since refined the concept in a variety of ways. The new and improved OKAY 2 is an analog, monophonic, square wave synthesizer that is largely made up of 3D printed parts. It was designed on OpenSCAD and EAGLE by a man named Tommy, who is in charge of Oskitone.


Learn more / En savoir plus / Mehr erfahren:


https://www.scoop.it/t/21st-century-learning-and-teaching/?&tag=makered


No comment yet.
Scooped by Gust MEES
April 13, 2018 8:26 AM
Scoop.it!

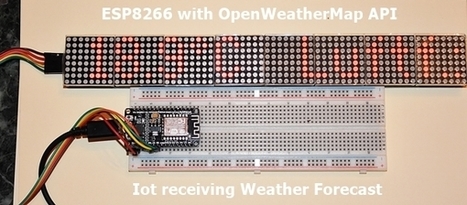
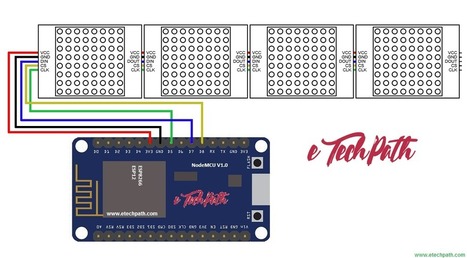
How to Control MAX7219 LED Matrix with ESP8266 WiFi Module | #Maker #MakerED #MakerSpaces #Coding

How to Control MAX7219 LED Matrix with ESP8266 WiFi Module | #Maker #MakerED #MakerSpaces #Coding | 21st Century Learning and Teaching | Scoop.it

About this Project:


In this project we will learn how to interfacing ESP8266 module with MAX7219 matrix display to scrolling text message from web user interface. We will use Arduino IDE to program ESP module in this project. I am using MajicDesigns MD_MAX72xx library for running this project, also the code is very similar to included example in the library with some improvements in web user interface html code.


Learn more / En savoir plus / Mehr erfahren:


https://www.scoop.it/t/21st-century-learning-and-teaching/?&tag=ARDUINO

 

Gust MEES's insight:

About this Project:


In this project we will learn how to interfacing ESP8266 module with MAX7219 matrix display to scrolling text message from web user interface. We will use Arduino IDE to program ESP module in this project. I am using MajicDesigns MD_MAX72xx library for running this project, also the code is very similar to included example in the library with some improvements in web user interface html code.


Learn more / En savoir plus / Mehr erfahren:


https://www.scoop.it/t/21st-century-learning-and-teaching/?&tag=ARDUINO
 

No comment yet.
Scooped by Gust MEES
April 9, 2018 8:20 AM
Scoop.it!

!!! Arduino Nano mit neuem Bootloader | #Maker #MakerED #MakerSpaces #Coding 

!!! Arduino Nano mit neuem Bootloader | #Maker #MakerED #MakerSpaces #Coding  | 21st Century Learning and Teaching | Scoop.it

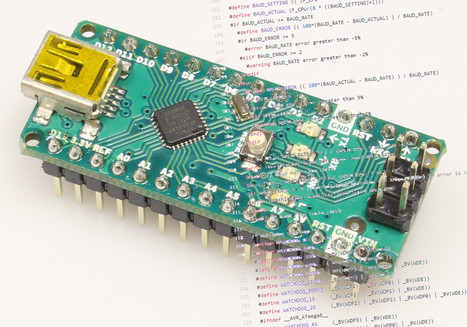
Stillschweigend hat Arduino den Bootloader für die Nano-Boards Anfang 2018 ausgetauscht. Wer sich ein neues Original-Board kauft, kann eine unangenehme Überraschung erleben.

Meistens benutzen wir in der Redaktion die billigen China-Kopien der Arduinos. Als wir jetzt allerdings Mal wieder einen mit FTDI-Chip brauchten, um etwas auszuprobieren, bestellten wir einen originalen Arduino Nano und kamen kurz ins Straucheln.


Learn more / En savoir plus / Mehr erfahren:


https://www.scoop.it/t/21st-century-learning-and-teaching/?&tag=ARDUINO
 

Gust MEES's insight:

Stillschweigend hat Arduino den Bootloader für die Nano-Boards Anfang 2018 ausgetauscht. Wer sich ein neues Original-Board kauft, kann eine unangenehme Überraschung erleben.

Meistens benutzen wir in der Redaktion die billigen China-Kopien der Arduinos. Als wir jetzt allerdings Mal wieder einen mit FTDI-Chip brauchten, um etwas auszuprobieren, bestellten wir einen originalen Arduino Nano und kamen kurz ins Straucheln.


Learn more / En savoir plus / Mehr erfahren:


https://www.scoop.it/t/21st-century-learning-and-teaching/?&tag=ARDUINO
 

No comment yet.
Scooped by Gust MEES
March 30, 2018 1:04 PM
Scoop.it!

PID Controller Basics Using XOD and Arduino | #Coding #Maker #MakerED #MakerSpaces #VisualProgramming #LEARNingByDoing

PID Controller Basics Using XOD and Arduino | #Coding #Maker #MakerED #MakerSpaces #VisualProgramming #LEARNingByDoing | 21st Century Learning and Teaching | Scoop.it

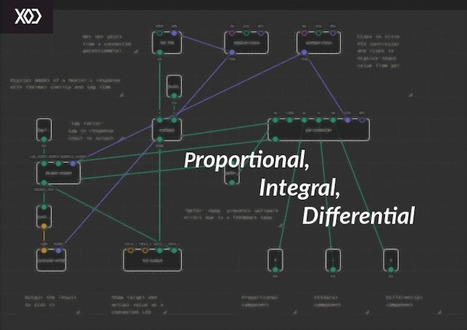
As a beginning student of the Arduino environment and aspiring maker, you’ve probably done some experiments with interfacing the board to some external hardware, such as LEDs, relays, sensors, or…


Learn more/ En svoir plus / Mehr erfahren:


https://www.scoop.it/t/21st-century-learning-and-teaching/?&tag=ARDUINO

 

https://www.scoop.it/t/21st-century-learning-and-teaching/?&tag=Visual+programming


Gust MEES's insight:

As a beginning student of the Arduino environment and aspiring maker, you’ve probably done some experiments with interfacing the board to some external hardware, such as LEDs, relays, sensors, or…


Learn more/ En svoir plus / Mehr erfahren:


https://www.scoop.it/t/21st-century-learning-and-teaching/?&tag=ARDUINO

 

https://www.scoop.it/t/21st-century-learning-and-teaching/?&tag=Visual+programming


No comment yet.
Scooped by Gust MEES
May 8, 2018 7:39 PM
Scoop.it!

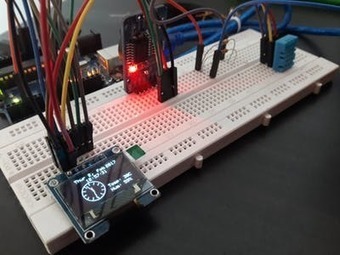
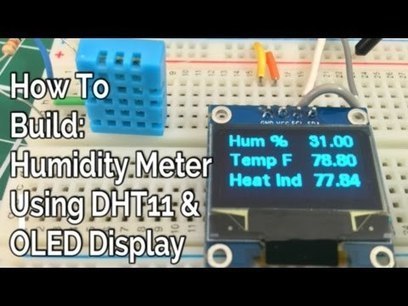
How to build Humidity and Temperature digital meter using DHT11 and OLED Display (#I2C) on #Arduino | #Coding #Maker #MakerED #MakerSpaces

How to build Humidity and Temperature digital meter using DHT11 and OLED Display (#I2C) on #Arduino | #Coding #Maker #MakerED #MakerSpaces | 21st Century Learning and Teaching | Scoop.it

A blog about Arduino programming, electronics.


Learn more / En savoir plus / Mehr erfahren:


https://www.scoop.it/t/21st-century-learning-and-teaching/?&tag=ARDUINO

 

Gust MEES's insight:

A blog about Arduino programming, electronics.


Learn more / En savoir plus / Mehr erfahren:


https://www.scoop.it/t/21st-century-learning-and-teaching/?&tag=ARDUINO

 

No comment yet.
Scooped by Gust MEES
May 5, 2018 7:30 AM
Scoop.it!

Arduino Usage | Adafruit DS3231 Precision RTC Breakout | #Coding #Maker #MakerED #MakerSpaces #LEARNingByDoing 

You can easily wire this breakout to any microcontroller, we'll be using an Arduino. For another kind of microcontroller, just make sure it has I2C, then port the code - its pretty simple stuff!


Learn more / En savoir plus / Mehr erfahren: 


https://www.scoop.it/t/21st-century-learning-and-teaching/?&tag=ARDUINO

 

Gust MEES's insight:

You can easily wire this breakout to any microcontroller, we'll be using an Arduino. For another kind of microcontroller, just make sure it has I2C, then port the code - its pretty simple stuff!


Learn more / En savoir plus / Mehr erfahren: 


https://www.scoop.it/t/21st-century-learning-and-teaching/?&tag=ARDUINO

 

No comment yet.
Scooped by Gust MEES
May 3, 2018 9:54 AM
Scoop.it!

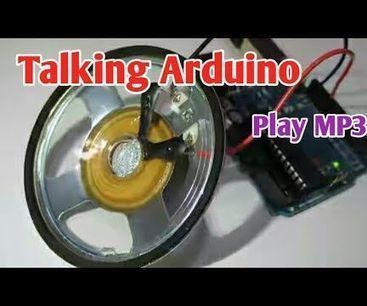
Talking Arduino | Playing a MP3 With Arduino Without Any Module | Playing Mp3 File From Arduino Using PCM | #Coding #maker #MakerED #MakerSpaces #Music

Talking Arduino | Playing a MP3 With Arduino Without Any Module | Playing Mp3 File From Arduino Using PCM | #Coding #maker #MakerED #MakerSpaces #Music | 21st Century Learning and Teaching | Scoop.it

In this instructables we will learn how to play a mp3 file with arduino without using any audio module, here we gonna use PCM library for Arduino which plays...


Learn more / En savoir plus / Mehr erfahren:


https://www.scoop.it/t/21st-century-learning-and-teaching/?&tag=ARDUINO


Gust MEES's insight:

In this instructables we will learn how to play a mp3 file with arduino without using any audio module, here we gonna use PCM library for Arduino which plays...


Learn more / En savoir plus / Mehr erfahren:


https://www.scoop.it/t/21st-century-learning-and-teaching/?&tag=ARDUINO


No comment yet.
Scooped by Gust MEES
April 30, 2018 6:09 PM
Scoop.it!

Raspberry Pi-alike NanoPi K1 Plus: For $35 you get 2xRAM, 4K video, Gigabit Ethernet | #Coding #Maker #MakerSpaces #MakerED

Raspberry Pi-alike NanoPi K1 Plus: For $35 you get 2xRAM, 4K video, Gigabit Ethernet | #Coding #Maker #MakerSpaces #MakerED | 21st Century Learning and Teaching | Scoop.it

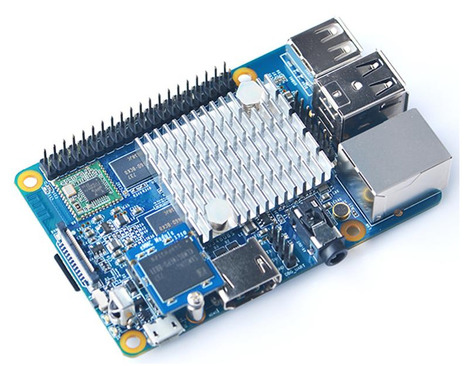
FriendlyElec has released a $35 rival to the Raspberry Pi 3 B+, outdoing the better-known board with 2GB of memory, Gigabit Ethernet, and a more powerful GPU.

The NanoPi K1 Plus follows FriendlyElec's Nano Pi K2, released last year with similar dimensions to the Raspberry Pi 3 for $40.

The NanoPi K1 Plus shares similar specs to the Nano Pi K2 and maintains the Raspberry Pi's form factor, but offers double the RAM, Gigabit Ethernet, and 4K video playback.

The device also has the same 40-pin GPIO pin-header as the Raspberry Pi 3, so it should work with Raspberry Pi accessories and housings.

Instead of the NanoPi K2's 1.5GHz Amlogic processor, FriendlyElec opted for an Allwinner H5 quad-core 64-bit Cortex A53 processor that runs at 1.4 GHz as well as a six-core Mali450 GPU. The Raspberry Pi 3 B+ uses a 1.4GHz Broadcom BCM2837B0, Cortex-A53 ArmV8 64-bit SoC.

The NanoPi K1 features three USB 2.0 ports, one microUSB 2.0 port for power, a microSD slot, while wireless support includes 802.11 b/g/n.


Learn more / En savoir plus / Mehr erfahren:


https://www.scoop.it/t/21st-century-learning-and-teaching/?&tag=Raspberry+Pi


Gust MEES's insight:

FriendlyElec has released a $35 rival to the Raspberry Pi 3 B+, outdoing the better-known board with 2GB of memory, Gigabit Ethernet, and a more powerful GPU.

The NanoPi K1 Plus follows FriendlyElec's Nano Pi K2, released last year with similar dimensions to the Raspberry Pi 3 for $40.

The NanoPi K1 Plus shares similar specs to the Nano Pi K2 and maintains the Raspberry Pi's form factor, but offers double the RAM, Gigabit Ethernet, and 4K video playback.

The device also has the same 40-pin GPIO pin-header as the Raspberry Pi 3, so it should work with Raspberry Pi accessories and housings.

Instead of the NanoPi K2's 1.5GHz Amlogic processor, FriendlyElec opted for an Allwinner H5 quad-core 64-bit Cortex A53 processor that runs at 1.4 GHz as well as a six-core Mali450 GPU. The Raspberry Pi 3 B+ uses a 1.4GHz Broadcom BCM2837B0, Cortex-A53 ArmV8 64-bit SoC.

The NanoPi K1 features three USB 2.0 ports, one microUSB 2.0 port for power, a microSD slot, while wireless support includes 802.11 b/g/n.


Learn more / En savoir plus / Mehr erfahren:


https://www.scoop.it/t/21st-century-learning-and-teaching/?&tag=Raspberry+Pi


No comment yet.
Scooped by Gust MEES
April 26, 2018 6:56 PM
Scoop.it!

Converting Images to Flash Memory Icons/images for TFT (without SD Card) | #Coding #Maker #MakerED #MakerSpaces #LEARNingByDoing

Converting Images to Flash Memory Icons/images for TFT (without SD Card) | #Coding #Maker #MakerED #MakerSpaces #LEARNingByDoing | 21st Century Learning and Teaching | Scoop.it

Many times to make any user interface or nicely display content, we use icons/images. In this Instructable, you will be displaying icons or logos or images...


Learn more / En savoir plus / Mehr erfahren:


https://www.scoop.it/t/21st-century-learning-and-teaching/?&tag=ARDUINO


https://www.scoop.it/t/21st-century-learning-and-teaching/?&tag=TFT+Screen


Gust MEES's insight:

Many times to make any user interface or nicely display content, we use icons/images. In this Instructable, you will be displaying icons or logos or images...


Learn more / En savoir plus / Mehr erfahren:


https://www.scoop.it/t/21st-century-learning-and-teaching/?&tag=ARDUINO


https://www.scoop.it/t/21st-century-learning-and-teaching/?&tag=TFT+Screen


No comment yet.
Scooped by Gust MEES
April 24, 2018 8:32 PM
Scoop.it!

ESP8266 ESP-01's projects | #Arduino #Coding #Maker #MakerED #MakerSpaces #LEARNingByDoing 

ESP8266 ESP-01's projects | #Arduino #Coding #Maker #MakerED #MakerSpaces #LEARNingByDoing  | 21st Century Learning and Teaching | Scoop.it

234 hardware projects made with ESP8266 ESP-01 from Everything ESP.


Learn more / En savoir plus / Mehr erfahren:


https://www.scoop.it/t/21st-century-learning-and-teaching/?&tag=ARDUINO


https://www.scoop.it/t/21st-century-learning-and-teaching/?&tag=ESP8266+WiFi+Module


Gust MEES's insight:

234 hardware projects made with ESP8266 ESP-01 from Everything ESP.


Learn more / En savoir plus / Mehr erfahren:


https://www.scoop.it/t/21st-century-learning-and-teaching/?&tag=ARDUINO


https://www.scoop.it/t/21st-century-learning-and-teaching/?&tag=ESP8266+WiFi+Module


No comment yet.
Scooped by Gust MEES
April 23, 2018 7:47 PM
Scoop.it!

784 Projects tagged with "ESP8266" | Hackaday.io | #Coding #Maker #MakerED #MakerSpaces #IoT #InternetOfThings

784 Projects tagged with "ESP8266" | Hackaday.io | #Coding #Maker #MakerED #MakerSpaces #IoT #InternetOfThings | 21st Century Learning and Teaching | Scoop.it

784 Projects tagged with ESP8266


Learn more / En savoir plus / Mehr erfahren:


https://www.scoop.it/t/21st-century-learning-and-teaching/?&tag=ARDUINO


https://www.scoop.it/t/21st-century-learning-and-teaching/?&tag=ESP8266+WiFi+Module


Gust MEES's insight:

784 Projects tagged with ESP8266


Learn more / En savoir plus / Mehr erfahren:


https://www.scoop.it/t/21st-century-learning-and-teaching/?&tag=ARDUINO


https://www.scoop.it/t/21st-century-learning-and-teaching/?&tag=ESP8266+WiFi+Module


No comment yet.
Scooped by Gust MEES
April 21, 2018 7:06 PM
Scoop.it!

ESP8266 WiFi Weather Station with Color TFT Display - YouTube | #Maker #MakerED #MakerSpaces #Coding 

In this project we’ll show you how to make a WiFi enabled, portable Weather Station using an ESP8266. LINKS BELOW! The software, written by Daniel Eichhorn, uses the Wunderground API to pull weather data. It shows the date, time, current weather conditions, 4-day forecast and even moon phases.


The user interface features lovely typography and icons that makes really a clean layout. The 2.4” TFT Feather Wing combined with the Adafruit Feather HUZZAH ESP8266 make assembling this project incredibly easy. Full Tutorial, Files and Code: https://learn.adafruit.com/wifi-weath...


Learn more / En savoir plus / Mehr erfahren:


https://www.scoop.it/t/21st-century-learning-and-teaching/?&tag=ARDUINO


https://www.scoop.it/t/21st-century-learning-and-teaching/?&tag=ESP8266+WiFi+Module


Gust MEES's insight:

In this project we’ll show you how to make a WiFi enabled, portable Weather Station using an ESP8266. LINKS BELOW! The software, written by Daniel Eichhorn, uses the Wunderground API to pull weather data. It shows the date, time, current weather conditions, 4-day forecast and even moon phases.


The user interface features lovely typography and icons that makes really a clean layout. The 2.4” TFT Feather Wing combined with the Adafruit Feather HUZZAH ESP8266 make assembling this project incredibly easy. Full Tutorial, Files and Code: https://learn.adafruit.com/wifi-weath...


Learn more / En savoir plus / Mehr erfahren:


https://www.scoop.it/t/21st-century-learning-and-teaching/?&tag=ARDUINO


https://www.scoop.it/t/21st-century-learning-and-teaching/?&tag=ESP8266+WiFi+Module


No comment yet.
Scooped by Gust MEES
April 19, 2018 12:03 PM
Scoop.it!

Einfacher Ultraschall-Levitationsapparat | #Maker #MakerED #MakerSpaces #Coding #Arduino #LEARNingByDoing

Einfacher Ultraschall-Levitationsapparat | #Maker #MakerED #MakerSpaces #Coding #Arduino #LEARNingByDoing | 21st Century Learning and Teaching | Scoop.it

Wer mit Ultraschall-Levitation experimentieren und Objekte rein durch die Energie von Schallwellen schweben lassen möchte, benötigt dafür keine wissenschaftliche Gerätschaften, komplizierte Steuerungen oder teuren Bausätze. Ein Arduino, ein Stepper-Motor-Treiber und ein umgebauter Abstandssensor reichen aus.

Das fertige Micro Ultrasonic Levitation Device und einige der nötigen Zutaten (Bild:  Ulrich Schmerold)
Zugegeben: Unser Mini Ultrasonic Levitation Device kann keine schweren Gegenstände in der Luft halten. Doch auch kleine Styroporkügelchen sind faszinierend, wenn sie wie von Geisterhand schweben. Anders als bei magnetischer Levitation benötigt man für die Ultraschallvariante keine Regelung, die das schwebende Objekt überwacht. Bei der akustischen Levitation "nistet" sich ein Objekt in einem Knoten einer stehenden akustischen Welle ein. Dadurch können auch mehrere Dinge gleichzeitig übereinander schweben – und nehmen sogar gleichmäßig verteilte Positionen ein.


Learn more / En savoir plus / Mehr erfahren:


https://www.scoop.it/t/21st-century-learning-and-teaching/?&tag=ARDUINO


Gust MEES's insight:

Wer mit Ultraschall-Levitation experimentieren und Objekte rein durch die Energie von Schallwellen schweben lassen möchte, benötigt dafür keine wissenschaftliche Gerätschaften, komplizierte Steuerungen oder teuren Bausätze. Ein Arduino, ein Stepper-Motor-Treiber und ein umgebauter Abstandssensor reichen aus.

Das fertige Micro Ultrasonic Levitation Device und einige der nötigen Zutaten (Bild:  Ulrich Schmerold)
Zugegeben: Unser Mini Ultrasonic Levitation Device kann keine schweren Gegenstände in der Luft halten. Doch auch kleine Styroporkügelchen sind faszinierend, wenn sie wie von Geisterhand schweben. Anders als bei magnetischer Levitation benötigt man für die Ultraschallvariante keine Regelung, die das schwebende Objekt überwacht. Bei der akustischen Levitation "nistet" sich ein Objekt in einem Knoten einer stehenden akustischen Welle ein. Dadurch können auch mehrere Dinge gleichzeitig übereinander schweben – und nehmen sogar gleichmäßig verteilte Positionen ein.


Learn more / En savoir plus / Mehr erfahren:


https://www.scoop.it/t/21st-century-learning-and-teaching/?&tag=ARDUINO


No comment yet.
Scooped by Gust MEES
April 13, 2018 8:43 AM
Scoop.it!

lcd-image-converter download | #Coding #Maker #MakerED #MakerSpaces #LEARNingByDoing

lcd-image-converter download | #Coding #Maker #MakerED #MakerSpaces #LEARNingByDoing | 21st Century Learning and Teaching | Scoop.it

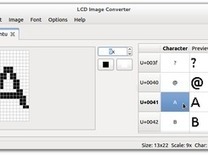
This program allows you to create bitmaps and fonts, and transform them to "C" source format for embedded applications.

The transformation of the images to the source code is made by using templates. Therefore, by modifying the templates, you can change the format of the output within certain limits.


Learn more / En savoir plus / Mehr erfahren:


https://www.scoop.it/t/21st-century-learning-and-teaching/?&tag=ARDUINO


Gust MEES's insight:

This program allows you to create bitmaps and fonts, and transform them to "C" source format for embedded applications.

The transformation of the images to the source code is made by using templates. Therefore, by modifying the templates, you can change the format of the output within certain limits.


Learn more / En savoir plus / Mehr erfahren:


https://www.scoop.it/t/21st-century-learning-and-teaching/?&tag=ARDUINO


No comment yet.
Scooped by Gust MEES
April 10, 2018 5:17 PM
Scoop.it!

First Steps with the Arduino-UNO R3 | Maker, MakerED, Coding | Scrolling Text with 8×8 LED MATRIX  | #MakerSpaces #LEARNingByDoing

First Steps with the Arduino-UNO R3 | Maker, MakerED, Coding | Scrolling Text with 8×8 LED MATRIX  | #MakerSpaces #LEARNingByDoing | 21st Century Learning and Teaching | Scoop.it

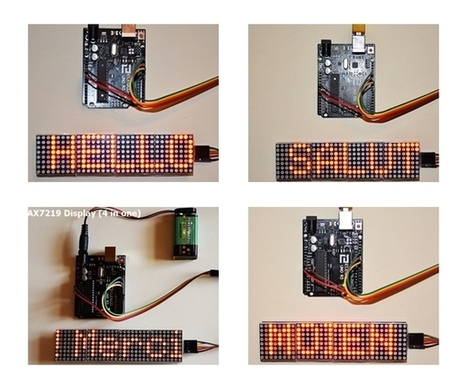
Scrolling Text with 8x8 LED MATRIX (4 Modules in One) . . . As we were playing around already with LED's in previous blog posts let us NOW try out a LED Matrix "4 in one"; its four (4) singular displays soldered on one piece of a single printed circuit board (PCB)...


Learn more / En savoir plus / Mehr erfahren:


https://www.scoop.it/t/21st-century-learning-and-teaching/?&tag=ARDUINO


Gust MEES's insight:

Scrolling Text with 8x8 LED MATRIX (4 Modules in One) . . . As we were playing around already with LED's in previous blog posts let us NOW try out a LED Matrix "4 in one"; its four (4) singular displays soldered on one piece of a single printed circuit board (PCB)...


Learn more / En savoir plus / Mehr erfahren:


https://www.scoop.it/t/21st-century-learning-and-teaching/?&tag=ARDUINO


No comment yet.
Scooped by Gust MEES
April 2, 2018 8:10 AM
Scoop.it!

First Steps with the Arduino-UNO R3 | Maker, MakerED, Coding | 2.8″ TFT Touch Screen with SDCard | #ElectronicsBadge #LEARNingByDoing

First Steps with the Arduino-UNO R3 | Maker, MakerED, Coding | 2.8″ TFT Touch Screen with SDCard | #ElectronicsBadge #LEARNingByDoing | 21st Century Learning and Teaching | Scoop.it

I was very happy when I got delivered that nice looking 2.8 inches TFT with incorporated SDCard. I ordered it on Amazon and it is from ELEGOO. It was delivered with a small CD where a lot of coding examples are integrated and a well done manual. SO, I started as soon…


Learn more / En savoir plus / Mehr erfahren:


https://www.scoop.it/t/21st-century-learning-and-teaching/?&tag=ARDUINO


Gust MEES's insight:

I was very happy when I got delivered that nice looking 2.8 inches TFT with incorporated SDCard. I ordered it on Amazon and it is from ELEGOO. It was delivered with a small CD where a lot of coding examples are integrated and a well done manual. SO, I started as soon…


Learn more / En savoir plus / Mehr erfahren:


https://www.scoop.it/t/21st-century-learning-and-teaching/?&tag=ARDUINO


No comment yet.