


During the last 2 weeks I’ve collected a lot of ESP-8266 power usage charts as shown here. Enough to conclude that a ESP8266 can be used to build battery powered sensors

 Your new post is loading... Your new post is loading...
During the last 2 weeks I’ve collected a lot of ESP-8266 power usage charts as shown here. Enough to conclude that a ESP8266 can be used to build battery powered sensors

No comment yet.
Sign up to comment
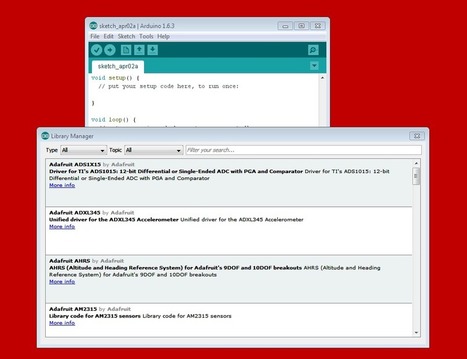
Big things are happening! Sceptical? Download the latest Arduino IDE, and go to Sketch - Include Library - Manage Libraries

Let’s start exploring a bit more about Intel Edison. As you may already know, Intel provides 2 different hardware platforms to work with Edison development board: the core module is called Intel Edison Compute Module, while the 2 extension boards are called Intel Edison Arduino Board and Intel Edison Breakout Board respectively. We refer to them as the Arduino module and mini-breakout board, respectively. The tutorial of this week is called Getting Started with Intel Edison Mini Breakout Board:

In our kitchen, the light that falls on the counter is blocked by the kitchen cabinets. It would be nice to have some light when preparing food, but often when you need light, your hands are dirty. I came up with the idea of running a strip of LEDs under the cabinets and being able to control them by waving your hand under the cabinet to turn them on. You can adjust the brightness by moving your hand down from just under the cabinet to counter level to control brightness based on the distance from the cabinet.
Have you ever wanted to wirelessly control power outlets from your phone? You could buy a Belkin WeMo Switch for over $40 for 1 outlet or build your own with 5 outlets for under $35 if you already own a Raspberry Pi. Hopefully this post will guide you in the right direction.
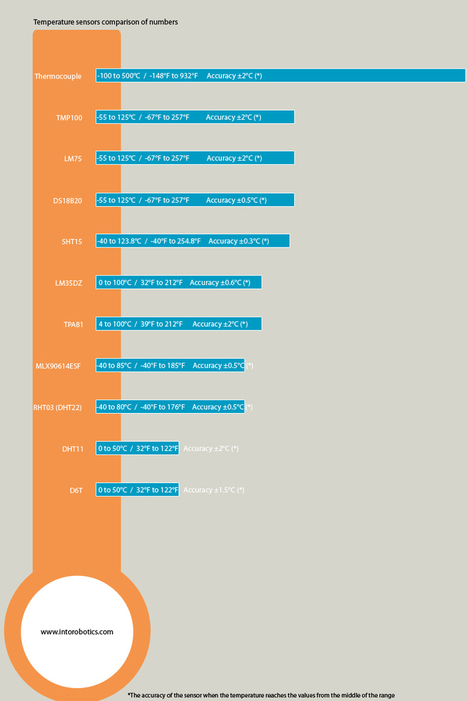
Do you want to find the right sensor for your DIY project based on the Arduino microcontroller? Well, finding the right sensor requires research and to facilitate this process, you’ll find all the info you need in this article.

I love to use WiFi in my home automation projects. On this website, you can find a lot of projects using Arduino along with the CC3000 WiFi chip from TI.
HAL-9000 (Space Odyssey), Mother (Alien), The Matrix, Jarvis (Iron Man), KITT – who doesn’t know them? And since a few days there’s Jasper, voice control for the Raspberry Pi.

I’ve often talked about how to use a atmega in in standalone mode without any Arduino board:

The CoPiino is a Arduino compatible Atmel 1284 based "shield" for the Raspberry Pi that allows remote editing and uploading of Arduino sketches using a web browser. Access the CoPiino app running on the Raspberry Pi with a web browser to edit and upload new sketches. Transfer sensor data from the CoPiino to the Raspberry Pi for display by the Apache Web Server, and stored by the MySQL server running on the Pi.
Vincent Demay's insight:
Take a look at the video: https://www.youtube.com/watch?v=TyV_AYDO__M

In this blog, I’ve often talked about how to use a atmega in in standalone mode without any Arduino board:with a 16mhz resonatoror without any resonator using internal clockIn both cases, you need to load the bootloader to the Atmega chip.

Since a while, I’m trying as I can to reduce the power consumption of my Arduino based system. Remember, I wrote a post about optimizing Arduino consumption few months ago. In this post I will explain how to use the Arduino internal quartz reducing significativelly the power consumption and making system last longer with 2 LR6 batteries. Using the internal clock instead of a 16mhz resonator helps my system to last longer on batteries : from 17 days to 3 or 4 months

These last days I spent some time playing with ethernet on my Arduino. The main goal is to make the Arduino accessible directly for the web via the Web. To do so I played with several shields or modules.
|

A little while back I released the very first version of ESPToy — a ESP8266 Development Board with a few useful on-board components like color LED, button, and temperature sensor.
|

|
Scooped by
Vincent Demay
March 20, 2015 5:38 PM
|

|
|
Scooped by
Vincent Demay
March 7, 2015 4:24 PM
|

|
|
Scooped by
Vincent Demay
March 3, 2015 5:27 AM
|

Very often we need to connect some type of mechanical switch to an Arduino as an input device. Also very often, there is mechanical slop in a switch, so the arduino sees one activation of the switch as multiple activations. This is called switch bounce. You can write code that looks at the state of the switch, saves it to a variable and waits for a short period of time and looks again to see if the button is still pressed, or you can debounce in hardware and save code space and complexity.
|
|
Scooped by
Vincent Demay
February 17, 2015 10:04 AM
|

|
|
Scooped by
Vincent Demay
January 23, 2015 5:21 PM
|

|
|
Scooped by
Vincent Demay
January 20, 2015 8:56 AM
|

|
|
Scooped by
Vincent Demay
January 16, 2015 11:30 AM
|

Coming from the Arduino world, most everything I do is 5v logic. It's been a switch for me now that I'm integrating my Raspberry Pi's into my Arduino solutions (they really are complementary).
|
|
Scooped by
Vincent Demay
January 14, 2015 10:14 AM
|

We always admired the amazing hardware and software that DIY home automators can put together and Mat Smiths project to build his ultimate home control panel is a great example.
|
|
Scooped by
Vincent Demay
December 4, 2014 10:02 AM
|

Today I am introducing the first version of RFToy — an Arduino-compatible gadget for interfacing with Radio Frequency (RF) modules.
Nice gadget - could be very usefull


