Your new post is loading...

|
Scooped by
mickael grad
April 15, 2013 11:47 AM
|
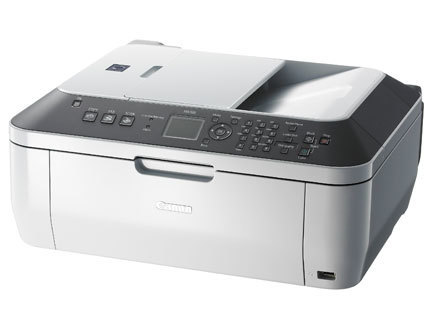
canon mg8220 printer error message
Message Some ink tanks are not installed in place."U072 "More than one ink tank of the following color is installed."U071 Action Possible causes are as follows:Some ink tanks are not installed in the correct position. (The lamp on the ink tank flashes.)More than one ink tanks of the same color are installed. (The lamp on the ink tank flashes.)Confirm that the ink tanks are installed in the appropriate positions. Massage"The remaining level of the ink cannot be correctly detected."U130 ActionThe remaining ink level cannot be correctly detected. (The lamp on the ink tank flashes.)Replace the ink tank and close the Scanning Unit (Printer Cover).Printing with an ink tank that was once empty may damage the machine. If you want to continue printing in this condition, you need to release the function for detecting the remaining ink level. Press and hold the Stop/Reset button for at least 5 seconds, and then release it.With this operation, releasing the function for detecting the remaining ink level is memorized. Please be advised that Canon shall not be liable for any machine malfunction or damage caused by refilled ink tanks. If the function for detecting the remaining ink level is disabled, the ink tank in gray is displayed on the LCD when checking the current ink level. Since printing in this condition may cause the contents of the fax to be lost, the machine stores received faxes in memory without printing until the ink tank is replaced. Print the fax stored in memory manually after replacing the ink tank. You can set the machine to print received faxes forcibly without storing them in memory, but a part of contents or all contents of the fax may not be printed.
|
|
Scooped by
mickael grad
August 21, 2012 5:57 PM
|
Reset the printer to resolve error conditions or if the printer does not respond
Resetting the Printer By resetting the printer's power, the print buffer is cleared and certain sensors are reset. If there is invalid data in the buffer, or sensors are stuck in a particular mode; a message may appear. Follow these steps to reset the printer: Turn the printer off with the Power button (if available). Disconnect the data cable from the printer (not applicable to WiFi, Bluetooth or Infrared) . Unplug the printer's power cord for approximately 10 minutes, and then plug it back in. If troubleshooting a communication issue, reconnect the data cable (not applicable to WiFi, Bluetooth or Infrared). For More Information: www.techbuddiesonline.com Call To Us Toll Free +1-855-517-2433
|
|
Scooped by
mickael grad
June 22, 2012 6:50 PM
|
How to Install Canon Printers Without the Disks
Canon printers are more commonly used for personal computers, as opposed to commercial use. These particular printers usually come with installation disks that are used to install the hardware's software drivers on the computer, but it's easy to misplace those disks over time. Luckily, the Canon support site provides software drivers for Canon printers, allowing users to install the software without the disks. 1 . Go to the official Canon Global website in your computer's Internet browser. 2 . Click the "Support <Drivers/Downloads>" tab along the left side of the Canon Global homepage. Select your region on the interactive map that appears on the right side of the tab options, and select the subregion where you are located. 3 . Select your product type, and click "Printers & Multifunction" to begin searching for your Canon product type. Click the product series that relates to your Canon printer. 4 . Scroll through the list of Canon printer models in the product series. Click the "Drivers & Software" link next to your Canon printer's thumbnail image. You will be redirected to the printer's product and overview page. 5 . Scroll down the Canon printer's product and overview page to the Drivers and Downloads section of the page. Click the "Select Your Operating System" drop-down bar. Select the name of your operating system, and click the red arrow to retrieve the software driver for your system. 6 . Click the .exe link under the firmware files that will be listed for the Canon "Software & Drivers" section. 7 . Run the Canon printer driver's .exe file from the File Download box that will appear. Click "Open" once the driver is processed. This file download will open the Canon installation wizard. 8 .Follow the system prompts in the Canon installation wizard to connect your Canon printer and complete the installation process.
|
|
Scooped by
mickael grad
June 20, 2012 6:01 PM
|
How to Clear a Paper Jam on a Canon Inkjet Printer
For many people, maintaining a Canon Inkjet Printer in the home or office can be expensive and frustrating. There are numerous error messages and they always come at inconvenient times. Many Canon printers today have LCD monitors to help us understand problems that arise, however, many inkjet printers do not come with such monitors. Most of us do not read the Canon Inkjet Printer manuals thoroughly and have little to no idea what the blinking error light means. Paper jams are among the most common problem with Canon Inkjet Printers. Follow these instructions to learn how to clear a paper jam on a Canon Inkjet Printer: Instructions 1 Protect yourself from shock. Disconnect the power cord from the back of the Canon Inkjet Printer. This is an important step when working inside ANY electronic device. 2 Unhinge the back access panel of the printer. It seems repetitive to say this, but this door will be in the BACK of the printer. 3 Look through the opened back panel and look for paper. Remove any and all paper you find jammed there. 4 Close the back access panel. Make sure that it latches into place and looks the same way that it did before you opened it. 5 Find the front or top access panel. This is the panel you would lift to change ink cartridges. Open this access panel. If the carriage that holds the ink cartridges moves, then you forgot to unplug the printer, go back and do that now. Look for paper that may be jammed in this area of the printer. 6 Remove any paper you find jammed here. When pulling from the front there will be resistance from the paper feeder. Pull slowly or the paper will rip and create a more stressful problem. 7 Close the front access panel. Make sure that it falls or latches back in place. It should look the same way that it did before you opened it. 8 Plug the printer's power cord into the wall outlet, and attempt to print again. If the printer prints the job, then you have successfully removed the paper jam.
|
|
Scooped by
mickael grad
June 20, 2012 5:55 PM
|
How to Diagnose Canon Printer Problems
Canon is one of the largest manufacturers of printers and copiers for home and office use. Canon printers come in several types and models, including laser, inkjet, photo and the very popular all-in-one printers that copy, scan, print and fax. As with all technical equipment, printers can misbehave. Follow the steps below to diagnose Canon printer problems. Instructions 1. General Issues 1 Check for a paper jam. Paper jams occur when one or more sheets of paper become stuck in the feeding or printing mechanism. Gently remove any jammed paper and reset the printer. 2 Check ink levels. Those ink cartridges run out fast. If your printer looks like it is printing but nothing comes out on the page, you might be out of ink. Try replacing the cartridge and printing again. 3 Check for a clogged print head. If you know you have ink, the print head might be clogged. Navigate to "Control Panel > Printer > Right Click > Properties > Maintenance > Clean Cartridges" to attempt to clean the print head. 4 Reinstall printer drivers and software. If none of the above helps, try uninstalling and reinstalling the printer and software to correct possible software bugs, errors or conflicts. 2. Canon-Specific Issues 5 Check printer drivers. Navigate to "Control Panel > Printers > Right Click > Properties > Update Driver" to check for a new driver for your printer. You can also find drivers and software on the Canon Support site (see Resources). 6 Resolve the Waste Ink Error. Press menu on the printer and press scan/copy to enter service more. Press the right arrow to access "NVRAM." Set ABS-M level to 0. Set ABS-P level to 0. Press "Stop" to exit. 7 Resolve Wrong Cartridge Message. Turn off the printer and unplug the power cord. Remove the cartridges and the print head. Clean the print head in lukewarm water. Set it aside to dry. Clean the contacts gently with an eraser and wipe with a tissue. Reinstall the print head and reinsert the cartridges. Run a cartridge alignment. 8 Resolve E0D02 error. Clean the cartridges and the sender strip. The sender strip is behind the rubber drive belt behind the main hatch. It runs horizontally across the machine. Wipe it gently with a lint free cloth.
|
|
Scooped by
mickael grad
June 5, 2012 6:16 PM
|
Canon Pixma MX870 Office All-In-One Printer Wireless Printing Problems
The Canon Pixma MX870 Office All-In-One Printer wirelessly brings professional-quality printing, copying, scanning, and faxing to your small business or home office. This Pixma is ready for networking from within range of your wireless router or you can network via its wired Ethernet interface. You can enjoy computer-free printing capabilities via compatible memory cards, PictBridge, and optional Bluetooth, while images are easily viewed on a 2.5" LCD. This printer boasts 9600 x 2400dpi resolution which combines with a 5-ink cartridge system that includes a pigment black ink and 4 dye-based color inks to deliver documents with crisp, clear text, and professional-looking photos with rich colors and contrast. The MX870 is operated via an Easy Scroll Wheel which makes it easy to view and correct your photos for printing and to access the various features available for faster operation. Its 35-page Automatic Document Feeder (ADF) keeps your workflow going and can save you money with automatic two-sided printing. This Pixma features Canon's Auto Photo Fix II technology which automatically categorizes your images into one of five types - Portrait, Scenery, Night Scenery, Snapshot with Scenery, and Snapshot with Night Scenery - then applies optimal image and multi-zone exposure correction. With Dual Color Gamut Technology, your copies and scans will be superb as the MX870 automatically optimizes your originals so copies stay true, even when copying from a copy. The MX870's versatility goes beyond previous models, allowing you to print your photos wirelessly from compatible iPhone 3G, 3GS and iPod touch models with the new Easy-PhotoPrint for iPhone App, available for free on the app store. Note! The MX870 does NOT provide direct fax capability under Mac OS X. To send a fax using a Mac is a two-step process: one must print the document and then send the FAX. Direct print from a PC is supported. Extraordinary Resolution Realize the power of 9600 x 2400 maximum color dpi firing with ink droplets as little as 1 picoliter. The MX870 delivers incredible quality and detail in both your business documents and photos. High Performance Individual Ink System This 5-color ink system consists of four dye-based inks plus a pigment-based black ink, producing exceptional photos and crisp, laser-quality text. Only replace the color ink tank that runs out. So, you save money on ink. Fully-Integrated Duplex Auto Document Feeder The built-in 35 sheet Duplex Automatic Document Feeder (ADF) makes it easy to copy, scan or fax multiple documents without having to load them one at a time. Its full integration makes it easier to fit into tight spots and once it's loaded you can do whatever else you want. Auto Duplex Printing Built-in Auto Duplex Printing prints 2-sided documents without having to manually flip the pages and can reduce your paper consumption by 50%. This means you can automatically copy two sided documents without having to flip any paper manually at all. Easy Scroll Wheel With the Easy Scroll Wheel you can quickly access and select the various features available for faster operation. 2.5" LCD Screen The MX870's 2.5" color LCD screen lets you easily view, select and edit your images for simple computer-free printing. No downloading needed, Auto Scan Mode In the Auto Scan Mode, the MX870 automatically recognizes the type of original, then scans and saves the suitable settings. For network users, Auto Scan Mode is only available when scanning at a computer using MP Navigator. Dual Color Gamut Technology Copy with confidence as this built-in technology automatically optimizes your originals so copies stay true to it, time after time, copy after copy. Quick Start Powering up your printer is now faster than ever. After pressing the power button you can begin inputting commands in approximately two seconds. So, full operation is possible in a much shorter time. Auto Photo Fix II This built-in technology automatically categorizes your images into one of five types - Portrait, Scenery, Night Scenery, Snapshot with Scenery, and Snapshot with Night Scenery - then applies optimal image and multi-zone exposure correction. So, unexposed areas of the photo will be optimized, area by area, and faces that are backlit and under-exposed will automatically be brightened with correct color cast to help ensure more accurate skin tones for gorgeous images. Built-In Wireless Connectivity Print or scan wirelessly from any Wi-Fi enabled computer around the house. Wireless printing requires a network with wireless 802.11b/g capability. Wireless performance may vary based on terrain and distance between the printer and wireless network clients. Built-In Ethernet The wired LAN interface lets you connect to a home or office network, with connected computers sharing the power of this versatile machine, each being able to display the printer's status at any moment. Super G3 Fax The business fax standard for color and PC facsimiles on plain paper meets the home office workhorse with 100 coded speed dials and up to 250 incoming pages to meet your every communication need. Note: The Public Switched Telephone Network currently supports fax modem speeds of 28.8 Kbps or lower, depending on telephone line conditions. Sending and receiving fax machines need to conform to ITU-T v.34 guidelines. Note:The MX870 does NOT provide direct FAX capability under Mac OS X. To send a FAX using a Mac is a two-step process: one must print the document and then send the FAX. Direct print from a PC is supported. iPhone Printing Take full advantage of Canon's fantastic Wi-Fi printing technology to unlock, print and share your stored images right on the spot. Print your photos wirelessly from compatible iPhone 3G, 3GS and iPod touch models. Memory Cards, USB, PictBridge & Optional Bluetooth Just insert a compatible memory card into the built in card slot, select images on the LCD display, and print. Thanks to a PictBridge connection you can also print photos directly from your USB Flash Drive and digital camera, DV camcorder or camera phone. Plus, you can print from the optional BU-30 wireless Bluetooth. Requires mobile phone (or other device) equipped with Bluetooth technology v2.0 and optional Bluetooth unit BU-30. Bluetooth operation depends on the devices and software version used. Operating distance is approximately 10 meters but may vary due to obstacles, radio signals, locations where radio interference occurs, magnetic fields from microwave ovens, device sensitivity and/or antenna performance.
|
|
Scooped by
mickael grad
June 4, 2012 4:33 PM
|
The Canon MP170 Won't Print Though the Ink Is Full
If you recently inserted a new ink cartridge into your Canon MP170 printer but have found the device still isn't producing copies, you need to troubleshoot the situation. Typically, this is due to a minor programming or connection problem and is corrected with only a few short steps. Once it is corrected, you can return to printing the documents as if nothing had happened. Instructions 1 Check the power on the Canon MP170. If the printer is not currently turned on, your computer is unable to send the print request to the hardware. 2 Inspect the printer to make sure there is paper in the printer. 3 Look at the USB data cable connection. If the cable is not hooked up completely, the printer is still not going to receive the print request. 4 Remove the USB data cable from the current USB port on the computer and insert it into a different USB port. Sometimes, some USB hardware does not function with certain ports, and USB ports also are capable of dying out, preventing anything form connecting with them. 5 Open the document you are attempting to print, then select "Print" and look at the print options. Make sure the Canon MP170 is selected as the go-to printer. If it isn't, the print request is being created for a different printer.
|
|
Scooped by
mickael grad
May 21, 2012 5:33 PM
|
Setup Secrets for Canon Printers
I finally decided to abandon my 5 year old Canon inkjet printer (and my even older separate Canon flatbed scanner) and move up to an All-in-One (AIO) model. For me, this meant getting a model without a fax capability. I never fax and didn’t want to waste money on unneeded hardware that would unnecessarily complicate the machine. Instead, I wanted the absolute best combination of photo printer and scanner/copier that I could find. I settled on the new Canon MP990. So far, I’ve been very happy with it. It’s fast, photos are sharp and accurate, and scanning quality appears excellent. Perhaps my biggest surprise was to discover how much Canon’s application software has improved since my prior printer and scanner purchases. For example, Canon’s MP Navigator EX scanner software includes an OCR feature. In my brief testing, it converted a page of plain text into an editable TextEdit document with amazing speed and accuracy. The more I explore what this AIO can do, the more cool features I uncover. In my decision making, there was one more significant advantage of the Canon MP990 over many other models I considered: I could connect the MP990 via Ethernet (in addition to USB or Wi-Fi). This meant I could share the MP990 to all the Macs on my local network via the Ethernet port on my AirPort Extreme Base Station. A critical point here is that both the printer and scanner components of the MP990 can be accessed from my Mac via this Ethernet setup. If I instead connected the MP990 to the USB port on the AirPort Extreme, I would only be able to access to the printer (because the AirPort Extreme does not support scanning over USB). Is the MP990 the absolute best printer/scanner combo I could have gotten? I don’t know. I didn’t do side-by-side comparisons with all its competitors. I’ll leave that to others. This column is not meant as a review anyway. Rather, I want to alert you to a few setup problems you may have if you too decide to buy this, or a similar recent, Canon AIO. Are you running Snow Leopard? If you a running Mac OS X 10.6.x, you’ll have a bit of work to do before you can use the printer. First, be sure to install the latest Canon Printer Drivers Update for 10.6, available from Apple. But that’s not enough. Even with the update installed, when you launch the Canon Setup application (from the included CD), you will be greeted with this message: If you click the “Check Latest Info” button, as advised, you are taken to a Web page from which you are supposed to get the needed drivers. Unfortunately, the page doesn’t yet list the MP990 (it only goes as high as the MP980, at least as of today). Don’t despair. There is another page from which you can get the. After installing these drivers, and assuming you have already properly set up and connected the printer to your Mac or network (via the instructions included with the MP990), you can now add the MP990 to your Mac’s printer list via typical methods — such as by accessing Add Printer from the Print & Fax System Preferences pane. But wait. You’re not quite done. The Setup application didn’t tell you this — but you still don’t have any of the included Canon utility and application software. To get these, go back to the Canon CD and run Setup again. This time, when the above dialog appears, ignore the warning and click OK. Next, select Custom Install. From the window that appears, select to install everything but the MP drivers. Now you’re really done. Can’t use scanner over network (Ethernet)? Having finished all of the above, I still was unable to access the MP990’s scanner from my Mac. Printing worked fine over Ethernet, but not scanning. The scanner hardware was working; I could scan-to-print from the MP990 itself. But I could not get any software on my Mac (such as Mac OS X 10.6’s Image Capture or Canon’s MP Navigator EX) to recognize the scanner. I suspect I would have had a similar problem with a Wi-Fi connection, but I did not confirm this. It turns out that what I needed to know is contained in the the MP990 On-screen Manual (which gets installed to your Mac from the CD). The critical section is “Advanced Guide > Scanning > Canon IJ Network Scanner Selector Screens > Canon IJ Network Scanner Selector Menu and Setting Screen.” This is not an immediately obvious place to go and is not easy to find. To save you the trouble, here are the key steps you need to do: 1. In your Mac’s menu bar, locate an icon that looks like a scanner with an arrow pointing to the right. Click it. Select “Open Settings…” from the menu that drops down. This launches Canon IJ Network Scanner Selector. The Scanner Selector software is tucked away in the /Library/Printers/Canon folder, which is why you won’t find it by looking in your Applications folder or via a typical Spotlight search. 2. From the Scanner Selector’s settings, shift the enabled radio button from “Do Not Use” to the item that has the name of your printer. Over at the MP990’s LCD screen (Canon calls it the Operation-Panel), the scanner settings should now include a network option (in addition to the USB option that is there by default). If the network option is not already enabled, manually select it now. You can now scan over your Ethernet network. 3. Even after completing all of the above, you probably still won’t be able to access the scanner from the MP Navigator EX application. To get this working, you need to launch the application and click the Preferences button in the lower right of Navigator’s main window (ignore the Preferences command in MP Navigator EX menu; it will be unselectable!). Now, from the Product Name menu in Preferences, select the networked version of your MP990. Done at last. Or maybe not. You may still have work to do, such as to set up the scanner driver to work from within Photoshop (if you own the Adobe software). Canon could certainly have made it easier for you to figure all of this out. The good news is that, once you’re done with these setup hassles, you’ll have a great feature-packed printer and scanner. Enjoy.
|
|
Scooped by
mickael grad
May 21, 2012 5:27 PM
|
Unable to scen for canon printer
Check if the Port Setting is Correct (Windows) If the Port setting in Windows is incorrect, the printer and computer will not be able to communicate with each other. Windows Log on to the computer as a user account with administrator privilege.Open the printer's Properties. For Windows 7 Click the 'Start' button from the bottom left of the Windows screen, and then click on 'Devices and Printers'.Click your right mouse button on the listing for your printer, and then select 'Printer Properties' from the menu that appears. For Windows Vista Click / Select 'Start' from the bottom left of the Windows screen, 'Control Panel', 'Hardware and Sound', and then click on 'Printers'Click your right mouse button on the listing for your printer, and then select 'Properties' from the menu that appears. For Windows XP Home Edition Click / Select 'Start' from the bottom left of the Windows screen, 'Control Panel,' 'Printers and Other Hardware,' and 'Printers and Faxes.'Click your right mouse button on the listing for your printer, and then select 'Properties' from the menu that appears. For Windows XP Professional Edition Click 'Start' from the bottom left of the Windows screen, and 'Printers and Faxes.'Click your right mouse button on the listing for your printer, and then select 'Properties' from the menu that appears. In the printer's Properties dialog box, select the Ports tab and locate the port with a check mark. Check the printer name of the selected port "USBnnn" (nnn denotes numbers). If the printer name is the same as the model connected, the correct port is set. If a different port is selected, find the port that the printer is actually connected to and click to put a check mark. . * The example Properties dialog box is with the USB port selected. Click OK to apply the selected port setting. Windows Me/98 (if applicable) Open the printer's Properties. For Windows Me/98Click / Select 'Start' from the bottom left of the Windows screen, and 'Settings,' then 'Printers.'Click your right mouse button on the listing for your printer, and then select 'Properties' from the menu that appears. In the printer's Properties dialog box, select the Details tab, and confirm the 'Print to The Following Port' contents. The correct port displays the connected printer name to the right of \"USBPRNxxx\" (xxx denotes numbers). If a different port is displayed, select the proper port from the drop-down menu or re-install the printer driver. * The example Properties dialog box is with the LPT port selected. Click OK to apply the selected port setting.
|
|
Scooped by
mickael grad
May 18, 2012 3:15 PM
|
How to Install a Canon PIXMA MP160 Printer
the Canon PIXMA MP160 printer is an all-in-one photo printer. This printer offers high-quality resolution that gives photos a rich, dynamic finish. Using the Canon MP160 is a user-friendly process, and so is installing it, even for relatively inexperienced computer users. 1 Open the official Canon website (see Resources). When it opens, click on the "American" demographic symbol. 2 Click on the "Support and Drivers" tab on the left side of the screen. Select "Canon USA" and the screen will redirect to a popup screen. When the popup screen loads, click on the "Printer" icon. You will be prompted to locate and select your product's name and model number. 3 Choose your product's name and model number by clicking on the designated drop down bar in the middle of the screen. Click on the MP160 product name and model number. Your screen will be redirected to an operating system prompt. Choose your operating system in the designated drop down menu when the next screen loads. 4 Download the Canon MP160 setup application. Click on the Canon MP160 link that will be generated based on the information you provided. A file download dialog window will appear on your computer's screen. Click on the "Save" option that will be presented in this window. When the setup application download is complete, click on the "Open" action to access the Canon MP160 installation wizard. 5 Agree to the Canon Manufacturer Terms of Use. This will be the first screen that will be displayed in the Canon MP160 installation wizard. Once you have read and reviewed the Canon manufacturer user license agreement, follow the prompts that will be listed in the Canon MP160 installation wizard to complete the installation process. 6 Select all the default settings by simply clicking on the "Next" option that will be displayed at the bottom of the installation wizard's window. 7 Click the "Finish" option to complete and conclude the installation process. The Canon MP160 portal will open automatically once the installation wizard is closed. Choose all of the recommended settings in the Canon MP160 portal. The last screen will display the option to print a test page. Click on this option to test the printer's connection and installation, and ensure that it is printing correctly.
|
|
Scooped by
mickael grad
May 2, 2012 1:22 PM
|
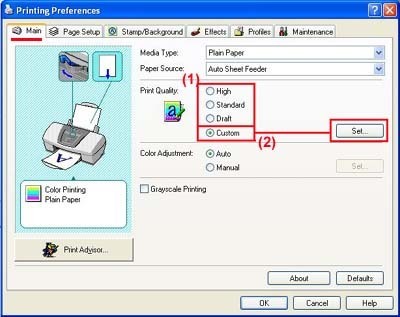
Change the Print Quality Settings (Windows) in Canon
The Quality setting controls how finely ink droplets are placed on the printed page. Depending on the type of paper being used a higher Print Quality setting does not always insure a better print. Print speed will decrease as the Print Quality setting is increased. Follow the instructions below to change the print quality settings in the Canon printer driver for the Windows operating system through a printing application. Select the command you use to perform printing from the program you are using. (In general, select 'Print' on the Filemenu to open the Print dialog box.)Select your model name and click 'Preferences' (or 'Properties'). The printer driver setup window appears.Set the desired print quality in the 'Print Quality' section. Select 'High', 'Standard', or 'Draft / Fast'. To set more detailed print quality settings, follow this procedure: Select 'Custom' and click 'Set'. In the Set Print Quality dialog drag the slide bar from 'Fast' to 'Fine' to select the print quality. Select 'Auto', 'Dither', or 'Diffusion' from the 'Halftoning' section
|
|
|
Rescooped by
mickael grad
from Canon Printer Support
April 5, 2013 2:15 PM
|
How to Set Up a Canon Wireless Printer
Power on your Canon wireless printer after you have removed it from the packaging. Insert the ink cartridges when prompted on the screen. Your first printer ink cartridges are included. If you have a computer already connected to a desktop or Windows XP, skip to step 7. Print and scan the alignment sheet as prompted on the printer screen. Press OK when done. Insert the setup CD even if you are connecting your Canon printer via wireless network. There are printer drivers created for wireless networks on this CD. Follow the CD setup instructions on the screen. Have the printer find the actual wi-fi network signal that you will be using and select that on the printer screen and on your computer. The wi-fi light will be on when the network is connected. Print a test page from your computer when everything is completed on the screen and if you are prompted by the Canon setup CD to do so. Go into printers and ensure Canon is set as your default printer. This will ensure all software will use this as your primary printer. There will be a check mark next to it. Go into printer setup and search for a printer connected via network on your computer. This may take a few minutes. You must enable printer and file sharing on both computers before you will be able to view a USB connected printer on a network. Select use this printer when it finds your printer. Make sure it is set to be the default printer and print a test page.
|
|
Scooped by
mickael grad
June 22, 2012 6:54 PM
|
How to Diagnose Canon Printer Problems
Printing Issues on Canon imagePROGRAF Large Format Printers (Mac OSX ) A number of users may come across problems printing from Vectorworks to Canon's imagePROGRAF line of large format printers. This problem may include missing text, incorrect scaling and randomly disappearing geometry. Normally the issue is not present when the user attempts to Export to PDF instead, but then can become apparent again when trying to print that PDF from Preview or Adobe Reader. (This is primarily an issue with the Canon print drivers in Mac OSX 10.6) This may be corrected by going to the File > Print > Printer Settings in Vectorworks, then under the Main menu, in the Advanced Settings tab, uncheck the option for "Fast Graphics Process
|
|
Scooped by
mickael grad
June 22, 2012 6:48 PM
|
How to Install a Canon Printer in Mac Classic
Mac Classic is any version of Mac that came before Mac OS X, but it usually refers to Mac OS 9 and Mac OS 8 since they were the most recent operating systems before OS X came along. While all Mac OS X computers have printer drivers installed on them, most Mac Classic computers do not. To install a Canon printer on Mac Classic, it must be compatible with Mac OS 9 or lower and have an install CD. 1 Put the Canon printer install CD into your Mac and click the icon. Click on the "Install.pkg" to install the printer drivers on your Mac. Click "Continue" and then "Install." 2 Plug your Canon printer into an outlet and connect it to the Mac via the printer port or USB port. Turn the printer on. 3 Eject the disk from your Mac and open the "Chooser" in the Apple menu. 4 Choose the Canon printer's icon from the list and click on "Select a port." 5 Select the printer icon and click "Close." A new window will open prompting you to set up the printer. 6 Align your Canon printer following the directions on your screen and click "Close" when it is finished.
|
|
Scooped by
mickael grad
June 20, 2012 5:59 PM
|
How to Troubleshoot Canon Printer Problems
Canon is a brand of computer printers that makes commercial products that are available around the world. If you enjoy one of their printers at your home or office you may at some time experience some slight performance errors. These problems are usually easily fixed by following a simple troubleshooting process, which will take you just a few minutes. If you continue to experience printer failure or the problems become more severe, contact your Canon supplier for technical support. 1. Connectivity Problems 1 Make sure that the printer is connected to a power outlet. The power cable should be connected in the back of the printer and to a working electrical socket. 2 Check that the wire from the printer is running to the correct port on the computer tower. The wire runs from the small, square port on the printer to one of the USB ports on your tower or laptop computer. 3 Turn the printer on. Much of your printing failures can be avoided by making sure that the power is turned on before selecting the print command. 4 Install any updates or replacement software needed to run your printer on your computer. You can get this software from the manufacturer's website and will be notified through your printer drive if there is something new to download. 2. Feeder Problems 5 Pull out all of the paper supply in the printer and make sure that all pieces of paper are flat and whole. Any folded corners, crumpled sheets or torn pieces should be thrown away. 6 Check the size of the paper you are using and check the paper guide on the supply to make sure the paper is the correct size. The paper guide is the small plastic clip that holds the paper steady in the feeder. 7 Open the cover of the printer and make sure there is no paper stuck within the feed rollers. You should pull out the jammed paper if there is any, including any little torn pieces that may be stuck inside. 8 Clean out the feed rollers with compressed air to remove any dirt inside the printer and refill the paper supply. 3. Ink Problems 9 Check the ink levels in your cartridges to see if you have to replace the ink. You can do this through the control panel of your printer software. If you don't know where to find these controls, just search your computer for 'printer drive'. 10 Open the cover of the printer and wait for the ink cartridges to stop in front of you within the printer. This will allow you to take them out and replace them with full ones. 11 Pull the cartridges out of the printer. The number of cartridges and how to remove them will vary with your model of printer, but usually there is a small clip holding the top edge of the cartridge in place. Just push this clip back and pull the ink out. 12 Pull the protective seal off the head of the new ink cartridge. This is where the ink comes out and when you pull off the seal it will allow the ink to descend. 13 Drop the ink cartridges into the printer and push each cartridge into place. If there are clips you will hear them click when the cartridges are in place. 14 Run a diagnostics test on your ink heads if your ink problems persist after refilling the ink. This will help you clear out the heads.
|
|
Scooped by
mickael grad
June 6, 2012 4:46 PM
|
Why Does My Canon Multipass Printer Print Boxes Instead of Text?
The problem of a Canon Multipass printing only boxes is not uncommon. This issue actually can be seen on any printer, particularly older ones, and also will sometimes manifest in nonsense characters instead of just boxes. Driver Issues The most common reason for this problem is an incorrect or outdated print driver, which can be corrected easily by downloading the newest driver from the Canon website. Spooler Issues Sometimes the print spooler can become overwhelmed and lose track of jobs, causing nonsense printouts. This can be fixed by turning the printer off and then unplugging the connection to the computer for 30 seconds. Memory Overload Many printers (particularly older ones) have very little memory and are easily overloaded. Avoid this by limiting the amount of pages you send to your printer at once.
|
|
Scooped by
mickael grad
June 5, 2012 6:14 PM
|
Canon MX870 prints incredibly slow via WIFI
I have an MX870 with an iMac quad core running OSX 10.6 and a net gear router. I don't use a USB cable because the run would exceed 15' because of the way the furniture is layed out where the computer and printer are, and the USB cable is too long to power the connection. This has happened with every printer I've used. However, the printer/computer and router are all physically within about 6 feet of each other at most (I'm just trying to avoid running a USB cable directly across the carpet in the middle of the living room). So I use the wireless printing option. However, even when i have a document that is composed of nothing more than 1 black and white sentence and nothing else on the page, or a envelope that I'm putting nothing more on than an address, it always takes between 2-3 minutes from the time I hit print, to the time the paper comes out of the printer. Even with wireless printing, this can't be right. There has to be some way of speeding up the process. Any suggestions would be welcome. Thanks
|
|
Scooped by
mickael grad
May 23, 2012 5:54 PM
|
• How to Set Up Canon MX700 Wireless Printing
The Canon MX700 multi-function printer does not have wireless printing capabilities built in, but you can connect the printer to a wireless print server to achieve the same results. When setting up the wireless print server, you need to install both the printer and printer server driver on your computer, as well as configure the print server for the wireless network you intend to use Insert the installation disc for the MX700 into the computer's disc drive. A installation program will run.2 Click on "Easy Install." 3 Click "Install." On the next screen, click "Yes" to agree to the license agreement. 4 Click on "Use the printer via USB," then click "Next." 5 Connect the USB cable to the computer and the MX700. 6 Click "Next" twice. Click on "Agree" or "Do not agree" on whether you want to participate in the PIXMA extended survey program, then click "Exit." Configuring the Wireless Print Server and Installing the Driver 7 Remove the installation disc for the MX700, then insert the installation disc for the wireless print server in the disc drive. An installation program will run. 8 Click on the button to start the installation. It may say "Next" or "Install Now." 9 Connect a USB cable to the print server and the printer. Click "Next" if required by the installation program. 10 Connect an Ethernet cable to the wireless print server and the wireless router. Click "Next" if required by the installation program. 11 Click on the option to obtain an IP address automatically, then click "Next," if required by the installation program. 12 Double-click on the wireless network the wireless print server will be using from the list of available networks. 13 Enter the wireless security key. You may need to select the wireless security type as well, depending on the brand of wireless print server. 14 Disconnect the Ethernet cable, then restart the wireless print server by unplugging it and replugging it. Once the print server has been set up, you will be required to install the Print Server's driver. If the program does not automatically proceed to the driver installation, click on the button to proceed. 15 Select the printer that is connected to the wireless print server from the list of printers, then click "Next," if necessary. After the driver copies, you may be asked to print a test page. If not, click on "Finish.
|
|
Scooped by
mickael grad
May 21, 2012 5:29 PM
|
Delete queued print jobs to resolve printing errors (Windows) in Canon Printer
Delete Queued Print Job If a print job is corrupt and does not print clearly, does not print at all or is preventing other queued jobs from printing, delete the queued job. On the Windows taskbar, double-click the printer icon located to the left of the time. At the Printer queue window, select the print job, under 'Document Name' column, to highlight it.From the 'Document' menu, select 'Cancel'.Repeat steps two and three to cancel another print job.If the print job cannot be cancelled or will not stop printing, shut down the computer, disconnect the printer cable and then restart the computer.Close the Printer window.Shut down the computer.Disconnect the printer cable (USB or parallel cable).Restart the computer.If a message window appears asking to cancel printing, select 'Yes'.Verify the printer icon no longer appears on the Windows taskbar. If the icon appears, double-click it and cancel the remaining print jobs as instructed on steps two and three.After all print jobs have been cancelled, reconnect the cable to the printer and then try to print again. If the print job does not complete, it may be necessary to disconnect the printer cable, power off and on the printer and then reconnecting the cable. Unable to fax for canon printer Start Print Spooler Service (Windows XP / 2000 / Windows Vista / Windows 7) Accessing Services To resolve the error shown below , right-click Print Spooler service and then select Start. Error Text : 'No printers are installed. To install a printer, point to Settings on the Windows Start menu, click Printers, and then double-click Add Printer. Follow the instructions in the wizard.' ex. Windows XP Computer Management Open Computer Management.On the right-hand side pane of Computer Management window, scroll down to locate 'Print Spooler'.Right-click on 'Print Spooler' and select 'Start'. Close the Computer Management window and attempt to print again. Accessing Services and Applications Click the Start button . Click your right mouse button on Computer.Select Manage from the menu that appears. Click the plus (+) next to Services and Applications.Select Services.
|
|
Scooped by
mickael grad
May 18, 2012 3:18 PM
|
Canon Pixma MP800: Troubleshooting Guide
Canon designed the PIXMA MP800 as an all-in-one printer, copier and scanner. It appeals to the home user who needs these office services but is limited for desk space. Even the best Canon printer can stop working. Troubleshoot your PIXMA MP800 to help find and fix common underlying problems that may affect the printer's performance. Make sure the MP800 is plugged into a reliable power source--for the best results, plug it directly into an outlet instead of using an extension cable--and powered on if its front display panel is dark. Check the front and back paper feeder slots if the MP800 makes strange noises or stops printing halfway through a printing job. The device may be clogged. Remove any pieces of paper that may be stuck. Review the front LCD display screen for an error. The error message typically describes what's wrong and how to fix it. Adjust the MP800's print head if your printer results look crooked or off-balance. Press the "On/Off" button to turn off the device, then turn it back on. Insert two A4-sized (letter size) sheets of plain paper into the MP800's top feeder slot. Press "Maintenance" on the MP800's display screen and use the arrow keys to scroll down to "Manual Head Align." Push "OK" and follow the on-screen prompts to complete the alignment process. Clean the MP800's scanner bed if the LCD screen displays an error saying, "Cannot Obtain Clean Scan" or if your scanning results look streaked, splotched or obscured by debris. Canon recommends wiping the glass with a clean, lint-free cloth. Solid debris deposits can be removed with water. Don't use glass cleaners, as this may damage the MP800. Dial the Canon printer support line at 8555172433 if you still can't get your PIXMA MP800 printer to work correctly.
|
|
Scooped by
mickael grad
May 2, 2012 1:44 PM
|
Run the Canon IJ Network Tool
1.Verify you are connected to the network (SSID) you will be using with the printer. 2.Start the IJ Network Tool by browsing to the Library\Printers\Canon\BJPrinter\Utilities folder and double-click Canon IJ Network Tool 3.When the Network Tool finishes searching, select Setupin the dropdown list at the upper left of the window 4.If the following message appears, click OKto continue. 5.On the Setup screen, select the model, then click OK.. The typewill be listed as Canon USB. 6.On the Confirm Connection Access Point screen, verify that the Access point is the one to which you wish to connect, then click Yes. If you wish to connect to a different Access Point, click No and proceed to Step 7. If the Confirm Access to Keychaindialog appears, click Allow. 7.On the Access Pointsscreen, select the Access Point to be used , enter the network password in the space provided and click Connect. If you are not using encryption (not recommended), this step is skipped. If you do not know this password, you may be able to obtain it using the Canon PIXMA Wireless Setup Assistant. 8.After searching for printers, the Setup Completionwindow appears. Click OK. 9. Select the printer and click Add. Be sure canonijnetworkis listed in the Kindcolumn If the default printer browser does not list the network printer , click More Printersand select Canon IJ Networkin the dropdown. Then select the printer and click Add 10. Select the scanner on the Scan-from-PC settings screen, then click OK 11. At this point setup is complete. If any more Canon IJ Network Tool screens appear, close or cancel them, then disconnect the USB cable.
|
|
Scooped by
mickael grad
May 2, 2012 1:12 PM
|
Canon Printer support, Dell-Support, HP-Printer, Canon-printer, Network, MS-Office, Windows, Microsoft, Blackberry, Ciso, wireless, PC-Security, Outlook, Office-2010, IBM-support, Lenovo, IPhone, Linksys...
|