


Follow, research and publish the best content
Get Started for FREE
Sign up with Facebook Sign up with X
I don't have a Facebook or a X account
Already have an account: Login

TIC & Educación
1.4M views |
+11 today

 Your new post is loading...
 Your new post is loading...
Your new post is loading...

Annotation Studio is a free document editing tool that I learned about a few weeks ago onLarry Ferlazzo's blog. This afternoon I finally gave it a try. The best way to describe what Annotation Studio offers is to think of it as Google Docs commenting if Google Docs supported videos and pictures in comments. 
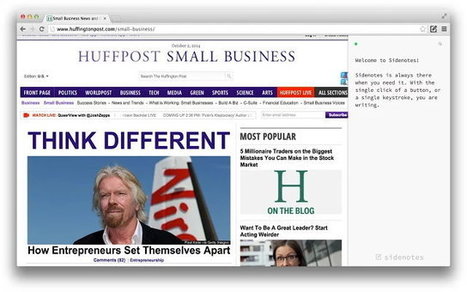
Sidenotes es una práctica solución para la creación de notas rápidas desde Chrome. Se trata de una barra lateral que se despliega en la parte derecha del navegador, dentro de cualquier sitio web, y desde allí permite realizar anotaciones de texto ¿Lo mejor? Se sincronizan con Dropbox para disponer de ellas incluso desde otros equipos.
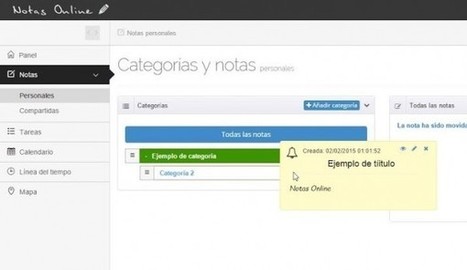
Notasonline.es es un nuevo proyecto que nos permite crear notas y tareas en la web de forma sencilla. Su creador, Mario Castellano, nos comenta sus funciones: En primer lugar nos encontramos con el panel de inicio rápido, donde creamos notas y tareas rápidamente, sin editor wysiwyg ni posibilidad de cambiar el color de las notas. Las tareas se pueden marcar como terminadas, editarlas o eliminarlas.
¿Te preguntas cómo desactivar las anotaciones en los vídeos de Youtube? ¿Estás harto de tener que cerrarlas una a una? No te preocupes, gracias a la ayuda de este tutorial descubrirás que Youtube ofrece una opción para olvidarte de ellas para siempre. Descúbrelo paso por paso.
Sticky Notes Collector es una extensión para Chrome que nos permite dejar notas en páginas web especificas y organizarlas de manera muy simple.

Evernote se ha convertido casi en una herramienta estándar de la industria para guardar todo tipo de notas e información online. Los datos pueden ser fácilmente accesibles desde cualquier ordenador con conexión a Internet y una amplia gama de aplicaciones móviles permite el acceso en varios dispositivos también. Pero si lo gusta del todo esta herramientas para tomar notas, aquí hay 5 alternativas a Evernote.
Gumersindo Fernández's insight:
Google Keep Quip Microsoft OneNote Springpad Simplenote
As we all know MS PowerPoint provides many robust options for creating presentations. However, despite the wide range of available options in PowerPoint it can be hard to annotate slides during a live presentation. Via Baiba Svenca

Dovid's curator insight,
October 2, 2013 11:02 AM
If you use a smartboard, you might get stuck sometimes because you forgot to convert your original PDF into jpeg or any picture format, sot that you can tweak them while having a class. This app would eliminate that need! 
Christine Bushong's curator insight,
October 10, 2013 1:29 PM
Baiba Svenca's insight:
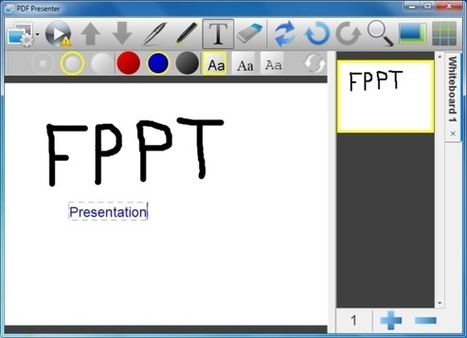
The article describes how you can display and annotate your PDF presentations using PDF Presenter which serves as an online whiteboard. It lets you highlight the important points on your document while you are demonstrating it. PDF Presenter is free and it works on all platforms but you will need Java to use it.
Classmint is an interactive study notes service rooted in research-proven scientific techniques that help to learn faster and apply learned knowledge.
scrible lets you highlight and annotate web pages and easily save, share and collaborate on your web research with others. Sign up for free! Via Robin Good, Ana Lara

Kaye Blum's curator insight,
July 16, 2013 5:55 AM
Better than Scoop.it? It has the advantage of highlighting text... other advantages? 
SLRE's curator insight,
August 2, 2013 6:45 AM
Handig app om dingen die je op het web tegenkomt van aantekeningen te voorzien en te bewaren. 
wanderingsalsero's curator insight,
October 20, 2013 7:54 PM
I haven't read this article but I'm seriously interested in the question implied in the title.....i.e. how to 'mark up' information and get them on the web. In many cases, I think that's adequate for most people's purpose.
I have yet to find a tool that I found really comfortable for doing that. Maybe this is it.
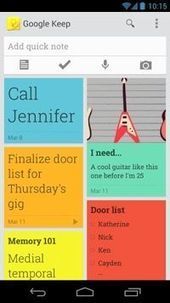
Programas como Google Keep sirven para anotar pensamientos y citas o guardar enlaces e imágenes interesantes desde el teléfono.
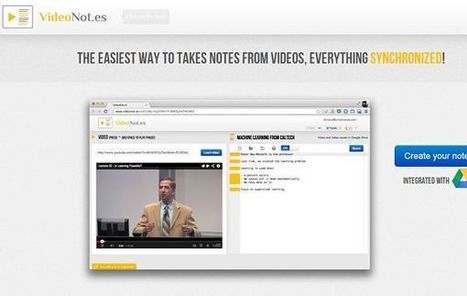
VideoNot es una aplicación web gratuita con la que podemos tomar notas o hacer anotaciones mientras visualizamos un vídeo de YouTube, Coursera, Udacity u otras plataformas. No precisa registro y es completamente gratuita.
|
Over the weekend I received an email from a reader who was looking for an alternative to Evernote that she could use to take notes during parent-teacher conferences. I've had a lot of questions along the same lines since Evernote changed their plans to essentially make their free plan almost worthless. In this case the teacher seeking an alternative to Evernote wasn't looking for a bookmarking tool. She was looking for a note-taking tool. One of my suggestions was to take a look at OneNote. My other suggestion was to try Simplenote.
Below are handy Chrome extensions you can use to quickly jot down notes and record your ideas on any webpage you are browsing. No need to switch any tab or swap apps, you can write down your notes either at the side of your browser as is the case with Sidetones or on any other location on the webpage using Note Anywhere. We invite you to try them out and share with us your feedback.

Annotary es una herramienta 2.0 muy útil para realizar anotaciones en páginas web pudiendo guardarlas para leerlas en otro momento. Es un bookmarklet que se añade a la barra de marcadores y se puede activar en cualquier página en la que entremos. También es útil para recopilar sitios web organizados por categorías según nuestras preferencias ya que se pueden crear carpetas o colecciones.

Today, we are introducing you to what we consider to be the best 4 web tools for creating screenshots. Besides being free, these tools are very simple to use and are also student friendly. They will allow you to capture your screen, crop and annotate your pictures using arrows, colours, shapes, text and many more.
La abundancia de información en la web hace que necesitemos en mucha ocasiones disponer de herramientas de almacenamiento de notas.
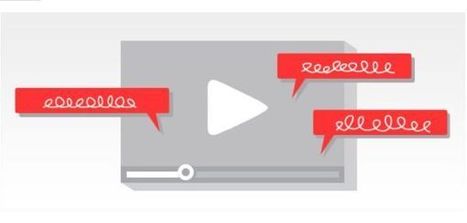
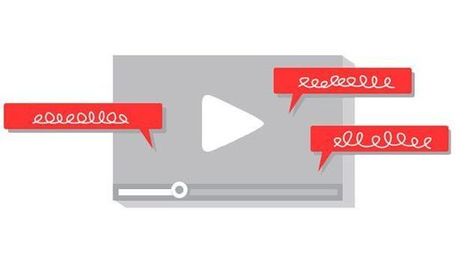
Los cuadros de texto y los bocadillos emergentes que aparecen en muchos vídeos de YouTube pueden acabar resultado bastante pesados y fastidiosos. Aquí explicamos cómo librarse de esas molestas anotaciones.
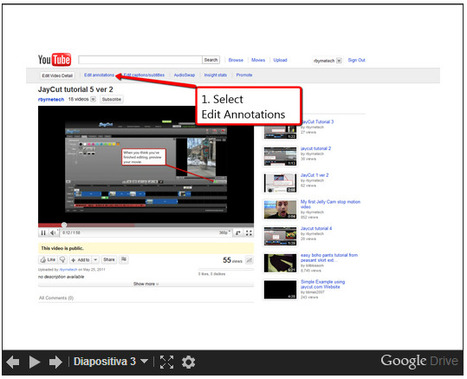
In my previous post about PBS Math Club I mentioned that you could create similar videos by using the annotations tool in the YouTube video editor. If you would like to try this yourself, I have directions that will walk you through the process. Keep in mind that you can only annotate videos that you own and upload to your YouTube account.

Si bien existen herramientas más completas para la recopilación de datos, Simplenote es una alternativa efectiva y sencilla que permite almacenar notas y recordatorios de manera rápida desde dispositivos móviles.

Armamos una lista con los mejores cuadernos digitales antes de comenzar las clases, para tener un apoyo extra dentro del aula.

Would you be interested in the best 5 free annotations tools for teachers? Would you like to know how to use them?
Gumersindo Fernández's insight:
Diigo A.nnotate Bounce App Crocodoc Markup.io
VideoANT is a free tool for collaboratively annotating videos. I first wrote about VideoANT back in 2010. Recently, as I learned from Nathan Hall, VideoANT received a major facelift that makes it easier to use than it was before. The first improvement to note is that the service is now built on HTML5 which means that Flash is no longer needed. The second major improvement is improved ease of annotating videos.

Raúl Luna's curator insight,
June 11, 2013 11:38 AM
Utilidad creada por la Universidad de Minessota que permite trabajar sobre un vídeo anotándolo y comentándolo colaborativamente.
1.Entrar en https://ant2.cehd.umn.edu/ . Sepuede iniciar inmediatamente una anotación, sin registrarse, pegando la URL del vídeo en Youtube pero si quieres tener un fácil acceso a tus proyectos es preferible registrarse con tu cuenta de Facebook o Twitter
2.Puedes cambiar el título empezar directamente a hacer anotaciones pulsando en ‘Start Annotating!’
3.El video aparece en una ventana a la izquierda con una línea de tiempo encima y un botón ‘Add an Annotation’ abajo.
4.Comienza a reproducir el vídeo.Cuando quieras hacer una anotación pulsa ‘Add an Annotation’ y el video se pondrá en pausa, apareciendo una caja titulada ‘New Annotation’ a la derecha.
5. Escribe el título de la anotación, añade el contenido y pulsa ‘Save Annotation’ para crear la anotación y que aparezca una marca en la línea de tiempo. (Si decides no añadir la anotación pulsa ‘Cancel’).
6.Tras salvar la anotación o cancelar el video continúa reproduciéndose a partir del punto donde había parado. Añade en cualquier momento nuevas anotaciones.
7.Para moverte rápidamente por el vídeo utiliza la linea de tiempo.
8.Cualquier anotación puede editarse o eliminarse pulsando la flecha desplegable que aparece a su derecha
9.También se pueden hacer comentarios sobre cualquier anotaciónSi pulsas sobre una anotación el vídeo se desplaza automáticamente a ese punto y comienza a reproducirse desde ahí.
10.Para compartir el vídeo con sus anotaciones copia la URL y envíala a las personas con las que quieras compartir (no necesitarán tener cuenta en VideoANT pero tendrán que identificarse con su correo para anotar o hacer comentarios) IMPORTANTE: en este momento cualquiera puede borrar una anotación o comentario aunque no sea suyo.
Procedimiento traducido a partir de las indicaciones de Nathan Hall en http://goo.gl/2zXAj
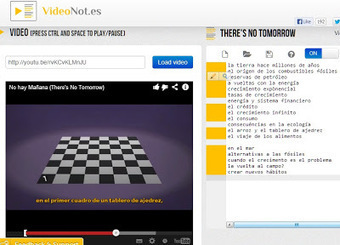
VideoNot.es es una sencilla herramienta que permite anotar puntos en la línea de tiempo de un video, crear textos asociados a los que accedes con un clic, guardar los datos en tu Google Drive y compartirlos de la manera habitual de Google.
|


