


A keypad is a useful feature to add to a project that requires data input. Today we will see how easy it is to use an inexpensive matrix membrane keypad with an Arduino.
Get Started for FREE
Sign up with Facebook Sign up with X
I don't have a Facebook or a X account


 Your new post is loading...
 Your new post is loading...
Your new post is loading...
A keypad is a useful feature to add to a project that requires data input. Today we will see how easy it is to use an inexpensive matrix membrane keypad with an Arduino. 
No comment yet.
Sign up to comment
Alta calidad en prototipos PCB, primer pedido gratis !!! : http://pcbway.es Menu Básico de Varios Niveles con Teclado, LCD y Arduino Sitio para descargar los programas: http://elprofegarcia.com

This tutorial will demonstrate how to read a matrix keypad so you can hook up a simple
Para este proyecto, el tipo de teclado que usamos es un teclado matricial. Este es un teclado que sigue un esquema de codificación que le permite tener mucho menos pines de salida que las claves.
|
This should be a cool and easy project. We will conect a small thin Keypad that I've bought from eBay for less than 70 cnts to one Arduino microntroller. You could use any Arduino boar that you want. Using the KeyPad library we will be able to read each of the 16 buttons that this keypad has using just 8 pins of the arduino. The library use is simple. Normally we shoud use two pins for each button to be able to detech esch push. But this library uses 4 pins for columns and 4 pins for rows for this 4x4 keypad. The library is non-blocking which means you can press and hold the key all day long and your Arduino will continue processing the rest of your code. Consider, though, when you are writing your code that every delay() you use will take processing time away from the keypad. Something as short as delay(250) can make the keypad seem very unresponsive. And the same thing will happen if you sprinkle a bunch of delay(10)'s all through your code. The function getKey() returns a key value as soon as you press the key but it does not repeat automatically.

Este teclado de 16 teclas se conecta utilizando una conexión I2C (2-Wire), aunque en el chip sensor capacitivo TTP229 tiene implementada la opción de conectar solamente 8 teclas, que tienen salida directa en los pines del módulo. Son los pines marcados como OUT1 a OUT8. Las líneas marcadas SDO y SCL pertenecen a la interfaz I2C.

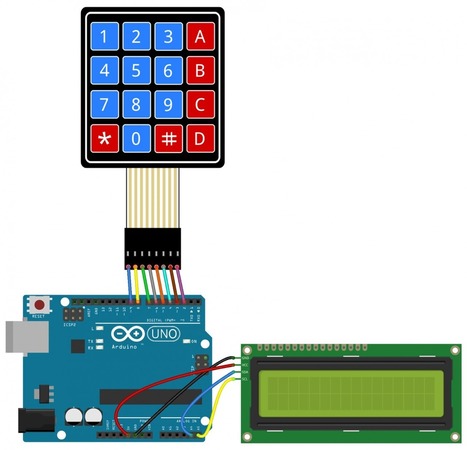
Keypads are a great way to let users interact with your project. You can use them to navigate menus, enter passwords, and control games and robots. In this tutorial, I’ll show you how to setup a keypad on the Arduino. First I’ll explain how the Arduino detects key presses, then I’ll show you how to find the pinout of any keypad. As a simple example, I’ll show you how to print out the key presses on the serial monitor and an LCD. Finally, I’ll show you how to activate a 5V relay when a password is entered correctly. I’ll be using a 4X4 matrix membrane keypad in this article, but there’s also code and wiring diagrams for 3X4 matrix keypads as well. I like membrane style keypads because they’re thin and they also have adhesive backing so you can stick them to most flat surfaces. You can also get telephone style keypads that have thicker buttons if you like that style better. Even salvaged keypads from old telephones will work with the Arduino.
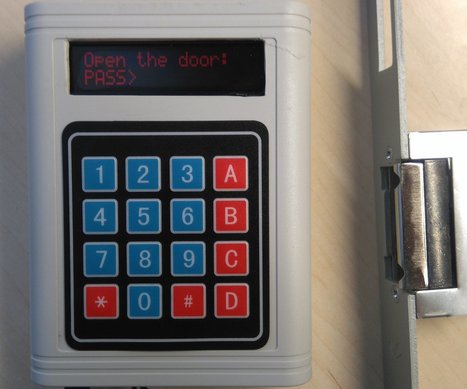
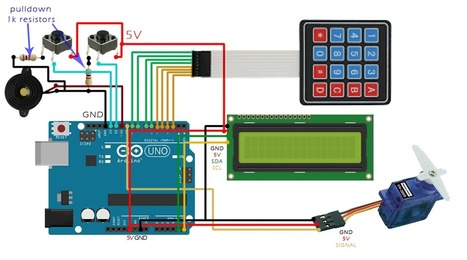
By using this system you will be able to unlock a door for 5 seconds. After 5 seconds the electrical door opener will be automatically be locked. You can unlock it by typing the correct password and pressing the '*' button. If you want to change the current password, you can do it by pressing the 'A' button and if you want to skip or abord an operation you can do it by pressing the '#' button. It also has a buzzer for making various tones during operation.
|


