Como hacer un termómetro con un sensor NTC para medir temperaturas de hasta 140 grados!. ----------------------------------------------------------- Esquema, Código y diagrama: https://adshort.co/TermometroArduinoN...
Research and publish the best content.
Get Started for FREE
Sign up with Facebook Sign up with X
I don't have a Facebook or a X account
Already have an account: Login

tecno4
2.4M views |
+16 today

 Your new post is loading...
 Your new post is loading...
Your new post is loading...
En esta lección aprenderemos a programar un termómetro con Arduino a través de Tinkercad, el cual nos permite simular circuitos, ¡por lo que no es necesario disponer físicamente de componentes electrónicos! 
Quizás el siguiente paso después del hola mundo en Arduino, el típico blink, sea medir la temperatura con un sensor. En los kits más utilizados ya sean originales o no originales, siempre viene un sensor de este tipo. Pero cuando vas a realizar un proyecto para crear un dispositivo totalmente funcional, debemos escoger el mejor sensor de temperatura para Arduino.
Sensores de temperatura, humedad y presión. Analógicos y digitales
Un ejemplo de este tipo de sensores son los termistores. Un termistor es un dispositivo cuya resistencia cambiará en función de la temperatura. Usaremos estas variaciones para realizar una medición aproximada de nuestra temperatura ambiente. Concretamente nosotros utilizaremos el termistor MPC9701, que pertenece a la familia de termistores activos lineales. Es un sensor que nos dará valores analógicos de temperatura, convirtiendo la temperatura en un voltaje análogo. Es de bajo costo y ofrece bajo consumo, con una precisión de ±4°C desde 0°C a +70°C Este sensor provee una solución de bajo costo para aplicaciones que requieran mediciones del cambio de temperatura relativa. Podéis encontrar más info en su datasheet.
In this tutorial, I will be looking at how to set up the Arduino DS18b20 temperature sensor and anything else you need to know about it.
Descripción paso a paso para comprobar el buen funcionamiento de un sensor de temperatura LM35. Este sensor tiene un factor de escala de 10mv/°C
From
maker

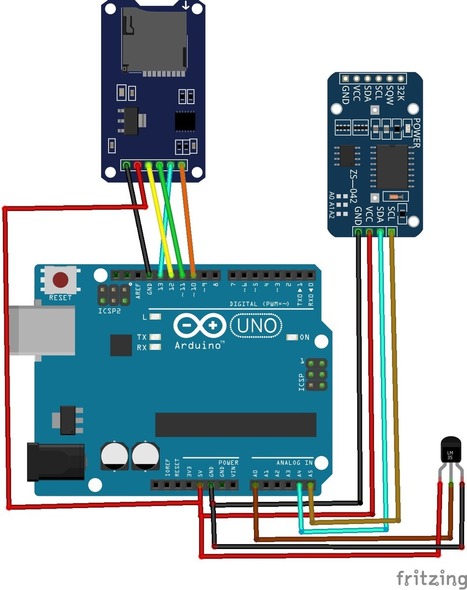
In this article, you are going to learn about Arduino SD card data logging. We will use the LM35 temperature sensor to get the temperature value, and the DS3231 module to get the time and date. Then we will use the SD card module to open the SD card, and we will enter the date, time, and temperature in the SD card file.

In this Arduino Tutorial we will learn how to use an SD Card module with the Arduino Board. Also in combination with the DS3231 Real Time Clock module we will make a data logging example where we will store the data of a temperature sensor to the SD Card and import it into Excel to make a chart out of it. You can watch the following video or read the written tutorial below.

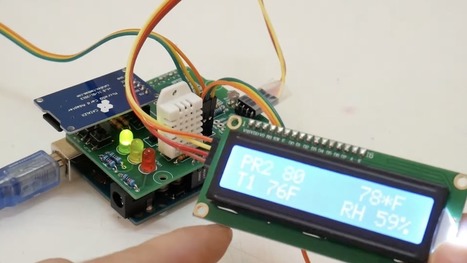
In this arduino based project, we are going to control DC fan speed according to the room temperature and show these parameter changes on a 16x2 LCD display. It is accomplished by the data communications between Arduino, LCD, DHT11 sensor Module and DC fan that is controlled by using PWM. PWM is a technique by using which we can control voltage.

Con esto del frío estaría bien poder medir la temperatura. Y ya lo hicimos en su día, pero estos sensores de los que hablamos eran poco precisos (dejémoslo ahí, aunque en realidad son una mier**). Si quieres medir algo con más precisión seguramente hayas oído hablar de Pt100 o Pt1000… ¿Qué es eso? Pues eso vamos a resolver. ¡Sube que te llevo!
En Arduino LM35 es un sensor que puede medir temperatura. En este tutorial te diremos como leerlo y enviar la temperatura por el puerto Serial. Para poder leer un sensor analógico se requiere de un ADC. Este modulo puede convertir una señal analógica de voltaje a un valor binario. Por lo tanto para usar el ADC con Arduino y leer el sensor LM35, se utilizará a la función analogRead.
|

To keep maintaining rooms, crops, and weather conditions under control, many projects require to monitor environment temperature. Arduino Uno can interface LM35, which is a good temperature sensor as it can measure from -55 to 150 ˚C with a 0.1°C resolution
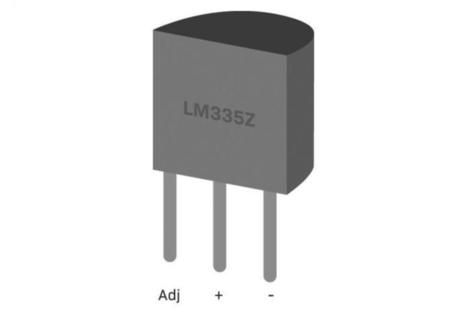
In this issue of The Classroom, we take a look at the geometry of the LM335, what makes it work, and how you can use it. We’ll also explore a demonstration circuit that you can take inspiration from. As usual, downloading a copy of the manufacturer’s datasheet is helpful because it contains a great deal more diagrams than we can hope to replicate.
¿Qué sucede realmente cuando abres la puerta del refrigerador? Claro, sabes intuitivamente que se escapa el aire frío, pero ¿cuánto? ¿Y qué tan rápido se calienta la comida en el interior? Para averiguarlo, Ryan Bates ideó su propia configuración de registro de datos utilizando un Arduino Uno , un protector de sensor personalizado y un lector de tarjetas microSD.
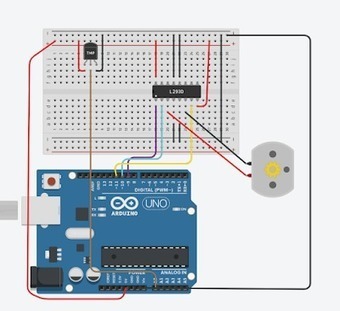
Diseñar un circuito para controlar la temperatura de la maqueta de una habitación con la utilización de un pequeño ventilador de corriente continua y un sensor de temperatura.
El funcionamiento del circuito será el siguiente, siempre que la temperatura sea superior a 28ºC el ventilador estará funcionamiento.
El sensor que vamos a utilizar es el LM35, cuyas características principales son las siguientes: Sensor de temperatura LM35
In this protip, I will show you how to build DS18B20 Digital Thermometer with Arduino.
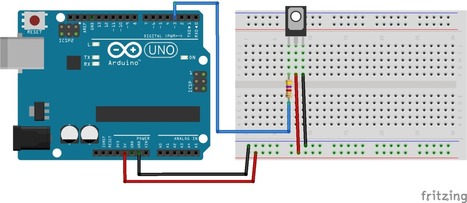
Thermistors are simple, inexpensive, and accurate components that make it easy to get temperature data for your projects. Remote weather stations, home automation systems, and equipment control and protection circuits are some applications where thermistors would be ideal. They’re analog sensors, so the code is relatively simple compared to digital temperature sensors that require special libraries and lots of code. In this article, I’ll explain how thermistors work, then I’ll show you how to set up a basic thermistor circuit with an Arduino that will output temperature readings to the serial monitor or to an LCD.
From
maker
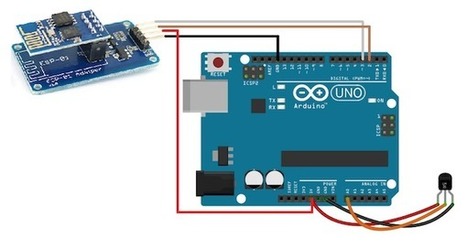
Learn how to use ThingSpeak to develop IoT applications! In this project, we build a temperature sensor.
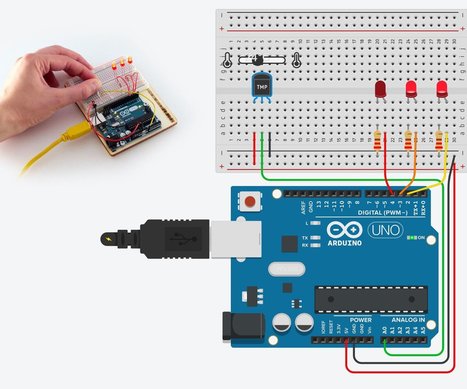
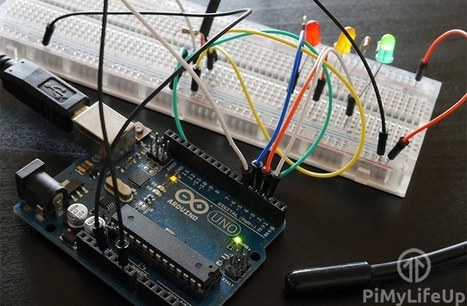
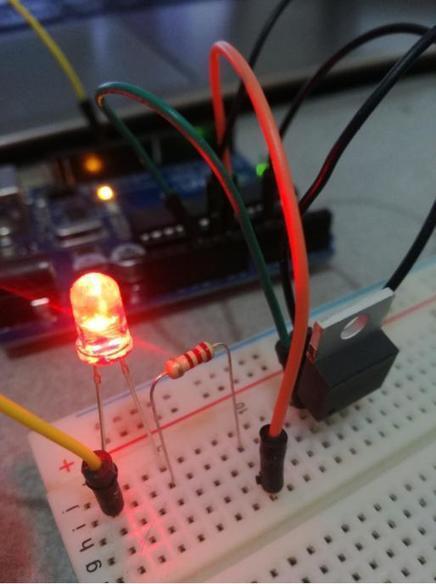
In this project, you will turn the Arduino into a thermometer! Use a temperature sensor to measure your skin temperature, and register the output with three LEDs. Even though the Arduino is a digital tool, it can interpret signals from an analog input, like the TMP36 temperature sensor, using the built in Analog-to-Digital (ADC) converter, accessed through the analog pins A0-A5, which you may have learned about in a previous lesson about analog input.

From
leantec
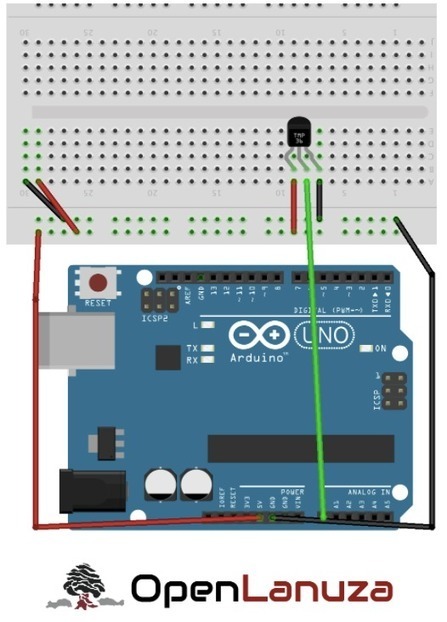
En nuestra entrada de hoy, explicamos de forma muy sencilla como medir la temperatura ambiente con Arduino y unos cuantos componentes extras más. Con lo expuesto en este post-tutorial, podrás hacer tu propio termostato, un metro digital o una alarma por temperatura entre otros muchos proyectos.
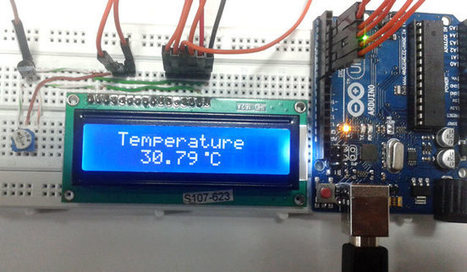
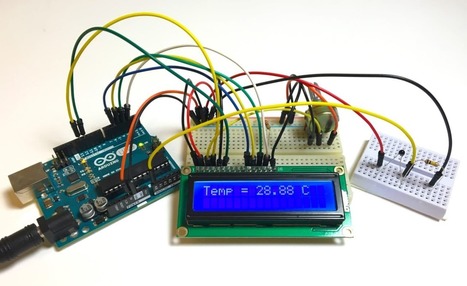
Thermometers are useful apparatus being used since long time for temperature measurement. In this project we have made an Arduino based digital thermometer to display the current ambient temperature and temperature changes on a LCD unit in real time . It can be deployed in houses, offices, industries etc. to measure the temperature. This project is based on Arduino which communicates here with LM35 temperature sensor and a 16x2 display unit. We can divide this arduino based thermometer into three sections - The first senses the temperature by using temperature sensor LM 35, second section converts the temperature value into a suitable numbers in Celsius scale which is done by Arduino, and last part of system displays temperature on LCD. The same is demonstrated in below block diagram.
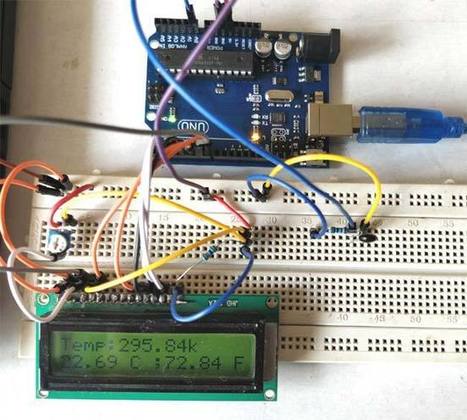
Using a thermistor is an easy and cheap way to sense the temperature. And to measure the exact temperature with thermistor, a microcontroller will be needed. So here we are using Arduino with Thermistor to read the temperature and a LCD to display the temperature. It is useful in various projects like remote weather station, home automation, and protection and controlling of industrial and electronics equipment’s. In this tutorial, we are going to interface Thermistor with Arduino and display the temperature on LCD. You can make various electronic circuit based projects using thermistor some of them are listed below:

Recuerdo cuando compré mi primer kit de Arduino. Lo primero que hice fue encender un LED vamos, como todo el mundo. Pero probablemente el segundo programa que hice fue medir la temperatura con el LM35. Fue una sensación increíble. Ahora, en este punto he aprendido que hay un componente para cada situación. El sensor de temperatura DS18B20 es uno de los sensores más versátiles que puedes encontrar en el mercado. Este sensor es idóneo cuando queremos medir la temperatura en ambientes húmedos e incluso dentro del agua. Esto es debido a que podemos comprar una versión que viene en forma de sonda impermeable. A lo largo de este artículo veremos las particularidades, ventajas y desventajas del DS18B20. No se trata de un sensor de temperatura común, veremos que es algo más. Quizás lo más complicado sea la programación ya que utiliza un protocolo poco común dentro del mundo de Arduino, 1-Wire. No te preocupes, yo te voy a enseñar paso a paso todo lo que tienes que hacer para conectarlo a tu Arduino y programarlo.
|