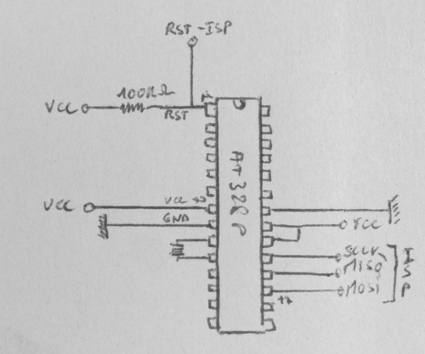

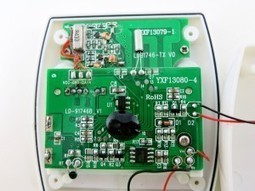
For one of my projects, I want to have a really low power consumption device to be able to use a battery for many month. For this I implemented a low power solution as described here.
Get Started for FREE
Sign up with Facebook Sign up with X
I don't have a Facebook or a X account


 Your new post is loading... Your new post is loading...
For one of my projects, I want to have a really low power consumption device to be able to use a battery for many month. For this I implemented a low power solution as described here. 
No comment yet.
Sign up to comment

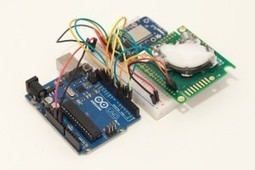
In this post I will describe experiments I did with a finger print scanner. Finger print scanner can be used in a lot of applications:
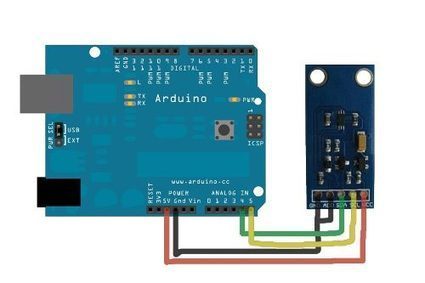
In this post I will expose how to measure luminosity with arduino and a BH1750 module
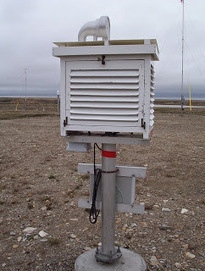
Outdoor Arduino projects, especially temperature, humidity, and barometric pressure, need access to outdoor environmental conditions, but protection from sunlight and rain.
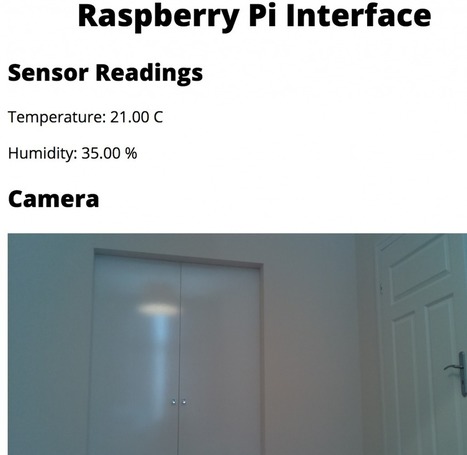
There are lots of devices on the market that allow you to monitor your home from a central interface. In this article, we are going to make our own DIY version of such devices.

Our best-selling remote control sockets are now available with a controller board for Pi. Whether you are a Pi newcomer, hacker, or Python sage you will be able to control your electrical sockets within a range of up to 30 metres, through doors, walls and ceilings. The RF transmitter add-on board can be used with the R-PI to control up to 4 simple Energenie radio controlled sockets independently using a small software program. We have written a simple program in Python to allow us to switch the sockets on and off with a single keyboard press. The add-on board connects to the row of pins called the GPIO which can be controlled as either input or output lines under your software control.
Fritzing is an open-source hardware initiative that makes electronics accessible as a creative material for anyone. You can easily learn how to build a circuit for you project and also design your own PCB. Via jean lievens, Gregory Crawford
LittleBits is the easiest and most extensive way to learn and prototype with electronics. We are making hardware limitless with our award-winning, ever-growing library of electronic modules, ranging from the very simple (power, sensors, LED) to the very complex (wireless, programmable).
Vincent Demay's insight:
An interesting with lot of devices. Maybe a little bit expensive?
JIBO is the perfect robot for everyone in the family. Because JIBO is an open platform, his skills and applications will grow, helping and delighting in ways even we haven’t even imagined.. Meet JIBO, The World’s First Family Robot Friendly, helpful and intelligent. JIBO is the real deal, from social robots pioneer Cynthia Breazeal. JIBO can’t wait to meet you.
Indoor Air Quality (IAQ) monitoring is growing trend in the home automation space. And one way to measure air quality is to measure the carbon dioxide (CO2) that is present in your home.
Vincent Demay's insight:
This interesting project shows how to light stair with Arduino and Raspberry while someone is climbing. Robert Hekkers did a amazing work described via several steps on his blog: "OK, but how do I control 12 LED strips independently? And not just on/off, but also in brightness. I didn’t like the idea of using 4 RGB LED controllers, so I started searching for a >12 channel LED controller. After some days I finally got the inspiration I needed – a JeeLabs Dimmer Plug! The Dimmer Plug uses a PCA9635 IC to drive and dim up to 16 LEDs independently.. that should do it! The Dimmer Plug uses I2C to communicate with the outside world, so that shouldn’t be a problem either." "The things I want to do with the LED strips involves sending certain ‘patterns’ to the LED driver at specific intervals. Will the Raspberry be able to do this in a reliable way? I don’t know yet, cause right now the Raspberry which I’m using to test this LED driver, has (almost) nothing else to do than run a single Node app that uses this LED driver. But what if more drivers are running, all consuming CPU cycles, or what if the OS feels it’s time to do something else for a change, just when the LED strips need to be adjusted in brightness? We’ll see.. maybe not now, but too much delay or other irregularities should be visible right away, so I decided to just wait and see how this turns out in practice." Step 3: Kit Velleman mk120 to detect people on stair "after my NAS was fixed, I could continue working on some components I need for our staircase renovation. One of those components is the Velleman MK120 Infrared Light Barrier. But I needed some proof of how well (or not) these light barriers would work, so I did some tests with the soldered kit on my desk. Well, with about 70 cm. between the transmitter and receiver, even moving a forefinger (or cat paws..) through the beam triggered the buzzer. I also did some test to let the IR beams bounce on nearby objects and that did have an effect on detecting objects, but I hope I can minimize that effect." "A small update. As you can see the stairs are almost done. The banisters still need to be painted and some minor ‘errors‘ need to be resolved, but the major part of the things I’m not good at are done!" "The sketch for the Arduino Ethernet is also progressing nicely – MQTT is operational, i2c is working fine too and I haven’t seen any glitches which I did see when the Raspberry Pi was controlling the LED driver. So all that’s left to do is connecting the light barriers as inputs to the Arduino so that the sketch knows when someone’s walking up or down the stairs." "This post should have been made 6 weeks ago or so, but I just couldn’t find the time with all the other things I wanted (and some which I just had) to do. But this week I realized that delaying this post any longer would probably mean it would never be made, so I sat down, read my last post about this project to see where I had ended." Full story here: http://blog.hekkers.net/tag/staircase/

Arduino user DavidMJBos sent us a project using Node js server on the Arduino Yún to control the lights, heating and some other sensors in the office of Appsaloon, the company where he’s doing an internship.They already use Node.js for a lot of things and some of them are pretty cool with it.That’s how they did it:
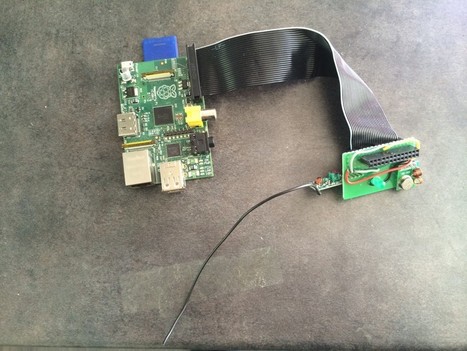
In this article I will describe the method I used to decode the X10 RF protocol with a Raspberry Pi.
|
Continuing from my previous blog post about Hi-Link HLK-RM04 module, I have finally received the ESP8266 Serial-to-WiFi module that I’ve been waiting for. As I said previously, with the popularity of IoT devices, there is an increasing demand for low-cost and easy-to-use WiFi modules. ESP8266 is a new player in this field: it’s tiny (25mm x 15mm), with simple pin connections (standard 2×4 pin headers), and best of all, it’s extremely cheap, less than US$3 from Taobao.com!
Tempescope is a physical weather display that visualizes the weather by actually reconstructing the weather conditions inside a box.
Vincent Demay's insight:
Everything to build your own is available here: http://www.tempescope.com/
Most of the home automation Arduino projects I’ve been working on lately use wireless communications (WiFi, Bluetooth, or XBee). Or at least these projects are interfaced with a computer via the Arduino serial interface. And one problem I had is that I felt I was reinventing the wheel at every new project, because I didn’t have a standardised way to make these projects communicate with an interface running on my computer.
Vincent Demay's insight:
It is also interesting to add 433Mhz because lot of existing devices already use this kind of RF communication: http://www.homautomation.org/2014/03/02/433mhtz-rf-communication-between-arduino-and-raspberry-pi-arduino-as-receiver/
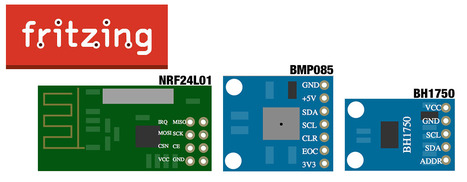
I’m using Fritzing (http://fritzing.org/home/) to create all my project.

Daniel C Kline's curator insight,
August 30, 2015 3:01 PM
An open-source path to circuit design and PCB layout.
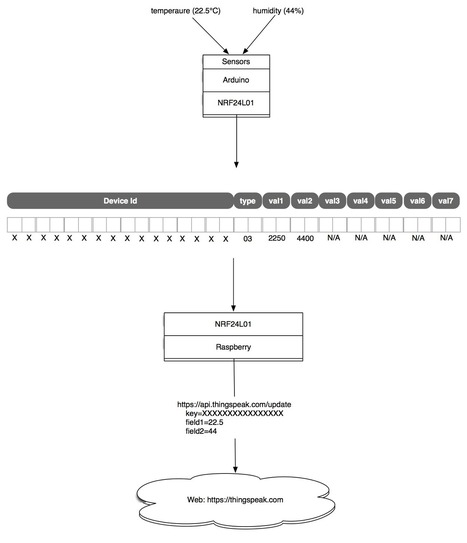
In this post I will complete the idea explained in one of my previous posts. Here is the idea:
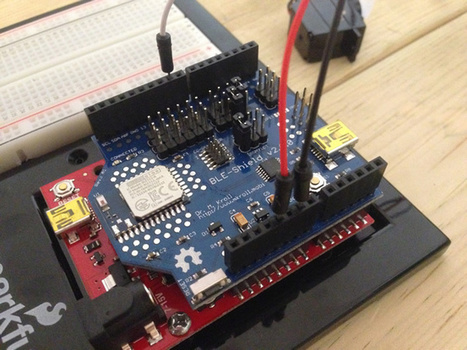
This tutorial will teach you how to create your own Bluetooth LE device using standard off-the-shelf components that you can control wirelessly with a simple iOS app. Since the focus of this project is building a BLE device, you’ll be using the iOS Core Bluetooth framework. If you’re unfamiliar with Core Bluetooth, check out our Introduction to Core Bluetooth: Building a Heart Rate Monitor tutorial.
Vincent Demay's insight:
Using BLE in home-automation is a good way to manage connected objects inside your home. Here is a nice tutorial on how to communicate between ios and BLE on Arduino.
From the 433Mhz raw waveform to the arduino or raspberry code to decode this chip sensor. "A soil moisture sensor (or meter) measures the water content in soil. With it, you can easily tell when the soil needs more water or when it’s over-watered. The simplest soil sensor doesn’t even need battery. For example, this Rapitest Soil Meter, which I bought a few years ago, consists of simply a probe and a volt meter panel. The way it works is by using the Galvanic cell principle — essentially how a lemon battery or potato battery works. The probe is made of two electrodes of different metals. In the left picture below, the tip (dark silver color) is made of one type of metal (likely zinc), and the rest of the probe is made of another type of metal (likely copper, steel, or aluminum). When the probe is inserted into soil, it generates a small amount of voltage (typically a few hundred milli-volts to a couple of volts). The more water in the soil, the higher the generated voltage. This meter is pretty easy to use manually; but to automate the reading you need a microcontroller to read the value."
HomeKit is a new framework for communicating with and controlling connected devices in a user’s home. Apps can enable users to discover devices in their home and configure them, or you can create actions to control those devices. Users can group actions together and trigger them using Siri. If your app is primarily designed to provide home configuration or home automation services such as turning on a light or opening a garage door, learn more about the HomeKit APIs and get started with the iOS 8 SDK andXcode 6 beta. If you are interested in creating a HomeKit accessory, apply to the MFi Program. To learn more about theMFi Program, read the FAQs.

‘Thread’ is a new IP-based wireless networking protocol for the smart home. Nest and Samsung are Thread Group founding members along with Yale Security, Silicon Labs, Freescale Semiconductor, Big Ass Fans and ARM.
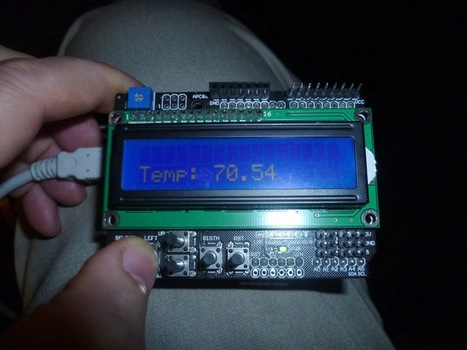
We took our LCD Keypad Shield, and added our Weather Shield that we used with the web server project. Now we have temperature, humidity, pressure, and more displaying on the LCD. Just press the buttons to see the various readings.
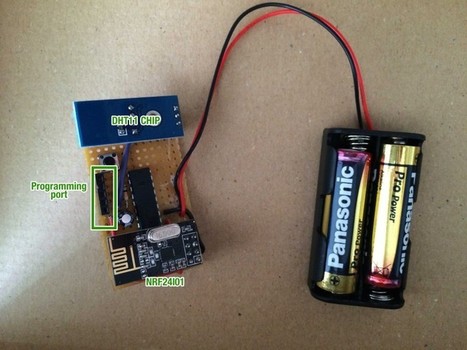
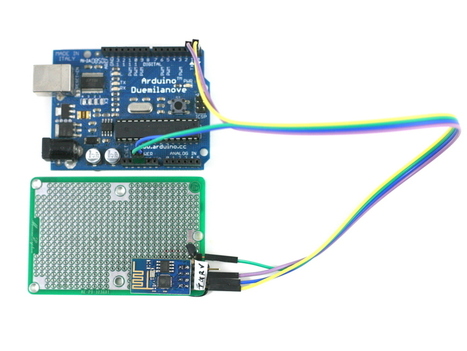
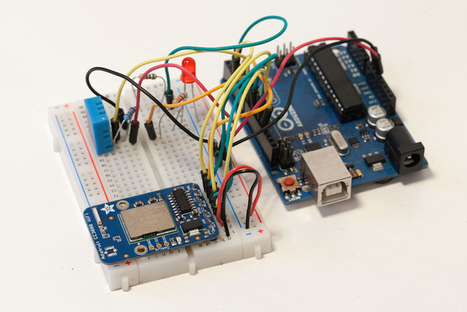
In this post I will describe how I send data and receive instruction from an Arduino to A Raspberry PI. As this way to communicate is a for home monitoring, I will take care of Arduino Sketch consumption.
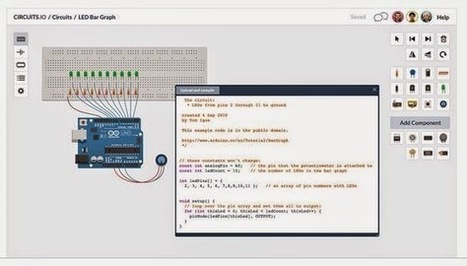
With 123D Circuits you can design in a familiar breadboard view and the app will guide you to make professional printed circuit boards with built in layout tools Via Gregory Crawford
|