


 Your new post is loading...


If you want to give your portraits more of a professional look or simply expand your repertoire as a portrait photographer, you’ll want to start experimenting with studio lighting techniques.
Chances are you’ve dabbled with flash or tried a simple lighting set-up at home, but if you want to really start taking control of your lighting and drawing out the character of your subject, you’ll want to broaden your horizons a bit.
Below we’ve suggested three straightforward studio lighting techniques using two-head lighting set-ups you can use to fine tune your light.
We’ve also compiled these advanced studio lighting techniques as a photography cheat sheet, which you can either drag and drop to your desktop or click on directly to view in higher resolution.
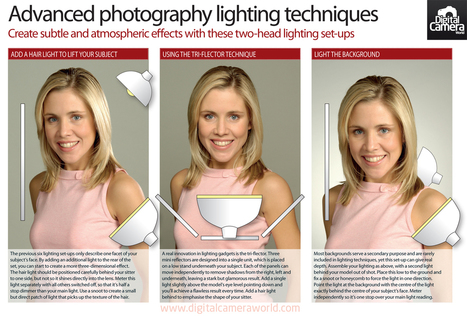
No. 1 : Add a hair light to lift your subject
Most studio lighting set-ups only emphsasise one facet of your subject’s face. By adding an additional light to the rear of the set, you can start to create a more three-dimensional effect.
The hair light should be positioned carefully behind your sitter to one side, but not so it shines directly into the lens. Meter this light separately with all others switched off, so that it’s half a stop dimmer than your main light.
Use a snoot to create a small but direct patch of light that picks up the texture of the hair.
No. 2: The Tri-flector technique
A real innovation in lighting gadgets is the tri-flector. Three mini reflectors are designed into a single unit, which is placed on a low stand underneath your subject.
Each of the panels can move independently to remove shadows from the right, left and underneath, leaving a stark but glamorous result.
Add a single light slightly above the model’s eye level pointing down and you’ll achieve a flawless result every time. Add a hair light behind to emphasise the shape of your sitter.
No. 3: Light the background
Most backgrounds serve a secondary purpose and are rarely included in lighting techniques, yet this set-up can give real depth. Assemble your lighting as above, with a second light behind your model out of shot.
Place this low to the ground and fix a snoot or honeycomb to force the light in one direction.
Point the light at the background with the centre of the light exactly behind the centre of your subject’s face. Meter independently so it’s one stop over your main light reading.
Download the Advanced Studio Lighting Techniques Cheat Sheet : http://goo.gl/aet3C
Via 173 Sud


These advanced studio lighting techniques using two-head lighting set-ups will give you incredible versatility as a portrait photographer.