Many people use Liquid Crystal Display (LCD) character modules everyday but never think about how they work. We find them on 3D printers and other electronic devices. But if you ever wanted to know how they work then Chuck tackles the question in this episode of Filament Friday. He uses a 3D print to help …
This is one of my news digests. If you like my editorial choices, there are more to be found by clicking on the "dear reader" link, and on my name above. Enjoy !
Takeoff projects help students complete their academic projects. Register at takeoff projects today to find and learn about different interesting big data projects and grab the best jobs. Get started right now.
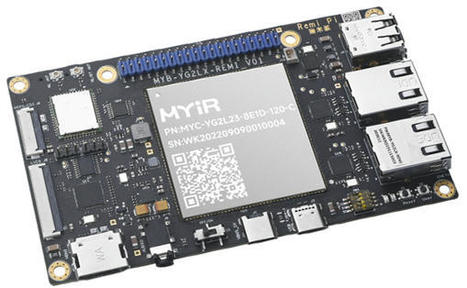
The Noni module, powered by Qualcomm’s QCA9274/QCA6274 chipsets, revolutionizes wireless connectivity with advanced WiFi-7 capabilities packed into a versatile M.2 A+E form factor. Tailored for a diverse range of applications, this module thrives in both commercial and industrial environments,...
CrowdSupply recently showcased the HealthyPi Move, a biometric monitor designed in a convenient wristwatch form factor. Equipped with Nordic Semiconductor's nRF5340 SoC and multiple advanced sensors, this portable device is advertised for both personal health tracking and data logging for research...
DISCLAIMER: This video and description contain affiliate links, which means that if you click on one of the product links, I’ll receive a small commission at no extra cost to you!
Hello Everyone! I designed, built and coded this Raspberry Pi & Arduino based project for my Humber College ATMN 256 Second Year Project Course utilizing Python3 and the Pi for the main control system to have a automated project.
I developed a small scale industrial product sorter utilizing RFID tags for product data, a belt conveyor for transporting it (Build for last years project) along with IR through-beam sensors for position tracking. To finish it off, I have a 4 DOF robotic arm with suction to pick and place the product into drop-off containers.
Tried to build everything somewhat "professional" utilizing DIN Rail power supplies and terminal/distribution blocks to keep some of the wiring tidy.
In trying to make a wifi repeater/extender using the esp32 board I tried the same with esp8266 and it worked quite well but I'm having problems to understand the same with esp32 I found the esp8266 code in official arduino examples ie: `ino // NAPT example released to public domain #if LWIP_FEATURES && !LWIP_IPV6 #define HAVE_NETDUMP 0 #ifndef STASSID #define STASSID "mynetwork" #define STAPSK "mynetworkpassword" #endif #include <ESP8266WiFi.h> #include <lwip/napt.h> #include <lwip/dns.h> #define NAPT 1000 #define NAPT_PORT 10 #if HAVE_NETDUMP #include <NetDump.h> void dump(int netif_idx, const char* data, size_t len, int out, int success) { (void)success; Serial.print(out ? F("out ") : F(" in ")); Serial.printf("%d ", netif_idx); // optional filter example: if (netDump_is_ARP(data)) { netDump(Serial, data, len); // netDumpHex(Serial, data, len); } } #endif void setup() { Serial.begin(115200); Serial.printf("\n\nNAPT Range extender\n"); Serial.printf("Heap on start: %d\n", ESP.getFreeHeap()); #if HAVE_NETDUMP phy_capture = dump; #endif // first, connect to STA so we can get a proper local DNS server WiFi.mode(WIFI_STA); WiFi.begin(STASSID, STAPSK); while (WiFi.status() != WL_CONNECTED) { Serial.print('.'); delay(500); } Serial.printf("\nSTA: %s (dns: %s / %s)\n", WiFi.localIP().toString().c_str(), WiFi.dnsIP(0).toString().c_str(), WiFi.dnsIP(1).toString().c_str()); // By default, DNS option will point to the interface IP // Instead, point it to the real DNS server. // Notice that: // - DhcpServer class only supports IPv4 // - Only a single IP can be set auto& server = WiFi.softAPDhcpServer(); server.setDns(WiFi.dnsIP(0)); WiFi.softAPConfig( // enable AP, with android-compatible google domain IPAddress(172, 217, 28, 254), IPAddress(172, 217, 28, 254), IPAddress(255, 255, 255, 0)); WiFi.softAP(STASSID "extender", STAPSK); Serial.printf("AP: %s\n", WiFi.softAPIP().toString().c_str()); Serial.printf("Heap before: %d\n", ESP.getFreeHeap()); err_t ret = ip_napt_init(NAPT, NAPT_PORT); Serial.printf("ip_napt_init(%d,%d): ret=%d (OK=%d)\n", NAPT, NAPT_PORT, (int)ret, (int)ERR_OK); if (ret == ERR_OK) { ret = ip_napt_enable_no(SOFTAP_IF, 1); Serial.printf("ip_napt_enable_no(SOFTAP_IF): ret=%d (OK=%d)\\n", (int)ret, (int)ERR_OK); if (ret == ERR_OK) { Serial.printf("WiFi Network '%s' with same password is now NATed behind '%s'\\n", STASSID "extender", STASSID); } } Serial.printf("Heap after napt init: %d\n", ESP.getFreeHeap()); if (ret != ERR_OK) { Serial.printf("NAPT initialization failed\n"); } } #else void setup() { Serial.begin(115200); Serial.printf("\n\nNAPT not supported in this configuration\n"); } #endif void loop() {}`
LattePanda Mu has just joined the company's growing single board computer (SBC) lineup. With a capable Intel N100 CPU, 8 GB of RAM, 64 GB of storage, and 9 PCIe 3.0 lanes, the compute module stands as a solid Raspberry Pi 5 challenger.
Welcome to our latest video where we delve into the world of smart home energy management! In this video, i will showcase how to monitor the total power consumption of your entire household using the ESP32 microcontroller and the Shelly Power Meter.
By integrating these two powerful devices, you'll gain real-time insights into your home's electricity usage, allowing you to optimize energy efficiency and reduce costs.
Learn how to control RGB LED strips wirelessly using the ESP-NOW network. This tutorial demonstrates how to send specific colors to NeoPixel strips attached to a transmitter device, using a rotary encoder for color selection. Find out how to set up the ESP-XII modules and program them using the FastLED library. Enhance your DIY projects with this wireless RGB LED control method. #WirelessLEDControl #RGBLEDStrips #ESPNOWNetwork #FastLEDTutorial #DIYProjects #ColorSelection #NeoPixelStrips #ESPXII #RotaryEncoder #LEDControl
We're joined by Tamas from Silicon Labs at Embedded World 2024, talking about the collaboration that stands to shape the future of home automation and smart technology. Arduino and Silicon Labs, two giants in the world of technology and innovation, have joined forces to unveil a groundbreaking product: the new Matter version of the Nano board.
In this test, we hook the servo motor up to the Pixhawk and connect the Pixhawk and Raspberry Pi through the Mavlink protocol. We wrong a simple script (below) that overrides the PWM value and triggers the servo motor.
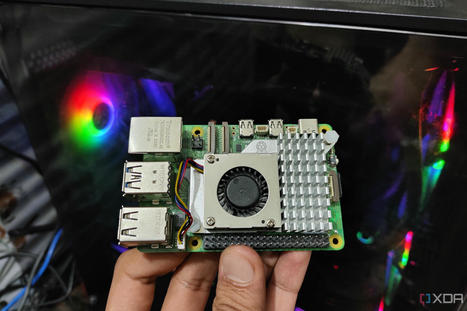
So finally I got my hands on a Raspberry Pi 5 and If you're an Apple HomeKit enthusiast like me, you're going to love this. Cause We're going to build a powerful smart home hub & take your HomeKit experience to the next level with the 7 wonders of building a DIY Smart Home. Last but the least, Towards the end of the video I also have a surprise App Install that will push your Smart Home Journey to the NEXT LEVEL !
⏱️ TIMESTAMPS ⏱️: ================ 00:00 - Intro 00:16 - Opening 00:31 - Raspberry Pi Changes 01:11 - DIY Smart Home Hub Changes 01:46 - DIY Smart Home Hub Benefits 02:29 - What you’ll need 03:57 - How to Flash Pi OS Lite 05:42 - Locate Pi On Network 06:54 - Use Terminal to Access Pi 07:36 - Execute Magic Script 10:54 - Portainer Configuration 11:45 - Test MQTT Service 12:15 - Zigbee2MQTT Configuration 14:40 - Scrypted Configuration 15:39 - Homebridge Configuration 17:30 - Heimdall Configuration 21:48 - Closing
Unveiling the Brilliance of Halley Twisted Extracts: Elevate Your Experience Introduction: Discover a world of refined excellence with Halley Twisted Extracts, where quality meets innovation to redefine your cannabis experience. Renowned for their premium products and unwavering commitment to excellence, Halley Twisted Extracts stands as a beacon of sophistication in the world of cannabis consumption. Let’s delve into the sublime intricacies of Halley Twisted Extracts and why they are a game-changer in the realm of cannabis-infused products. Body: 1. The Epitome of Quality: At Halley Twisted Extracts, quality takes center stage. Each product is meticulously crafted using the finest ingredients and cutting-edge extraction techniques, ensuring a pure and potent experience with every use. From their signature gummies to their versatile tinctures, Halley Twisted Extracts sets the bar high for excellence in the industry. 2. Purity Redefined: One of the hallmarks of Halley Twisted Extracts is their unwavering commitment to purity. Through a rigorous extraction process and stringent quality control measures, Halley Twisted Extracts ensures that each product is free from contaminants and impurities, delivering a clean and consistent experience that you can trust. 3. Innovation at Its Finest: Innovation is the beating heart of Halley Twisted Extracts. Constantly pushing the boundaries of what is possible in the world of cannabis-infused products, Halley Twisted Extracts introduces new and exciting creations that cater to the diverse needs and preferences of their discerning clientele. Whether you seek a gentle relaxation or a burst of creative energy, Halley Twisted Extracts has something for everyone. 4. Transparency and Trust: Transparency lies at the core of Halley Twisted Extracts’ ethos. With a commitment to openness and honesty, Halley Twisted Extracts provides detailed information about each product, including its ingredients, potency levels, and recommended uses. This dedication to transparency builds trust with consumers, empowering them to make informed decisions about their cannabis consumption. 5. Elevate Your Experience: With Halley Twisted Extracts, your cannabis experience reaches new heights. Whether you are a seasoned connoisseur or a newcomer to the world of cannabis-infused products, Halley Twisted Extracts offers a range of options to suit your preferences and elevate your experience. Step into a world of sophistication and luxury with Halley Twisted Extracts, where everyhttps://twistedextracts-ca.shop/index.php/product/cbd-oil-drops/https://twistedextracts-ca.shop/index.php/product/full-spectrum-oil-drops/https://twistedextracts-ca.shop/index.php/product/indica-oil-drops/https://twistedextracts-ca.shop/index.php/product/sativa-oil-drops/ https://twistedextracts-ca.shop/index.php/product/buy-cbd-jelly-bomb-online/https://twistedextracts-ca.shop/index.php/product/buy-halleys-twis…-extracts-online/ https://twistedextracts-ca.shop/index.php/product/buy-indica-11-jellybomb-online/
Take your engineering project to the next level! In this video, we explore LiFi technology and showcase a unique project using Arduino to build a LiFi system that transmits text data using your smartphone's flashlight! This is a perfect video for Indian engineering students or anyone interested in DIY LiFi projects. We'll guide you through:
Welcome to my channel! In this video, I'm excited to showcase my latest engineering project: an Arduino-based LiFi system that enables text data transfer via any smartphone's flashlight.
Subscribe & Stay Tuned: Don't miss out on future engineering projects and tutorials! Subscribe to my channel and hit the notification bell to stay updated. Subscribe Now!
Special Thanks: A big shoutout to the following YouTube channels for providing valuable clips featured in this video:
Thank You: Thank you for watching and supporting my channel! Your engagement and feedback mean the world to me. If you found this video helpful or inspiring, please give it a thumbs up and share it with your friends. Together, let's explore the exciting world of engineering and technology!
"Hello and welcome to this tutorial where we'll be exploring how to use an RFID-RC522 module with an Arduino to control an LED. This is a fantastic project for beginners looking to delve into the world of Arduino and RFID technology."
What You'll Need:
An Arduino Uno (or any other Arduino board) RFID-RC522 Module An LED 220-ohm resistor Breadboard Jumper Wires Step 1: Overview "We will start with a brief overview of the RFID-RC522 module and its functionality. This module operates at 13.56 MHz and communicates over the SPI protocol, making it ideal for projects involving identification."
Step 2: Connections "In this section, we'll go through the process of connecting the RFID-RC522 to the Arduino. We'll attach the SDA, SCK, MOSI, MISO, RST, GND, and 3.3V pins of the RFID module to the corresponding pins on the Arduino. Remember, it's crucial to connect the 3.3V pin to the Arduino's 3.3V output, as the module is not 5V tolerant."
Step 3: LED Setup "Next, we'll connect an LED to the Arduino. We'll use a 220-ohm resistor in series with the LED to protect it from high current. The longer lead of the LED, the anode, will be connected to digital pin 7 of the Arduino, while the shorter lead, the cathode, goes to the ground."
Step 4: Code Explanation "Now, we'll dive into the code. We'll explain how to use the MFRC522 library to interface with the RFID module. The code will be set up to turn the LED on for a few seconds whenever an RFID tag is detected by the module."
Step 5: Demonstration "We'll conclude with a live demonstration of the project. You'll see how, upon bringing an RFID tag close to the reader, the LED lights up, indicating the tag's detection."
Outro: "Thank you for watching! This project is a great starting point for anyone interested in RFID technology and its applications in the world of Arduino. Don't forget to like, share, and subscribe for more exciting projects!"
As mentioned in the Orange Pi Developer Conference 2024 article, the Orange Pi 5 Pro launch was just around the corner, and the latest Rockchip RK3588S...
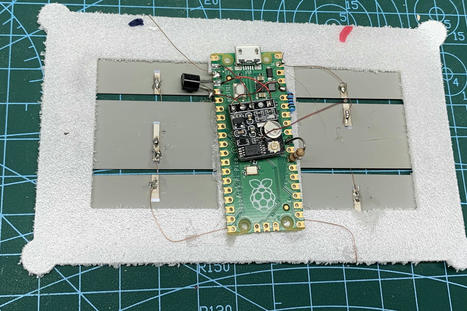
First, starting early April, Raspberry Pi OS comes with Vulkan driver support natively, I use tinyllamafile f16 and Q8_0 to run sample Q&A. The results coming from the set up of raspberry pi 5 is different from what Justine showed. I hope I can do something to make the throughput (tokens/sec) run as fast as what Justine showed. https://justine.lol/matmul/
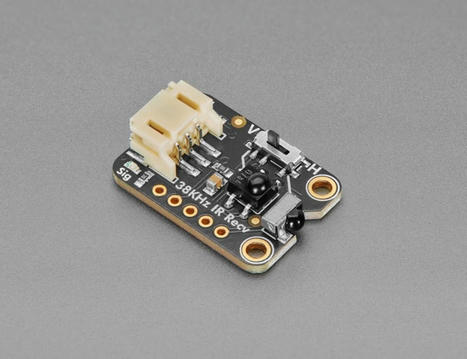
NEW PRODUCT – Adafruit Infrared IR Remote Receiver – STEMMA JST PH 2mm A year ago we designed a high-current-output Infrared Transmitter STEMMA which makes it easy to create high-powere…...
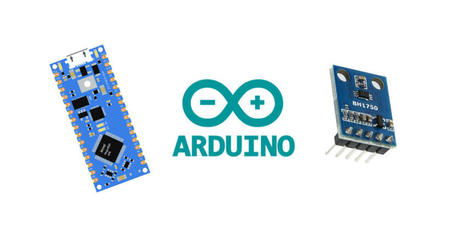
Welcome to 'Microcontroller Programming: Basics and Beyond 💻🔧'! In this video, I guide you through the fundamentals of microcontroller programming, laying the groundwork for your journey into the world of embedded systems. 🌐
From understanding the essential components of microcontrollers to writing your first code, we cover it all. Plus, I delve into the basic storyline applicable in all microcontroller programming, providing you with a solid foundation to tackle more complex projects with confidence. Whether you're a beginner or looking to refresh your knowledge, this video is your gateway to mastering microcontroller programming!🚀✨
To get content containing either thought or leadership enter:
To get content containing both thought and leadership enter:
To get content containing the expression thought leadership enter:
You can enter several keywords and you can refine them whenever you want. Our suggestion engine uses more signals but entering a few keywords here will rapidly give you great content to curate.


 Your new post is loading...