Instantly connect to what's most important to you. Follow your friends, experts, favorite celebrities, and breaking news. (RT @micknudsen: Got my @Raspberry_Pi today, but I have no clue what to use it for.
This is one of my news digests. If you like my editorial choices, there are more to be found by clicking on the "dear reader" link, and on my name above. Enjoy !
Takeoff projects help students complete their academic projects. Register at takeoff projects today to find and learn about different interesting big data projects and grab the best jobs. Get started right now.
Today, we'll look into yet another standard in the embedded space: MXM. It stands for "Mobile PCI Express Module", and is basically intended as a GPU interface for laptops with PCIe, but there's way m...
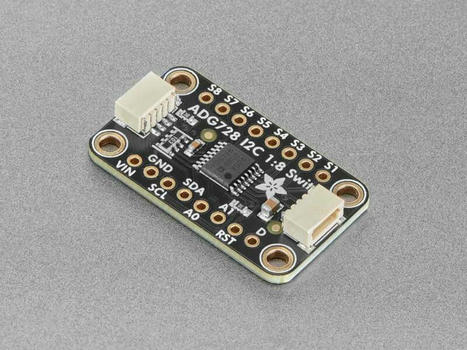
You can use the Adafruit ADG728 1-to-8 Analog Matrix Switch to connect between eight analog signals, much like a set of 8 mechanical switches.These chips tend to be tiny surface mount parts, so th…...
Blues has recently released the latest entry to its Notecard family, the Notecard XP (External Power supply), an updated and more cost-effective version...
your query: - arudino ultrasonic sensor sensor ultrasonic transducer hc-sr04 how to use ultrasonic with arduino ultrasonic sensor projects ultrasonic sensor code
This project is easy to implement.....we are having a project creation team we can assist you for your projects,Guide you and can do your desired projects with some profits .This is a newly Developing team so kindly Give your support guys🙏
Hey friend welcome back to my new video. In this video, I have shown how to run an OS in Raspberry PI using a hard disk. This was an experimental video. Through this experiment, I got to know that we can run OS on Raspberry PI using a hard disk. Please like, share and Subscribe. Let me know in the comments how you all like this video. Please stay tuned for the Windows 11 mini CPU Build. There is also a huge change in this video. This video was made using Adobe Premiere Pro 2024, Adobe Photoshop 2024 and Other Adobe Products. From now onwards, in the upcoming video, I will be using Adobe Products to produce a video. The people who don't know what Premiere Pro and Photoshop do, it provides an excellent video editing environment and software. These software are used to produce high-level YouTube videos and Movies.
Componentts used: *Monitor *Raspberry PI 4B Model *HDMI-Micro HDMI Cable *Official RPI type-C Power supply Cable *Mouse *Keyboard *RPI Imager (Software)
(Note- After clicking the link it may warn, saying it to be Harmful, but its is completely safe and trustable. You all can Download the software form the link provided below)
Renesas has announced the new low-power RA0 microcontroller series based on the power-efficient Arm Cortex-M23 core and the entry-level RA0E1 Group in the...
In this video I will be showing you how to connect to your Raspberry Pi automatically using a batch script I wrote. This script totally eliminates the need of punching in your credentials every time you connect.Hope it helps you guys!
Are you ready to dive into the exciting world of robotronics? Join us for an immersive journey where kids aged 12-17 explore the fundamentals of C++ programming on Arduino boards! Our interactive course offers hands-on experience, empowering young minds to create and code their own robotic marvels.
🤖 What to Expect:
Beginner-friendly introduction to C++ programming. Step-by-step guidance on Arduino board setup and usage. Engaging projects designed to ignite creativity and problem-solving skills. Real-world applications of robotics and automation. Expert-led sessions tailored for optimal learning and fun! Whether your child is a budding engineer or simply curious about robotics, this course is the perfect opportunity to foster their passion for STEM. Let's inspire the next generation of innovators together! Sign up now and unlock the endless possibilities of robotronics. 🚀
In this video I show you how to create a dimmable LED controlled by a potentiometer. I will show you how to build the circuit, do the math, and code the solution. Enjoy!
[Disclosure of Material Connection: I am a participant in the Amazon Services LLC Associates Program, an affiliate advertising program designed to provide a means for sites to earn advertising fees by advertising and linking to amazon.com. ]
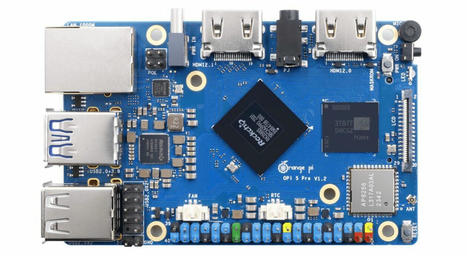
Key features of the board include an 8MB flash chip, a 26-pin general-purpose input/output (GPIO) header with analog inputs, physical reset, and boot-select buttons, a USB Type-C connector for power and data, and optional battery support via an onboard lithium-battery charging circuit.
FOSA 4 Inch TFT Touch Screen Review for Raspberry Pi - A Comprehensive Look! ► Latest Price & AMZN link here ► https://bit.ly/3Q2CKkC
For updated price or purchase visit this link.
If you find our content helpful or entertaining, Please consider subscribing. If you enjoyed this video, please give it a thumbs up and leave a comment below.
If you have a business inquiry or would like to work with us, please contact here - tessamaylv@gmail.com
Thank you for watching.
0:00 Intro 0:06 Review
Things that we mentioned in this video: 4 Inch TFT Touch : B07FTNGB81
We wanted to see if this would run locally on a RasPi5 instead of a cloud-based notebook like kaggle, and if interference (forward propogation) would be similar, which it was.
#finalyaerproject #btechprojects #electricalprojects #electronicsprojects For More Project srrobotics.in mo-9024388937
The objective of the AC Power Strength Controller with Programmable Interface is to develop a versatile and efficient system for controlling the strength of AC power supplied to electrical devices. By leveraging the capabilities of microcontroller-based programming and optocoupler-triac circuits, the project aims to enable users to regulate the voltage and intensity of AC power with precision and flexibility. This objective encompasses enhancing energy efficiency, minimizing power wastage, optimizing operational performance, and providing users with the ability to customize power settings according to specific requirements. Ultimately, the project seeks to contribute to sustainable energy practices and promote the adoption of smart power management solutions in various industrial, commercial, and residential settings.
/ srrobotics.in
major project for EEE major project for ECE major project for ME major college projects ...|| Major project final year projects ideas for electronics engineering 2021 innovation ideas projects in electronics electronics projecs for final year electronics project for students final year projects ideas btech final year projects final year arduino project arduino college projecs science projects school projects college projects mechnical projects electrical projects electronics projects science projects physics project electronics education kit iot based irrigation system projects node mcu based projects wifi based college project IOT projects
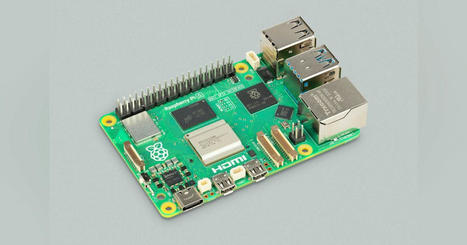
Powering Raspberry Pi through 40-pin expansion port also nicknamed GPIO due to a large number of General Purpose Input-Output ports frees USB-C port for other activities like Wi-Fi, Ethernet or Bluetooth connection sharing or file sharing.
I used Android 14 installation from the previous video (https://youtu.be/sRcld-BQCo4) for a sharing demonstration.
Watch the video to see how it works! I've been amazed!
28BYJ-48 stepper motors equipped with the UNL2007 driver board and controlled with the ESp8266 NodeMCU, rotate in fixed degrees of steps, which allows for precise angular positioning of the shaft without a position sensor. This video demonstrates how to configure the 28BYJ-48 stepper motor's maximum speed, gear ratio, and revolution per step in FLProg. The step block in FLProg and programmed into the ESP8266 NodeMCU can be configured to selectively change the 28BYJ-48 stepper motor direction with a push-button switch, adjust the speed with a potentiometer, and set fixed positions selectable with a push button switch or program timer.
FLProg is a visual or graphical programming language that uses PLC's Function Block Diagram or Ladder Diagram for programming Arduino Uno, Micro, Nano, Mega Leonardo, ESP8266, EP32, Intel Galileo and lots more
28BYJ-48 Stepper Motor 0:26 Circuit Connection 1:48 Maximum Speed 2:14 Direction of Rotation 3:12 Variable Speed 4:03 Fix Position 4:46
To get content containing either thought or leadership enter:
To get content containing both thought and leadership enter:
To get content containing the expression thought leadership enter:
You can enter several keywords and you can refine them whenever you want. Our suggestion engine uses more signals but entering a few keywords here will rapidly give you great content to curate.


 Your new post is loading...